Advertisement
Available languages
Available languages
Quick Links
Irrigation Timer
Art.no 31-8190
Please read the entire instruction manual before using the product
and then save it for future reference. We reserve the right for any
errors in text or images and any necessary changes made to
technical data. In the event of technical problems or other queries,
please contact our Customer Services.
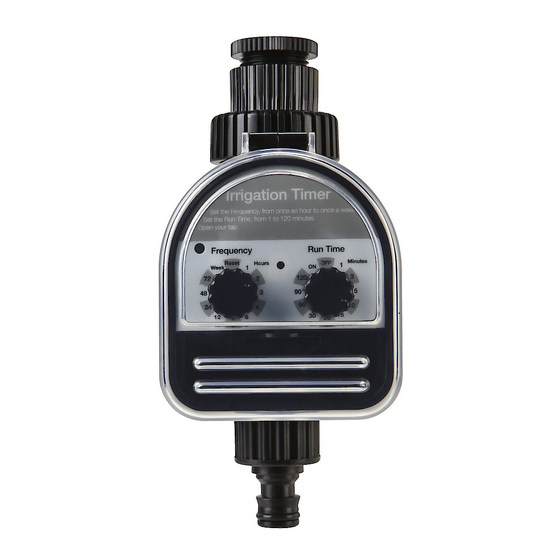
Buttons and functions
1. ¾" tap coupling,
½" adaptor included
2. [ RUN TIME ]
Irrigation timer
3. Battery status indicator
4. Irrigation delay control
1
5. [ FREQUENCY ] Irrigation
interval settings
6. Battery cover
2
7. Irrigation hose
connection
3
4
5
6
7
Installation
1. Press the battery cover's catch and remove the battery cover.
2. Carefully remove the battery holder and insert 2 × AAA/LR03
batteries. Note the polarity markings in the battery holder to
ensure correct battery insertion.
3. Carefully re-insert the battery holder back into the battery
compartment and refit the cover.
4. Check the timer's operation by setting the [ RUN TIME ] setting
to ON. After a few seconds you should hear the mechanism
begin working to turn on the water flow.
5. After checking, turn the setting to the OFF position. You should
then hear the mechanism working to shut off the water flow.
GREAT BRITAIN • customer service tel: 0845 300 9799 e-mail: customerservice@clasohlson.co.uk internet: www.clasohlson.com/uk
6. Connect the timer to your tap using the ¾" tap connector or by
using the ½"-adaptor, if needed. Note! Do not tighten too hard,
as the coupling seals can be damaged by over tightening.
7. Connect the irrigation hose to the hose coupling (7).
Operating instructions
Note: The timer is only designed to be used with cold water at
a max pressure of 6 bar (90 psi). If your water pressure is higher,
then a pressure regulator must be used together with the timer.
1. Set the [ FREQUENCY ] to the desired irrigation interval, from
once an hour to once a week.
2. Set the [ RUN TIME ] to the desired irrigation time, from 1 min to
120 min.
3. Turn on the tap. Note: Irrigation will start after the time
interval [ FREQUENCY ] you have set. So if you have set the
[ FREQUENCY ] to 1 hour then irrigation will begin one hour after
you input the setting and then irrigate once every hour thereafter.
4. If the [ RUN TIME ] setting is set to ON the water will be allowed
to flow constantly. If the [ RUN TIME ] setting is set to OFF
the water will be shut off constantly.
Irrigation setup examples
•
To set your watering settings to once a day:
Set the [ FREQUENCY ] setting to 24.
•
To set your watering settings to twice a day:
Set the [ FREQUENCY ] setting to 12.
•
To set your watering settings to every other day:
Set the [ FREQUENCY ] setting to 48.
•
To set your watering settings to once a week:
Set the [ FREQUENCY ] setting to Week.
Using the delay control to set the irrigation
start time
You can delay the irrigation start time in 1-hour intervals from
1 to 12 hours by depressing the irrigation control (4). Each press
corresponds to 1 hour of delay.
Example: If you input your settings at 1:15 pm and you want your
irrigation to start at 3:15 pm then you would press the delay control
twice (1 press = 1 h delay).
Battery status indicator
Battery status (3) indications:
•
Flashing: Functioning normally but the batteries are low and
should be changed as soon as possible.
•
Solid: Batteries will soon become flat and water flow will be
shut off.
•
Flashing-solid-off: Batteries are completely flat.
Note: Inserting new batteries does not trigger the battery indicator
to activate or shine. The battery indicator only indicates low and
extremely low battery status, not when batteries are new or have
been completely flat for a time.
Care and maintenance
•
Clean the timer using a lightly moistened cloth. Use only mild
cleaning agents, never solvents or corrosive chemicals. Keep all
water away from the battery chamber as water can leak in and
cause short circuiting.
•
Never mix old and new batteries or rechargeable batteries with
non-rechargeable batteries.
•
Never try to open the housing or modify the timer in any way.
This can lead to irreparable damage.
•
Disconnect the timer from the tap and remove the batteries if
the timer is not to be used for an extended period.
Troubleshooting guide
The irrigation
•
Check the batteries and replace if
timer does
necessary.
not work.
•
Make sure the [ RUN TIME ] setting is not
set to OFF.
•
Make sure that the [ RUN TIME ] setting
is not the same as or greater than
the [ FREQUENCY ] setting, e.g. [ RUN TIME ]
set to 120 min and the [ FREQUENCY ]
setting is set to 2 hours.
•
Make sure the tap is open.
Disposal
This product should be disposed of in accordance with
local regulations. If you are unsure how to proceed, contact your
local council.
Specifications
2 × AAA/LR03
Batteries
Tap connectors
¾" and ½" adaptor
Irrigation time
1–120 min
Irrigation interval
1/hour up to 1/week
Size (L × W × H)
17 × 8 × 10.5 cm
Weight
255 g
Advertisement

Subscribe to Our Youtube Channel
Related Manuals for Clas Ohlson 31-8190


Summary of Contents for Clas Ohlson 31-8190
- Page 1 • Flashing-solid-off: Batteries are completely flat. Art.no 31-8190 7. Connect the irrigation hose to the hose coupling (7). Note: Inserting new batteries does not trigger the battery indicator to activate or shine. The battery indicator only indicates low and Please read the entire instruction manual before using the product...
-
Page 2: Installation
½″-adaptern. Obs! Dra inte åt för hårt, packningarna • Rengör timern med en lätt fuktad trasa. Använd ett milt i anslutningarna kan skadas. Art.nr 31-8190 rengöringsmedel, aldrig lösningsmedel eller frätande kemikalier. 7. Anslut din bevattningsslang till anslutningen (7). Se till att vatten inte tränger in bakom batteriluckan och Läs igenom hela bruksanvisningen före användning och spara den... - Page 3 ½″-adapteret. Obs! Ikke trekk til for hardt. Det kan skade • Rengjør timeren med en lett fuktet klut. Bruk et mildt pakningene. Art.nr. 31-8190 rengjøringsmiddel, aldri løsningsmidler eller etsende kjemikalier. 7. Vannslangen kobles til uttaket (7). Pass på at det ikke trenger vann inn ved batterilokket og inn til Les brukerveiledningen grundig før produktet tas i bruk og ta vare...
- Page 4 Huom.! Älä kiristä liikaa, jotta liitäntöjen tiivisteet eivät vahingoitu. • Puhdista ajastin kevyesti kostutetulla liinalla. Käytä tarvittaessa 7. Liitä kasteluletku liitäntään (1). Tuotenro 31-8190 mietoa puhdistusainetta. Älä käytä liuotusaineita tai syövyttäviä kemikaaleja. Varmista, että paristolokeroon ei joudu vettä. Käyttö Lue käyttöohje ennen tuotteen käyttöönottoa ja säilytä se •...
-
Page 5: Bedienung
Hinweis: Nach dem Einsetzen neuer Batterien leuchtet ½″-Adapter anschließen. Hinweis: Nicht zu sehr anziehen, die Indikatorlampe nicht, um Strom zu sparen. da sonst die Dichtungen an den Anschlüssen Schaden Art.Nr. 31-8190 nehmen können. Pflege und Wartung 7. Den Bewässerungsschlauch an den Anschluss (7) anschließen. Vor Inbetriebnahme die komplette Bedienungsanleitung durchlesen •...
Need help?
Do you have a question about the 31-8190 and is the answer not in the manual?
Questions and answers