Table of Contents
Advertisement
Quick Links
Advertisement
Table of Contents

Related Manuals for TREND SM/PRO


Summary of Contents for TREND SM/PRO
- Page 1 SM/PRO Patent No.: GB2441513 Please read these instructions before use.
-
Page 2: Table Of Contents
SM/PRO Dear Customer Thank you for purchasing this Trend product, TECHNICAL DATA we hope you enjoy many years of creative and Cutter size 4mm Ø x 40mm x 100mm productive use. Guide bush size 30mm Please remember to return your guarantee card Workpiece within 28 days of purchase. -
Page 3: Safety
SM/PRO SAFETY Keep cord from heat, oil and sharp 5. Consider working environment. Do edges. Always trail the power cord not use the product in the rain or in WARNING: away from the work area. a damp environment. Keep work area well lit. - Page 4 Recommended speeds ensure there is sufficient clearance spanner or key and to the torque are shown in the Trend Routing between cutter tip and inside edge value provided by the manufacturer. Catalogue and/or website.
-
Page 5: Items Enclosed
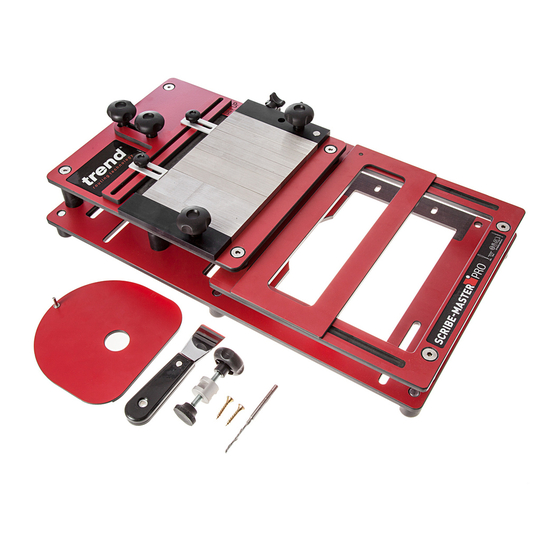
SM/PRO ITEMS ENCLOSED ITEMS REQUIRED n Plunge router with suitable collet fitted. n 30mm guide bush. n Suitable workbench, table or mitre saw stand. n Pozi No.2 screwdriver. ® n Handtools including a try square and sliding bevel. n Mitre saw. - Page 6 SM/PRO DESCRIPTION OF PARTS DIAGRAM...
-
Page 7: Accessories - Recommended Cutters
SM/PRO ACCESSORIES Please use only Trend original accessories. Recommended Cutters For softwood and MDF* Ref. SMC/02X1/4HSS 4mmØ x 40mm cut x 90mm OL SMC/02X1/4HSS Down cut (Included with jig). For hardwood Ref. SMC/03X8MMHSS SMC/03X8MMHSS 4mmØ x 40mm cut x 90mm OL Down-cut Heavy Duty Bag Ref. -
Page 8: Assembly
SM/PRO ASSEMBLY n Check that there is no damage or imperfections on your new jig. n Check that all the components are enclosed. n Please recycle all packaging. n Read all the safety instructions prior to use. Fitting the Feet n Stand the jig on its back end and screw on the six feet. -
Page 9: Jig Overview & Setup Position
SM/PRO Jig Overview and Setup Position Letterbox dot marker Rear material slide (back cut marker) lock down knobs Set out channel Comb locking knobs Router base plate Rear material slide Rear material slide Combs Comb assembly Letter box slide stops & knobs... -
Page 10: Operation
SM/PRO OPERATION Setting the Roller Stop Slides n Slide the workpiece inbetween the top plate and the base plate. n Ensure that the most intricate part of the workpiece is pushed up tight against the spacers and spelch block. n The back face of the workpiece should be against the rubber stripping on the base plate. -
Page 11: Setting Up The Workpiece In The Rear Material Slide
SM/PRO Setting up the Workpiece in the Rear Material Slide n Cut an off-cut from the workpiece to be scribed. This should be a square cut and of a size the operator feels comfortable with. (We recommend 40-50mm wide). n Place the workpiece into the set out channel on... -
Page 12: Aligning The Combs & Comb Assembly
SM/PRO Aligning the Combs and Comb Assembly n Ensure the comb assembly is in the set-up position. (The comb assembly will underline the words “SET- UP” marked on the top plate). n The right comb assembly lock down knob should be tightened but the left knob should be left slightly loose, this allows the combs to be tightened. -
Page 13: Moving The Combs To Cutting Position
SM/PRO Moving the Combs to the Cutting Position n To remove the workpiece off-cut from the rear material slide, loosen the lock down knobs of the rear material slide, and lift out off-cut. Lock back down the knobs to keep secure. -
Page 14: Adding The Workpiece
SM/PRO Adding the Workpiece n Slide the workpiece in between the top plate and the base plate. n Ensure that the most intricate part of the moulding is touching the spacers (opposite side to the roller stops) and the spelch block, with the back of the workpiece touching the base plate rubber strips. - Page 15 SM/PRO Feed direction n The router must be set so that the depth of cut clears the bottom of the workpiece by 2mm. n Move the router baseplate to the left hand side and engage the guide pin against the run in part of the combs (set by the rear material guide stops).
-
Page 16: Accessories
SM/PRO ACCESSORIES Please use only Trend original accessories. Tenon Slide Plate Accessory Ref. SM/TSP The tenon slide plate allows the jig to be used to cut tenons and trenches when the 30mm guide bush and a suitable size cutter is fitted (cutter not included). The... -
Page 17: Maintenance
SM/PRO MAINTENANCE Please use only Trend original spare parts and accessories. The jig has been designed to operate over a long period of time with a minimum of maintenance. Continual satisfactory operation depends upon proper tool care and regular cleaning. Keep the jig away from direct moisture. -
Page 18: Spare Parts - Spare Parts List
SM/PRO Please use only Trend original spare parts. SM/PRO - SPARE PARTS LIST v3.0 05/2017 Qty. Desc. Ref. Base Plate WP-SMP/01 Lower Top Plate WP-SMP/02 Top Plate WP-SMP/03 Rear Material Slide WP-SMP/04 Letterbox Slide WP-SMP/05 Router Base Plate WP-SMP/06 Machine Screw Csk M8 x 45mm Socket S/S... -
Page 19: Spare Parts Diagram
SM/PRO SM/PRO - SPARE PARTS DIAGRAM v3.0 05/2017 Please use only Trend original spare parts. SM/MKP Mounting Kit Accessory SM/TSP Tenon Slide Plate Accessory -18-... -
Page 20: Frequently Asked Questions
SM/PRO FREQUENTLY ASKED QUESTIONS Q. Can the jig deal with out of plumb walls? A. Y es, the jig can be adjusted to cut out of plumb walls. Q C an the jig do back cuts to deal with out of square corners? A. Y es, the jig has a back cut built into its set-up. -
Page 21: Quick Start Instructions
SM/PRO QUICK START INSTRUCTIONS These instructions are provided for those who are confident with the router and are already familiar with scribing skirting boards on the SM/PRO. Routing the Scribe Setting Up 1. Set cutter depth using router depth stop. - Page 22 RECYCLABLE © Copyright Trend 2015, 2016, 2017. No part of this publication may be reproduced, stored or transmitted in any form without prior permission. Our policy of continuous improvement means that specifications may change without notice. Trend Machinery and...
Need help?
Do you have a question about the SM/PRO and is the answer not in the manual?
Questions and answers