Table of Contents
Advertisement
MANU-COM66 v2.0
24/10/05
Dear Customer
Thank you for purchasing this Trend product, we
hope you enjoy many years of creative and
productive use.
Please remember to return your guarantee card
within 28 days of purchase.
CONTENTS
TECHNICAL DATA _____________________1
SAFETY ____________________________2-3
ITEMS ENCLOSED ____________________4
DESCRIPTION OF PARTS _______________5
- Recommended Cutters ________________6
- Sub-base Sets & 30mm Guide Bush ____6-7
- Panel Connector Bolts _________________8
- Carry Case __________________________9
- Location Bush Identification ____________10
- Margin Distance _____________________10
- Setting out the Joints _________________10
- Setting the Length Stop _______________ 9
- Female Joint_________________________9
- Male Joint__________________________10
- Out-of-Square Joints _________________10
- Cutting the Bolt Recesses _____________11
- Strengthening the Joint _______________12
- Sealing the Joint ____________________12
- Curved Peninsular ___________________15
MAINTENANCE ______________________15
& GUARANTEE ______________________15
SPARE PARTS
- Spare Parts List _____________________16
- Spare Parts Diagram _________________16
TROUBLE SHOOTING _________________IB
3:30 pm
Page 1
COMBI 66
TECHNICAL DATA
Jig thickness
Cutter size
Workpiece thickness max.
Worktop width:
Guide bush size
Weight
The following symbols are used throughout this
manual:
This unit must not be put into service until it has
been established that the power tool to be
connected to this unit is in compliance with
98/37/EC (identified by the CE marking on the
power tool).
INTENDED USE
This jig is intended for use with a plunge router
with suitbale guide bush and router cutter fitted
to rout a kitchen joint in laminate covered
particle board.
☎
-1-
16mm
12.7mm
45mm
min.
580mm
max.
650mm
30mm
3.3kg
Denotes risk of personal injury, loss of
life or damage to the tool in case of non-
observance of the instructions in this
manual.
Refer to the instruction manual of
your power tool.
If you require further safety advice,
technical information or spare parts,
please call our technical support
department on 01923 224681.
Advertisement
Table of Contents

Related Manuals for TREND COMBI 66


Summary of Contents for TREND COMBI 66
-
Page 1: Table Of Contents
MANU-COM66 v2.0 24/10/05 3:30 pm Page 1 COMBI 66 TECHNICAL DATA Dear Customer Thank you for purchasing this Trend product, we Jig thickness 16mm hope you enjoy many years of creative and Cutter size 12.7mm productive use. Workpiece thickness max. -
Page 2: Safety
MANU-COM66 v2.0 24/10/05 3:30 pm Page 2 COMBI 66 5. Consider working environment. Do SAFETY 17. Don't over reach. Keep proper not use the product in the rain or in a footing and balance at all times. Do WARNING: damp environment. Keep work area not use awkward or uncomfortable well lit. - Page 3 Using Routers In A Fixed Position Trend Routing Catalogue or on our Router Cutter Maintenance website. 1. Attention should be made to the 1. Composite cutting tools (brazed tip) HSE’s Safe Use of Vertical Spindle...
-
Page 4: Items Enclosed
MANU-COM66 v2.0 24/10/05 3:30 pm Page 4 COMBI 66 ITEMS ENCLOSED COMBI ITEMS REQUIRED ■ 1/2” plunge router. ■ 30mm guide bush. ■ 12.7 diameter x 50mm cut router cutter with 1/2” shank. ■ Trestle x 2. ■ 100mm throat clamp x 2. -
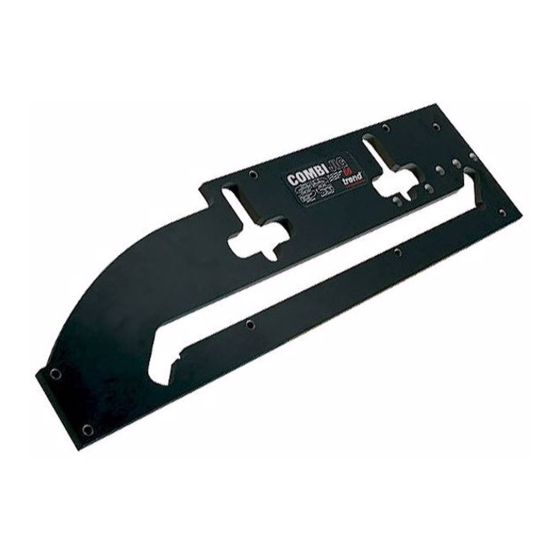
Page 5: Description Of Parts
MANU-COM66 v2.0 24/10/05 3:30 pm Page 5 COMBI 66 DESCRIPTION OF PARTS G&I COMBI Jig body Label Postform joint slot Female joint bush location hole Length setting stop location hole Male joint bush location hole Peninsular joint bush location hole... -
Page 6: Accessories Recommended Cutters
This can be achieved using Trend sub-bases and 30mm outside diameter guide bush ref. GB30. Trend sub-bases have a central recess to allow fitting of the Trend guide bush to most makes of routers and are available ready to fit the most popular makes. - Page 7 MANU-COM66 v2.0 24/10/05 3:30 pm Page 7 COMBI 66 Ref. GB/5 Fits following Router Models Description Order Ref. Elu MOF31,77,98,131,177(E), Bosch GOF1600A & 1700ACE DeWalt DW625EK, 629 Performance Pro CLM2050R, CLM1250R >11/2003 Felisatti R346EC, TTECH TTR127 GB/5 Makita 3612BR & 3600B Ryobi RE600N &...
-
Page 8: Panel Connector Bolts
MANU-COM66 v2.0 24/10/05 3:30 pm Page 8 COMBI 66 Panel Connector Bolts Ref. PC/10/M ( Pack of 10) Ref. PC/50/M ( Pack of 50) Ref. PC/100/M ( Pack of 100) Ref. PC/1000/M ( Pack of 1000) Panel butt connectors are essential for connecting worktops. -
Page 9: Carry Case
MANU-COM66 v2.0 24/10/05 3:30 pm Page 9 COMBI 66 Carry Case Description Order Ref. Carry Case for COMBI66 CASE/66 Hard wearing carry case to protect and allow ease of carrying of the COMBI66 Jig. -
Page 10: Assembly
MANU-COM66 v2.0 24/10/05 3:30 pm Page 10 COMBI 66 ASSEMBLY Margin Distance Allow 8.5mm when cutting joints. Measure or Location Bush Identification use a batten of this thickness to aid setting out. Three location bushes are used in different holes... -
Page 11: Operation
MANU-COM66 v2.0 24/10/05 3:30 pm Page 11 COMBI 66 OPERATION Setting the Length Stop Setting the Length Stop for the Female Joint Length stop on Carry out the setting operation first: underside. ■ Fit bushes into length stop setting holes Retained with screw &... -
Page 12: Male Joint
MANU-COM66 v2.0 24/10/05 3:30 pm Page 12 COMBI 66 Male Joint Routing the male part of the Joint Depending on accessibility lay female worktop into position on units. Lay male worktop on top and support other end. Using a pencil draw round the female cut onto the male from underside. -
Page 13: Cutting The Bolt Recesses
MANU-COM66 v2.0 24/10/05 3:30 pm Page 13 COMBI 66 Routing the bolt recess in the Cutting the Bolt Recesses female part of the joint When the joint has been tested, proceed as follows to cut the recess for panel butt Underside of worktop connectors on the underside of the worktop. -
Page 14: Strengthening The Joint
The biscuit jointing Underside View cutter set Trend Ref. 342, C152 or TR35 can be used with a portable router. The size of biscuit used should be No. 20. -
Page 15: Curved Peninsular
MANU-COM66 v2.0 24/10/05 3:30 pm Page 15 COMBI 66 Routing the Curved Peninsular Curved Peninsular Insert the three location bushes in the holes Location bushes as shown. Locate the template on the worktop as illustrated ensuring that location bushes are touching the worktop edge. -
Page 16: Spare Parts List
MANU-COM66 v2.0 24/10/05 3:30 pm Page 16 COMBI 66 COMBI 66 - SPARE PARTS DIAGRAM v1.0 04/2003 COMBI COMBI 66 - SPARE PARTS LIST v1.0 04/2003 Item Description Ref. Combi 66 Jig COMBI/66 Alloy Bush CJ/BUSH Length Setting Stop Kit... -
Page 17: Trouble Shooting
MANU-COM66 v2.0 24/10/05 3:30 pm Page 17 COMBI 66 TROUBLE SHOOTING Fault Cause Remedy ■ Joint does not fit correctly Cutter or guide bush is the Check concentricity of cutter at the radius. incorrect diameter or location with guide bush. Cutter 12.7mm... - Page 18 Web: ____________www.trendmachinery.co.uk RECYCLABLE © Copyright Trend 2005. No part of this publication may be reproduced, stored or transmitted in any form without prior permission. Our policy of continuous improvement means that specifications may change without notice. Trend Machinery and Cutting Tools...
- Page 19 MANU-COM66 v2.0 27/10/05 10:56 am Page 19 COMBI 66...
Need help?
Do you have a question about the COMBI 66 and is the answer not in the manual?
Questions and answers