Table of Contents
Advertisement
Advertisement
Table of Contents

Related Manuals for Bowflex MAX TRAINER MAX TOTAL Series


Summary of Contents for Bowflex MAX TRAINER MAX TOTAL Series
- Page 1 O WN E R’S / A SSE MB LY M AN UAL...
-
Page 2: Table Of Contents
To validate warranty support, keep the original proof of purchase and record the following information: Serial Number __________________________ Date of Purchase __________________________ If purchased in US/Canada: To register your product warranty, go to: www.bowflex.com/register or call 1 (800) 605–3369. If purchased outside US/Canada: To register your product warranty, contact your local distributor. For details regarding product warranty or if you have questions or problems with your product, please contact your local distributor. To find your local distributor, go to: www.nautilusinternational.com... -
Page 3: Important Safety Instructions
Important Safety Instructions When using an electrical appliance, basic precautions should always be followed, including the following: This icon means a potentially hazardous situation which, if not avoided, could result in death or serious injury. Obey the following warnings: Read and understand all warnings on this machine. Carefully read and understand the Assembly instructions. - Page 4 Before using this equipment, obey the following warnings: Read and understand the complete Manual. Keep the Manual for future reference. Read and understand all warnings on this machine. If at any time the Warning labels become loose, unreadable or dislodged, replace the labels.
-
Page 5: Safety Warning Labels / Serial Number
Safety Warning Labels and Serial Number WARNING! • Injury or death is possible if caution is not used while using this machine. • Keep children and pets away. • Read and follow all warnings on this machine. • Refer to the Owner’s Manual for additional warnings and safety information. -
Page 6: Specifications
Specifications / Before Assembly Maximum User Weight: 136 kg ( 300 lbs.) Total Surface Area (footprint) of equipment: 9648.8 cm (1494.5 in 65.5” Maximum Pedal Height: 48.5 cm ( 19.1 inches ) (166.4 cm) Machine Weight: 67.1 kg (148 lbs.) Power Requirements: (AC Adaptor) Input Voltage: 100-240V AC, 50-60Hz, 1.5A 49” Output Voltage: 12V DC, 3A 30.5”... -
Page 7: Parts
Parts ( 2 Boxes ) Box 1 Item Description Frame Shroud, Rear Foot Pad Insert Foot Pad Box 2 A decal has been applied to all right (“ R ”) and left (“ L ”) parts to assist with assembly. Item Description Item Description Bluetooth Heart Rate Armband Stabilizer Assembly ® Console Assembly Pedal Console Rear Cover Leveler Static Handlebar Cap Static Handlebar Assembly Rail Assembly Dynamic Handlebar, Left... -
Page 8: Hardware
Hardware / Tools Item Description Item Description Socket Head Hex Screw, M8x1.25x20 Black Wave Washer, 17.2x22 Lock Washer, M8x14.8 Black Socket Head Hex Screw, M8x1.25x55 Black Washer, Flat M8x18 Black Lock Nut, M8 Black Socket Head Hex Screw, M10x1.5x25 Black Flat Socket Head Hex Screw, M6x1.0x30 Black Washer, Flat M10x23 Black Socket Head Hex Screw, M6x1.0x20 CL10.9 Black Pan Phillips Screw, M5x0.8x20 Black Lock Washer, M6x14.8 Black Washer, Flat M8x24 Black Washer, Flat M6x13 Black Socket Head Hex Screw, M6x1.0x20 CL12.9 Black Note: Select pieces of Hardware have been provided as spares on the Hardware Card. Be aware that there may be remaining Hardware after the proper assembly of your machine. -
Page 9: Assembly
Assembly 1. Attach Rail Assembly to Frame and then Release the Frame from the Shipping Plate Some components of the machine can be heavy or awkward. Use a second person when doing the assembly steps involving these parts. Do not do steps that involve heavy lifting or awkward movements on your own. NOTICE: Hand tighten hardware. - Page 10 2. Attach Levelers to the Stabilizer Assembly Assembly / Owner’s Manual...
- Page 11 3. Carefully Lift the Frame Assembly from the Shipping Plate and Attach to the Stabilizer Assembly Some components of the machine can be heavy or awkward. Use a second person when doing the assembly steps involving these parts. Do not do steps that involve heavy lifting or awkward movements on your own. Lift the Frame Assembly from the exterior of the pivot assembly as indicated below.
- Page 12 4. Attach Stabilizer Shrouds to the Frame Assembly Assembly / Owner’s Manual...
- Page 13 5. Attach Rear Shroud and Caps to the Frame Assembly NOTICE: Place the inside hook of the Rear Shroud on the Frame Assembly and then pivot it up into place. Assembly / Owner’s Manual...
- Page 14 6. Attach Legs to Frame Assembly Be aware that the Legs are connected and when either of these parts move the other does as well. Assembly / Owner’s Manual...
- Page 15 7. Attach Pedals to Frame Assembly In order to avoid possible serious injury, when inserting the tube ends into the Leg Assemblies be careful to avoid fingers or hands being caught or pinched. 13mm Assembly / Owner’s Manual...
- Page 16 8. Attach the Foot Platforms and Foot Pads to the Pedals Assembly / Owner’s Manual...
- Page 17 9. Cut the Shipping Zip-Tie that Secures the Cables, Connect the Cables, and Attach the Static Handlebar Assembly NOTICE: Do not let the Cables drop into the Frame Assembly. Do not cut or crimp the Console Cables. Be sure to fully connect the cable connectors.
- Page 18 10. Remove the Rear Console Cover and Hardware from the Console Assembly. Connect the Cables and Place the Console onto the Static Handlebar. With the Excess of the Cables Pushed into the Static Han- dlebar, Pivot the Console Assembly Downward and Secure It to the Static Handlebars NOTICE: Do not cut or crimp the Cables.
- Page 19 11. Attach the Upper Handlebars to Frame Assembly Be aware that the Pedals and the Upper Handlebars are connected and when either of these parts move the other does as well. Some components of the machine can be heavy or awkward. Use a second person when doing the assembly steps involving these parts.
- Page 20 12. Connect the AC Adapter to the Frame Assembly NOTICE: Be sure to use the appropriate AC Adapter plug for your region. 13. Final Inspection Inspect your machine to ensure that all hardware is tight and components are properly assembled. Note: Remove any protective covers from the face of the Console.
-
Page 21: Moving The Machine
Adjustments Moving the Machine The machine may be moved by one or more persons depending on their physical abilities and capacities. Make sure that you and others are all physically fi t and able to move the machine safely. Grasp the Main Bar of the Static Handlebar Assembly to carefully tilt the machine toward you onto the transport rollers. -
Page 22: Features
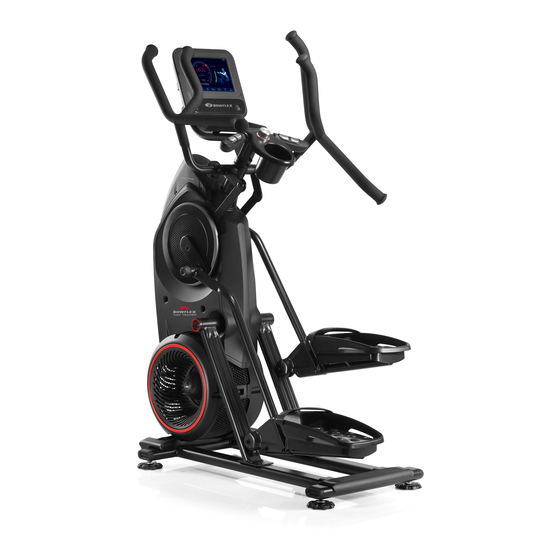
Features Console Speakers Media / Entertainment Notch Tray Resistance Level Knob Static Handlebars Contact Heart Rate (CHR) Sensors Water Bottle Holder Resistance Fan Power Connector Transport Roller Roller Rail Assembly Leveler Pedal Dynamic Handlebars USB Port Bluetooth Connectivity (not shown) ®... -
Page 23: Console Features
Console Features The Bowfl ex™ Max Total™ machine uses the Bowfl ex™ Max Intelligence™ App as the central component of the machine. A Wifi connection is required to use your Bowfl ex™ Max Total™ machine. If you do not have a Wifi connection available, contact your Bowfl ex™ Max Trainer™ Representative immediately for further assistance. Note: Y our Console may not look exactly as the provided images. These images are to be used only as a guide to use your machine. Console Display The Console Display shows the workout measurements, current options, and is the communication portal for the Bowfl ex™ Max Intelligence™ App. The Display can be touched to make selections on the screen or to simply wake up the Console from Sleep Mode. Status LED and Status LED Ring The Status LED and Status LED Ring show if the Console is activated and starting up/operating correctly (LED is on), if the battery is being initially charged (LED turns off briefl y every 2 seconds), or if the Console is experiencing an error (LED is blinking quickly) and should be restarted. - Page 24 Tap to select the Fitness Assessment program. The results from this workout will be used to create the custom workouts* for each profile user. PROGRAMS tab Tap to select a standard program. Bowflex™ Radio * Icon used to connect to Bowflex™ Radio. Volume / Heart Rate Device icon Icon that accesses Volume Control (tab that contains volume levels for Master volume, Coaching Voice*, Video*, and Celebrations) and lists the available Bluetooth Heart Rate Sensor Devices.
- Page 25 9:41 AM 100% Profile Name P R O G R A M S F I T N E S S A S S E S S M E N T "Endurance" Benefi t Zone Benefi t Zone display A suggested Burn Rate Target Zone to gain the full benefi ts from the current workout; Fat Burn, Endurance, and Performance Zones.
- Page 26 Stairs 7:00 S TART Manual Variable J O U R N A L J O U R N A L W O R K O U T S H O M E C H A N N E L P R O F I L E JOURNAL tab Displays the Workout Totals and Achievements for the selected User Profi le.
-
Page 27: Workout With Other Apps
(Optional) Though the Bowflex™ Max Intelligence™ App keeps track of all your workouts, along with your total calories burned, time, and more on the ma- chine, you can also access all of your information remotely on your own device. Simply download the App to your device and access your profile. 1. Download the free app, named “Bowflex™ Max Intelligence™ App ". The app is available on Google Play™ and the App Store. Note: For a complete list of supported devices, review the app on the App Store or Google Play™. 2. F ollow the instructions on the app to sync your device to your Bowflex™ Max Intelligence™ account. When your device has access to the account, you will be able to review workouts, coaching tips*, and upcoming workouts. -
Page 28: Heart Rate Armband
Bluetooth Heart Rate Armband ® Your fitness machine is provided with a Bluetooth Heart Rate Armband. When the Bluetooth Heart Rate Armband is connected, the Console will ® ® display the Bluetooth Connected icon. ® If you have a pacemaker or other implanted electronic device, consult your doctor before using a Bluetooth armband or other ®... - Page 29 FAT-BURNING TARGET HEART RATE 20-24 25-29 30-34 35-39 40-44 45-49 50-54 55-59 60-64 65-69 Maximum Heart Rate Target Heart Rate Zone (keep within this range for optimum fat-burning) Speakers To play audio through the speakers on your machine, open an App and stream the audio across the Wifi connection. Note: Though your machine is Bluetooth enabled, it is unable to receive and play audio across a Bluetooth connection from your device or ®...
-
Page 30: Fitness Basics
3 times per week, around 14 minutes each day. If you are new to exercise (or returning to a regular exercise program), and you are unable to comfortably complete 14 minutes of continuous exer- cise at one time, just do 5 – 10 minutes, and gradually increase your workout time until you can reach a 14 minute total. If your schedule is busy, and you are unable to fit 14 minutes of continuous exercise into your day, try accumulating 14 minutes by doing multiple shorter workouts on the same day. For example, 7 minutes in the morning and 7 minutes in the evening. This may be a great way to start your cardio training if you are new to vigorous activity. A great place to start your new exercise routine is to perform the Fitness Assessment workout on the Bowflex™ Max Intelligence™ App. The Fitness Assessment workout provides your current physical level, allowing it to create custom workouts* for you. For best results, combine your Bowflex™ Max Trainer™ cardio machine workouts with a strength training program using a Bowflex™ home gym or Bowflex™ SelectTech™ dumbbells, and follow the Bowflex™ Body Weight Loss Guide included in this manual. Consistency Busy work schedules, family obligations and daily chores can make it difficult to fit regular exercise into your life. Try these tips to increase your chances of success: Schedule your workouts the same way you schedule meetings or appointments. Select specific days and times each week, and try not to change your workout times. -
Page 31: China 200042, Www.nautilus.cn - 86 21 6115 9668 | Outside U.s. Www.nautilusinternational.com | Printed In China | © 2019 Nautilus, Inc. | Bowflex
Warm-Up * Before you use your Bowflex™ Max Trainer™ cardio machine, consider doing these dynamic warm-up stretches, which will help prepare your body for the workout: Dynamic Knee Hug Stand with the feet together. Bring one knee forward and up toward the chest. Place the hands around the shin and pull the knee into the chest. Release the stretch by putting the foot on the floor. Each repetition of the sequence should take... - Page 32 Dynamic Bent Knee Heel Press Stand with one foot forward and one foot back, hip-width apart and feet facing forward. Hold onto a wall for balance with one hand, if necessary. Bend both knees putting weight on the back heel. Release the stretch by returning to the start position.
- Page 33 The heart rate displayed on the console is an approximation and should be used for reference only. Steady State and Interval Training are 2 types of workouts you can do on your Bowflex™ Max Trainer™ cardio machine: Steady State workouts A Steady State workout involves slowly increasing your workout speed to a challenging, but comfortable, speed you can hold for most of your work- out. Getting your Heart Rate up into the Fat-Burning, Heart Zone zone for an entire workout would be a great Steady State workout. For example,...
-
Page 34: Assembly / Owner's Manual
Workout Log Use this log to track your workouts and progress. Tracking your workouts helps you stay motivated and achieve your goals. Date Calories Burn Rate (aver- Time RPM (average) Heart Rate (aver- Level (average) age) age) Cool-Down * When you are done using your cardio machine, consider doing these relaxing stretches, which will help your body recover from the workout and make you more flexible: Lying Leg Raise Lie on the floor face up with the legs slightly bent. Lift one leg... - Page 35 Side Lying Knee Bend Lie on the floor on one side of the body and rest the head on the lower arm. Bend the top knee and hold the ankle with the same-side hand, then pull the heel toward the gluteals. Hold the stretch for 10 to 30 seconds. Lie on the other side and repeat the stretch with the other leg.
-
Page 36: Operations
Operations How Often Should You Exercise Consult a physician before you start an exercise program. Stop exercising if you feel pain or tightness in your chest, become short of breath, or feel faint. Contact your doctor before you use the machine again. Use the values calculated or measured by the machine’s computer for reference purposes only. -
Page 37: Initial Set-Up
3. T he Console will display the list of available Wifi connections. Tap on the desired Wifi connection, and enter the password. Tap on Connect. 4. T he Console will test and connect to the Wifi connection. If the Console displays an Update Available screen, tap on the Agree button. The Console will update the software. 5. W ith a Wifi connection established, tap on Back. 6. T he Console will open the Bowflex™ Max Intelligence™ App. Tap on Get Started. 7. T he Console will display the options screen. Click on the Log In option. Follow the prompts to register your new fitness machine. When registra- tion is completed, your fitness machine is now ready for use. Note: T he Bowflex™ Max Total™ machine must be registered using a Wifi connection. Once the initial registration and configuration is com- pleted, the machine can be operated without a Wifi connection. However, only the basic workouts and functions will be available for use. -
Page 38: Fitness Assessment Program
Care should be used when mounting or dismounting the machine. Be aware that the Pedals and the Handlebars are connected and when either of these parts move the other does as well. In order to avoid possible serious injury, grasp the Static Handlebars to steady yourself. 6. G rasp the Static Handlebars. -
Page 39: Workout Programs
Upper Body Max 7 Interval Calorie B Workout Programs The standard Workout Programs are organized into two different styles of Workouts: Target Coaching Workouts and Benefi t Mode Workouts. Both types of Workouts are accessed from the WORKOUTS tab. Max 14 Interval TARGET COACHING WORKOUTS (Max Interval) Target Coaching Workouts suggest a Burn Rate Target for the User with the Burn Rate Target Range. The Burn Rate Target is based from the profi le of the Workout Program. The higher the column, the more intense the Burn Rate Target segment. Fat Bu The Max Interval Programs are workouts that alternate from intense bursts of output ( “SPRINT” ), to a slower paced, ‘catch your breath’ time period Stair... - Page 40 Fat Burn Upper Body Interval BENEFIT MODE WORKOUTS Benefi t Mode Workouts show the course profi le of the program in Resistance Levels. Each column in the profi le shows one workout segment. The Fat Burn Fat Burn higher the column, the higher the resistance level. During a Benefi t Mode workout, the Benefi t Zone display suggests a Burn Rate Target range to optimize the program. The Console will adjust the Resistance Level to follow the Workout Profi le Display. terval Note: I f the Resistance Level is adjusted during a workout, the profi le of the Workout Program will change. Upper Body Interval Upper Body Interval Calorie Burn Fat Burn Calorie Burn...
-
Page 41: Paused / Results / Cool Down Mode
Active Segment of Workout Completed Intervals of Workout Remaining Intervals (Resistance) (Burn Rate) Paused / Results / Cool Down Mode 1. To Pause a workout, stop pedaling during the workout. Note: The Console will automatically pause if there is no RPM signal for 5 seconds. W hen paused, the Console will briefl y show the Paused image. It will then display the Play button. -
Page 42: Maintenance
Maintenance Read all maintenance instructions fully before you start any repair work. In some conditions, an assistant is required to do the necessary tasks. Equipment must be regularly examined for damage and repairs. The owner is responsible to make sure that regular maintenance is done. -
Page 43: Maintenance Parts
Maintenance Parts Assembly / Owner’s Manual... - Page 44 Console Assembly Stabilizer Drive Pulley, Upper Console Rear Cover Transport Wheel Drive Belt Static Handlebars Stabilizer Shroud, Left Tensioner Static Handlebar Cap Shroud, Left Fan Fan Assembly Upper Shroud Fan Assembly Inserts Speed Sensor Shroud, Left Frame Assembly Disc Brake Crank Cover Rail Assembly Fan Belt...
-
Page 45: Troubleshooting
Troubleshooting Condition/Problem Things to Check Solution No display/partial display/unit Console in sleep mode Push the Resistance Level Knob or move handlebars to wake up Console. will not turn on Check electrical (wall) outlet Make sure unit is plugged into a functioning wall outlet. Check connection at front of unit Connection should be secure and undamaged. - Page 46 Condition/Problem Things to Check Solution Unit operates but Bluetooth Bluetooth HR device Fully charge HR device and activate. Be sure any protective cover has been ® ® Heart Rate (HR) not displayed removed from HR sensors. Make sure sensors are directly against skin and contact area is wet.
-
Page 47: Body Weight Loss Plan
Bowflex™ Body Weight Loss Guide Introduction and Overview Welcome to the Bowflex™ Body Weight Loss Guide. This guide is designed to be used with your Bowflex™ equipment and will help you: • Lose weight and get lean • Improve your health and wellness • Increase your energy and vitality Consult a physician before you start an exercise program or a new health and diet plan. Stop exercising if you feel pain or tightness in your chest, become short of breath, or feel faint. - Page 48 – Use the meal plan, sample options, and grocery list to create your own meals for more variety – You can swap out any type of protein, vegetables or smart carbs for the suggested meal options. For example: • Turkey for tuna • Any fish or seafood for chicken • Cooked vegetables instead of salad • Eat your calories – Cut out high calorie beverages like soda, juices, coffee drinks, and alcohol – Stick with water, unsweetened tea, and coffee. Aim for a minimum of 64oz (1.9 liters) of water per day to stay well hydrated • If you’re still hungry after or in between meals: – Have a glass of water and wait 15-20 minutes. Many times we mistake thirst (or even boredom!) for hunger. Wait out the initial urge to eat and sometimes it will pass. – If you’re still hungry after waiting 15-20 minutes have a snack or mini-meal with fruit, vegetables, and protein. If your goal is muscle gain or strength: •...
- Page 49 Here’s an overview of what an ideal day looks like: (See Portion Size Guide for proper serving sizes) Breakfast Snack #1 smart rich fruit protein carb carbs smart protein carb veggies protein/fat Lunch Snack #2 healthy smart protein carb smart protein carb veggies...
- Page 50 Breakfast Options Fruit Smart Carb Protein/Fat Fruit and Nut Oatmeal Cook Berries or banana Plain oats Nuts and milk plain oats in water. Top with fruit, (Regular or quick-cook) nuts, milk, cinnamon, and honey. Egg Muffin Cook egg/s. Toast Tomato English muffin or sandwich thin Egg, ham, and cheese bread and top with 1 slice of...
- Page 51 1 string cheese Energy or protein bar with <200 calories* *See www.Bowflex.com/Resources for brand recommendations Optional Treats You have the choice of replacing Snack #2 with a 100-150 calorie treat. You can have an optional treat every day but for optimal health it is recom- mended to limit small splurges to 3-4 times per week. Use the approach that works best for you. Here are a few examples:...
- Page 52 Portion Size Guide Portion Samples: Each of the items listed are for one serving MALE FEMALE PROTEIN 2 eggs 1 egg 1 cup = baseball 5oz chicken, fish, lean meat, or tofu 3oz chicken, fish, or lean meat 2/3 cup beans or lentils* 1/2 cup beans or lentils* 1 cup greek yogurt* 1/2 cup greek yogurt* 1.5oz cheese* 1.5oz cheese*...
- Page 53 Grocery List BREAD & GRAINS 100% whole wheat bread Tips: Look for 100% whole wheat as the first ingredient. Look for 4g of Sprouted grain breads fiber per slice or 5g per 2 slices of light or diet bread. Aim for bread with Light or whole wheat english muffins less than 100 calories per slice. Sandwich or bagel thins Corn or low-carb whole wheat tortillas High-fiber wraps Plain oats: 1 minute or old fashioned Whole grains: brown rice, bulgar, barley, quinoa, couscous DAIRY &...
- Page 54 • Treat yourself. Have a non-food reward for each goal you hit such as a massage, a new outfit, or an outing with friends and family • Use the resources below to find new recipes, get expert advice, and support to stay motivated Resources Downloadable Resources from Bowflex™ Website (www.Bowflex.com/Resources) • Grocery Shopping List for Fridge (Blank Form) • 7 Day Meal Planning Form • Additional Dinner Options •...
- Page 55 Assembly / Owner’s Manual...
- Page 56 Assembly / Owner’s Manual...
- Page 57 Assembly / Owner’s Manual...
-
Page 58: Buy Back Guarantee
This Bowflex™ Max Trainer™ Buy Back Guarantee applies only to merchandise purchased by consumers directly from Nautilus, Inc. This guarantee does not apply to sales made by dealers, retailers, or distributors. 1. C all a Bowflex™ Max Trainer™ Representative at 1-800-605-3369 for a Return Authorization Number (RMA). An RMA will be granted if: a. The Bowflex™ Max Trainer™ exercise machine was purchased directly from Nautilus, Inc. b. The request to return the product is within 6 weeks of the delivery date of your merchandise. 2. If an RMA is granted, the following instructions will prevent delays in the processing of your refund. -
Page 59: Warranty (Us/Canada Only)
Warranty ( if purchased in US/Canada ) Who Is Covered This warranty is valid only to the original purchaser and is not transferable or applicable to any other person(s). What Is Covered Nautilus, Inc. warrants that this product is free from defects in materials and workmanship, when used for the purpose intended, under normal conditions, and provided it receives proper care and maintenance as described in the Product’s Assembly and Owner’s manual. - Page 60 ™ ™ ™ ™ ™ 8023209.061519.B 8023209.061519.B...
Need help?
Do you have a question about the MAX TRAINER MAX TOTAL Series and is the answer not in the manual?
Questions and answers