
Related Manuals for National Instruments GPIB Series


Summary of Contents for National Instruments GPIB Series
- Page 1 GPIB Getting Started with Your ™ GPIB-ENET/100 and NI-488.2 for Windows Me/98/95 GPIB-ENET/100 for Windows Me/98/95 August 2000 Edition Part Number 322870A-01...
- Page 2 Sweden 08 587 895 00, Switzerland 056 200 51 51, Taiwan 02 2528 7227, United Kingdom 01635 523545 For further support information, see the Technical Support Resources appendix. To comment on the documentation, send e-mail to techpubs@ni.com © Copyright 2000 National Instruments Corporation. All rights reserved.
-
Page 3: Important Information
Any action against National Instruments must be brought within one year after the cause of action accrues. National Instruments shall not be liable for any delay in performance due to causes beyond its reasonable control. - Page 4 Classification requirements are the same for the Federal Communications Commission (FCC) and the Canadian Department of Communications (DOC). Changes or modifications not expressly approved by National Instruments could void the user’s authority to operate the equipment under the FCC Rules.
- Page 5 • Connect the equipment into an outlet on a circuit different from that to which the receiver is connected. • Consult the dealer or an experienced radio/TV technician for help. Canadian Department of Communications This Class B digital apparatus meets all requirements of the Canadian Interference-Causing Equipment Regulations. Cet appareil numérique de la classe B respecte toutes les exigences du Règlement sur le matériel brouilleur du Canada.
-
Page 6: Table Of Contents
Changing the Network Settings...............3-3 Static IP Parameters..................3-5 Choosing a Static IP Address ................3-5 For a Network Administered by a Network Administrator ....3-5 For a Network without a Network Administrator ......3-6 Verifying the Hostname ..................3-7 © National Instruments Corporation GPIB-ENET/100 for Windows Me/98/95... - Page 7 Contents Chapter 4 GPIB Configuration Configuring the NI-488.2 Software Characteristics............4-1 Chapter 5 Verify the Installation Power-On Self Tests...................... 5-1 Run the NI-488.2 Getting Started Wizard..............5-1 Connecting the GPIB Cable ..................5-3 Chapter 6 Using Your GPIB-ENET/100 and NI-488.2 NI-488.2 Getting Started Wizard ..................
- Page 8 Figure 6-1. Communicating with Your Instrument..........6-2 Figure 6-2. NI Ethernet Device Firmware Update Utility ........6-6 Tables Table 1-1. LED Descriptions ..................1-4 Table 3-1. Valid and Invalid IP Addresses for Subnet Mask 255.255.255.0 ..3-6 © National Instruments Corporation GPIB-ENET/100 for Windows Me/98/95...
-
Page 9: About This Manual
About This Manual This manual contains instructions to help you install and configure the National Instruments GPIB-ENET/100 and NI-488.2 for Windows Me/98/95. This manual assumes that you are already familiar with Windows Me/98/95 and with TCP/IP networks, and that your computer is connected to an Ethernet network. -
Page 10: Related Documentation
About This Manual Text in this font denotes text or characters that you should enter from the monospace keyboard, sections of code, programming examples, and syntax examples. This font is also used for the proper names of disk drives, paths, directories, programs, subprograms, subroutines, device names, functions, operations, variables, filenames and extensions, and code excerpts. -
Page 11: Introduction
❑ The NI-488.2 for Windows CD, which is included in your kit ❑ One of the following Category 5 twisted-pair network cables, which you can purchase from National Instruments: – Straight-through cable for connecting the GPIB-ENET/100 to a network hub –... -
Page 12: Optional Equipment
Chapter 1 Introduction ❑ One of the following shielded GPIB cables, which you can purchase from National Instruments: – Type X1 single-shielded cables (1, 2, or 4 m) – Type X2 double-shielded cables (1, 2, or 4 m) Caution To meet FCC emission limits for this device, you must use a shielded (Type X1 or X2) GPIB cable. -
Page 13: Feature Overview
DIN rail mounting, wall mounting, and stackable stand-alone use. You can stack the unit with other GPIB-ENET/100 units and additional National Instruments products including the ENET-232 Series and ENET-485 Series serial controllers. For more information about hardware specifications, refer to Appendix C, Specifications. -
Page 14: Ni-488.2 Overview
Chapter 1 Introduction The LEDs show the current status of the GPIB-ENET/100. Table 1-1 describes each LED. Table 1-1. LED Descriptions Description PWR/RDY Flashes rapidly at start-up while performing self tests and when acquiring network parameters. A steady yellow state indicates the box is ready for operation. -
Page 15: Time-Saving Development Tools
ANSI C environment for building your test program logic, and a collection of automated code generation tools, as well as utilities for building automated test systems, monitoring applications, or laboratory experiments. © National Instruments Corporation GPIB-ENET/100 for Windows Me/98/95... - Page 16 GPIB Analyzer is an optional tool available from National Instruments that is useful in troubleshooting a variety of IEEE 488 hardware and software problems. With its built-in time-stamping capability, you easily can determine the throughput and overhead of your GPIB systems.
-
Page 17: Installation
Insert the NI-488.2 for Windows CD. When the NI-488.2 Software for Windows screen appears, click the Install NI-488.2 Software for Windows item, as shown in Figure 2-1. Figure 2-1. NI-488.2 Software for Windows CD Autorun Screen © National Instruments Corporation GPIB-ENET/100 for Windows Me/98/95... -
Page 18: Add Gpib Hardware
Use the Add GPIB Hardware Wizard to inform Windows Me/98/95 that you are adding a GPIB-ENET/100 to your system. To do so, complete the following steps: Select Start»Programs»National Instruments»NI-488.2»Add GPIB Hardware. When the wizard prompts you for a type of hardware, select GPIB-ENET/100 and click Next to continue. -
Page 19: Installing The Gpib-Enet/100 Hardware
You can change the hostname after you finish the installation and configuration steps in this chapter. Refer to the Changing the Network Settings section in Chapter 3, Ethernet Configuration, for more information. © National Instruments Corporation GPIB-ENET/100 for Windows Me/98/95... -
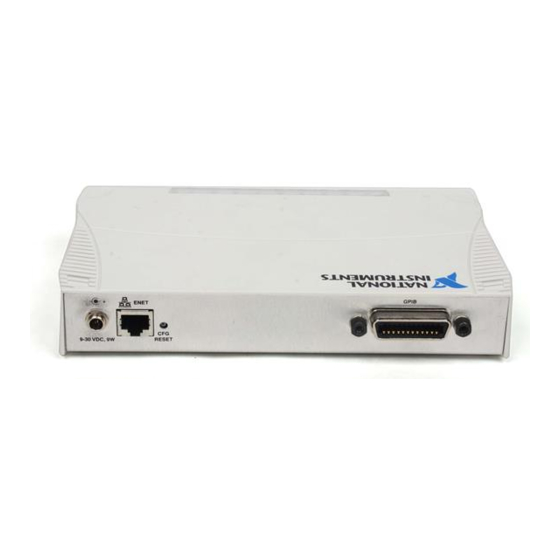
Page 20: Step 2. Connect The Cables
If you do not have an Ethernet cable, as listed in the What You Need to Get Started Note section of Chapter 1, Introduction, contact National Instruments for ordering information. Figure 2-4 shows the locations of the power, Ethernet, and GPIB connections on the rear panel of the GPIB-ENET/100. -
Page 21: Step 3. Switch On Your Gpib-Enet/100
Each Ethernet and GPIB LED lights up as its functionality is tested. By default, the GPIB-ENET/100 attempts its network configuration through DHCP. © National Instruments Corporation GPIB-ENET/100 for Windows Me/98/95... -
Page 22: Ni Ethernet Device Configuration Utility
• If the PWR/RDY LED is steady red, the GPIB-ENET/100 has an unrecoverable error. Contact National Instruments Technical Support. • If the PWR/RDY LED blinks a slow red/yellow pattern, the GPIB-ENET/100 did not pass its self tests. Refer to Appendix A,... -
Page 23: Ethernet Configuration
NI Ethernet Device Configuration utility. To do so, complete the following steps: Select Start»Programs»National Instruments»NI-488.2»Explore GPIB to start the Measurement & Automation Explorer. Under Measurement & Automation, expand the Devices and Interfaces folder. © National Instruments Corporation GPIB-ENET/100 for Windows Me/98/95... - Page 24 Figure 3-1. NI Ethernet Device Configuration Utility The NI Ethernet Device Configuration window displays a list of National Instruments Ethernet devices found on your subnet, sorted by model. Figure 3-1 shows an example of this display. The listed devices can be in one of four possible states, as indicated in the IP address/hostname column: •...
-
Page 25: Changing The Network Settings
GPIB-ENET/100 appears, similar to the example shown in Figure 3-2. Figure 3-2. Properties Window for an Unconfigured GPIB-ENET/100 The current hostname is displayed. The hostname associates a name with a numerical IP address. Hostname is a required field. © National Instruments Corporation GPIB-ENET/100 for Windows Me/98/95... -
Page 26: Figure 3-3. Specifying Ip Settings
Chapter 3 Ethernet Configuration The GPIB-ENET/100 attempts to use the hostname when registering with DHCP. Many DHCP servers have the ability to register the hostname and the assigned IP address. You then can reliably use the hostname to communicate with your GPIB-ENET/100 even if the numerical IP address changes. -
Page 27: Static Ip Parameters
IP addresses carefully. Contact your network administrator to obtain an appropriate static IP address for your GPIB-ENET/100. Also have the network administrator assign the proper subnet mask, gateway, and DNS server addresses. © National Instruments Corporation GPIB-ENET/100 for Windows Me/98/95... -
Page 28: For A Network Without A Network Administrator
Chapter 3 Ethernet Configuration For a Network without a Network Administrator If you are assembling your own small Ethernet network, you can choose your own IP addresses. The format of the IP addresses is determined by the subnet mask. You should use the same subnet mask as the computer you are using with your GPIB-ENET/100. -
Page 29: Verifying The Hostname
Refresh. The utility alerts you as shown in Figure 3-4 if it detects a problem with the network settings. Figure 3-4. Hostname Verification Error Detected © National Instruments Corporation GPIB-ENET/100 for Windows Me/98/95... -
Page 30: Figure 3-5. Resolving A Hostname Verification Error
Chapter 3 Ethernet Configuration To correct the problem with the hostname, complete the following steps: Locate the device that has a problem. This is indicated by an (!) on the device icon, as shown previously in Figure 3-1. Select Properties..A dialog box similar to the following appears. Figure 3-5. - Page 31 Confirm that the device is in network configuration mode and click OK. The device reboots with the new settings in effect. After the device reboots, click Refresh to verify that the hostname is now valid. © National Instruments Corporation GPIB-ENET/100 for Windows Me/98/95...
-
Page 32: Gpib Configuration
Click on the Network Settings tab. Type the IP address or hostname that you recorded in step 4 in the IP Address field, as shown in Figure 4-1. © National Instruments Corporation GPIB-ENET/100 for Windows Me/98/95... -
Page 33: Figure 4-1. Network Settings Tab
Chapter 4 GPIB Configuration Figure 4-1. Network Settings Tab The NI-488.2 Configuration utility context-sensitive online help contains all of the information that you need to configure the NI-488.2 software properly. To view the online help, click on the question mark ( ) button in the toolbar and click on any item for more information about it. -
Page 34: Verify The Installation
Run the NI-488.2 Getting Started Wizard To test the hardware and software installation, run the NI-488.2 Getting Started Wizard. Select Start»Programs»National Instruments» NI-488.2»Getting Started and follow the instructions on the screen. The NI-488.2 Getting Started Wizard, shown in Figure 5-1, verifies the hardware and software installation and helps you begin to communicate with your GPIB instrument. -
Page 35: Figure 5-1. Ni-488.2 Getting Started Wizard Dialog Box
Chapter 5 Verify the Installation Figure 5-1. NI-488.2 Getting Started Wizard Dialog Box When you click Verify your hardware and software installation, the NI-488.2 Troubleshooting Wizard tests your GPIB interface and displays the results, as shown in as shown in Figure 5-2. Note The GPIB cable must be disconnected from your GPIB interface before you run the NI-488.2 Troubleshooting Wizard. -
Page 36: Connecting The Gpib Cable
If you do not have a GPIB cable, as listed in the What You Need to Get Started section of Chapter 1, Introduction, contact National Instruments for ordering information. Connect one end of your GPIB cable to your GPIB-ENET/100 and tighten the thumb screws on the connector. -
Page 37: Using Your Gpib-Enet/100 And Ni-488.2
After the NI-488.2 Getting Started Wizard runs the NI-488.2 Troubleshooting Wizard to verify the installation, click Communicate with your instrument. The Getting Started Wizard then steps you through communicating with your GPIB instruments via the Measurement & Automation Explorer. © National Instruments Corporation GPIB-ENET/100 for Windows Me/98/95... -
Page 38: Using Dhcp
Chapter 6 Using Your GPIB-ENET/100 and NI-488.2 Figure 6-1. Communicating with Your Instrument Using DHCP The Dynamic Host Configuration Protocol (DHCP) is designed for large networks in which networking devices are transient and network parameters cannot be statically assigned and thus tied to specific devices. DHCP eases the addition of networking devices onto a network by having a server assign necessary network parameters, including the IP address, the netmask, and router information, to a newly attached network device. -
Page 39: Using The Cfg Reset Switch
PWR/RDY LED, you can use the CFG RESET switch to place the box into network configuration mode. You then can use the NI Ethernet Device Configuration utility as described in Chapter 3, Ethernet Configuration. © National Instruments Corporation GPIB-ENET/100 for Windows Me/98/95... -
Page 40: Using The Cfg Reset Switch At Power-On
Chapter 6 Using Your GPIB-ENET/100 and NI-488.2 This special mode ensures that network parameters are not changed while in use. Because you cannot change the network parameters unless you deliberately place the GPIB-ENET/100 into network configuration mode, the parameters are protected while in normal operation. Hosts cannot connect to the GPIB-ENET/100 while it is in network configuration mode. -
Page 41: Updating The Firmware
Do not power-off the GPIB-ENET/100 or disconnect the power supply while Caution running the NI Ethernet Device Firmware Update utility. Doing so will damage the unit. The GPIB-ENET/100 reboots automatically when the update completes. © National Instruments Corporation GPIB-ENET/100 for Windows Me/98/95... -
Page 42: Ni Ethernet Device Firmware Update Utility
Hosts cannot connect to the GPIB-ENET/100 while it is updating the firmware. To start the Update Firmware utility, complete the following steps: Select Start»Programs»National Instruments»NI-488.2»Explore GPIB to start the Measurement & Automation Explorer. Under Measurement & Automation, expand the Devices and Interfaces folder. - Page 43 The Current status box reports whether the firmware update completed successfully or failed. The GPIB-ENET/100 automatically reboots with the new firmware in effect. Click Exit to close the NI Ethernet Device Firmware Update utility. © National Instruments Corporation GPIB-ENET/100 for Windows Me/98/95...
- Page 44 PWR/RDY LED blinks slowly in a recognizable pattern to alert you of internal errors. Use this appendix to interpret and record the pattern that the PWR/RDY LED flashes, and then contact National Instruments. Note By recording the PWR/RDY LED status messages before calling National Instruments, you can save yourself time, and the Product Support Department can answer your questions more accurately and efficiently.
- Page 45 Step 3. Record Your Status Code Number When you have computed your error message number, write it down and also note the ON/OFF state of the LINK, TX, and RX LEDs. Have this information available when calling National Instruments. GPIB-ENET/100 for Windows Me/98/95 ni.com...
- Page 46 If the PWR/RDY LED is blinking in a slower red/yellow pattern, the GPIB-ENET/100 is reporting an internal error. Refer to Appendix A, PWR/RDY LED Signaling, to interpret the error code and contact National Instruments. © National Instruments Corporation GPIB-ENET/100 for Windows Me/98/95...
- Page 47 Appendix B Troubleshooting and Common Questions Troubleshooting EDVR Error Conditions In some cases, calls to NI-488 functions or IEEE 488.2-style functions may return with the ERR bit set in and the value EDVR in . The ibsta iberr value stored in is useful in troubleshooting the error condition.
- Page 48 Because many different network providers and protocols are available in this dialog box, consult your network provider documentation to determine which protocol provides WinSock support from that vendor. For example, to enable Microsoft WinSock support, select Microsoft © National Instruments Corporation GPIB-ENET/100 for Windows Me/98/95...
- Page 49 GPIB-ENET/100. What should I do? Network communication is slower than straight cable communication.You might need to raise the default Timeout value. Select Start»Programs»National Instruments»NI-488.2»Explore GPIB to start the Measurement & Automation Explorer. Under Measurement & Automation, expand the Devices and Interfaces folder.
- Page 50 I powered off my GPIB-ENET/100 before recording the flashing PWR/RDY LED pattern. What should I do? Try to duplicate the error before calling National Instruments for assistance. Recording the PWR/RDY LED pattern is not critical to the operation of your GPIB-ENET/100, but it saves you time and helps National Instruments diagnose the problem quickly and accurately.
- Page 51 Appendix B Troubleshooting and Common Questions How should I check for errors in my GPIB application? Examine the value of after each NI-488 or NI-488.2 call. If a call ibsta fails, the ERR bit of is set and an error code is stored in ibsta iberr For more information about global status variables, refer to Chapter 3,...
-
Page 52: Electrical Characteristics
EMI ............FCC Class A Verified Physical Characteristics Overall case size (dimensions)....21.0 by 12.4 by 3.7 cm (8.25 by 4.89 by 1.44 in.) Case material.......... Hard plastic with metal baseplate Weight ............ 0.41 kg (0.9 lb) © National Instruments Corporation GPIB-ENET/100 for Windows Me/98/95... - Page 53 Appendix C Specifications Software Characteristics Maximum software transfer rate ...Over 800 kbytes/s Electrostatic Discharge Protection Non-isolated devices.......1.5 kV Connectors Ethernet connector ........RJ-45 GPIB connector ........IEEE 488 standard 24 pin Network Specifications Connection type ........IEEE 802.3 compliant 100BaseTX (100 Mbits/s) 10BaseT (10 Mbits/s) Duplex mode...........Half duplex Actual speed may vary considerably from speed shown due to system, network, and instrumentation capabilities.
- Page 54 Technical Support Resources Web Support National Instruments Web support is your first stop for help in solving installation, configuration, and application problems and questions. Online problem-solving and diagnostic resources include frequently asked questions, knowledge bases, product-specific troubleshooting wizards, manuals, drivers, software updates, and more. Web support is available through the Technical Support section of .
- Page 55 Appendix D Technical Support Resources Worldwide Support National Instruments has offices located around the world to help address your support needs. You can access our branch office Web sites from the Worldwide Offices section of . Branch office Web sites provide ni.com...
- Page 56 Celsius DHCP Dynamic Host Configuration Protocol dynamic link library Domain Name Server electromagnetic interference Federal Communications Commission grams GPIB General Purpose Interface Bus hertz IEEE Institute of Electrical and Electronic Engineers inches © National Instruments Corporation GPIB-ENET/100 for Windows Me/98/95...
- Page 57 Glossary input/output Internet Protocol light-emitting diode pounds meters megabytes of memory network interface card seconds volts volts alternating current Win16 describes a 16-bit Windows application Win32 describes a 32-bit Windows application GPIB-ENET/100 for Windows Me/98/95 ni.com...
- Page 58 6-2 with driver, B-4 time required to complete, 2-6 with Ethernet Device Configuration using, 6-2 utility, B-6 using with DNS, 3-4, 6-2 Configuration Reset switch. See CFG RESET distance capabilities, 1-3 switch © National Instruments Corporation GPIB-ENET/100 for Windows Me/98/95...
- Page 59 Index firmware update utility if not supported, 3-4 before using, 6-5 manually inserting hostname in DNS important warning, 6-5 table, 6-3 running, 6-6 using with DHCP, 3-4, 6-2 upgrade location, 6-5 DNS server, 3-5 when to use, 6-5 Dynamic Host Configuration Protocol. front panel (figure), 1-3 See DHCP gateway IP, 3-5...
- Page 60 Add GPIB Hardware Wizard, 2-2 license Ethernet cable, 2-4 multiple-computer software license, 1-2 getting started, 1-1 GPIB cable, 5-3 GPIB-ENET, 2-1 GPIB-ENET/100, 2-3 National Instruments Web support, D-1 NI-488.2, 2-1 network addresses power cable, 2-4 configuring, 4-1 verification, 5-1 network administrator IP address...
- Page 61 Index troubleshooting wizard, 5-2 observing during self tests, 2-6 viewing or changing configuration, 4-1 overview, A-1 when using CFG RESET switch, 6-4, 6-5 optional equipment hardware, 1-2 rear panel (figure), 2-4 multiple-computer software license, 1-2 rebooting overview after Ethernet configuration, 3-5 features, 1-3 after firmware update, 6-5 GPIB-ENET/100 hardware, 1-2...
- Page 62 5-1 troubleshooting voltage rating, C-1 EDVR error conditions, B-2 hardware problems, B-1 troubleshooting wizard Web support from National Instruments, D-1 verifying installation, 5-2 winipcfg using to determine network settings, 3-7 WinSock updating the firmware, 6-5 before using NI-488.2, B-4...
Need help?
Do you have a question about the GPIB Series and is the answer not in the manual?
Questions and answers