Enertech Bentone BFG1 Installation And Maintenance Instruction
Hide thumbs
Also See for Bentone BFG1:
- Manual (46 pages) ,
- Installation and maintenance instruction (48 pages)

Subscribe to Our Youtube Channel
Related Manuals for Enertech Bentone BFG1


Summary of Contents for Enertech Bentone BFG1
- Page 1 178 119 35-1 2015-09-23 Providing sustainable energy solutions worldwide Installation- and maintenance instruction BFG1...
-
Page 3: Table Of Contents
3.1.1 Example of how to calculate the gas quantity (natural gas): _______________________________________________ 3.1.2 Nozzle assembly adjustment ________________________ 3.1.3 Air intake adjustment ___________________________________ 3.1.4 Air quantity setting procedure _______________________ 3.1.5 Inlet cone, air control ___________________________________ 3.1.6 Rotation of air intake ____________________________________ 3.1.7 Air duct ______________________________________________________ Bentone BFG1... -
Page 4: Important To Remember
• This manual is to be regarded as part of the burner and must always be kept near the installation site. Enertech AB reserves the right to make changes and correct any printing errors. -
Page 5: Service
60°C. • Care should be taken by the installer to ensure that no electrical cables or gas pipelines are crushed or damaged during installation or servicing. • Only spare parts recommended by Enertech should be used. Bentone BFG1... -
Page 6: What To Do If You Smell Gas
• If any electrical connection is used other than that recommended by Enertech, there may be a danger of damage to property and personal injury. • Care should be taken by the installer to ensure that no electrical cables or gas pipelines are crushed or damaged during installation or servicing. -
Page 7: Delivery Check
• Ensure that the burner is protected against direct spraying of water, since it is not designed to withstand this. • Only spare parts recommended by Enertech should be used. • This burner cannot be used for biogas without irst contacting Enertech. -
Page 8: Technical Data
Dimensions BFG1 Depending on which components that are used, dimensions may vary ø89,7 1.1.1 Dimensions flanges Flange 1 BFG1 H1 and BFG1 H2 130-150 Flange 2 ø90 BFG1 H1 and BFG1 H2 125-150 109,5 23,5 Flange 3 BFG1 H3 Bentone BFG1... -
Page 9: Capacity Range Bfg1 H1, Bfg1 H2 And Bfg1 H3
Max inlet pressure can vary depending on choice of multiblock. Indicated pressure applies to Dungs standard block type MBC... The dimension should be adapted in accordance with capacity, gas quality and inlet pressure. Data apply to Fida model 26/40 50%. Bentone BFG1... -
Page 10: Model Bfg1 H1
1.3.1 Burner output/ Basic settings 4 ,0 3 ,5 3 ,0 2 ,5 2 ,0 1 ,5 1 ,0 0 ,5 0 ,0 Burner output kW -0 ,5 Burner output kW Scale value valid at 0 mbar in furnace pressure. Bentone BFG1... -
Page 11: Model Bfg1 H2
1 0 ,0 8 ,0 1 ,5 6 ,0 1 ,0 4 ,0 0 ,5 2 ,0 0 ,0 0 ,0 Burner output kW -0 ,5 Burner output kW Scale value valid at 0 mbar in furnace pressure. Bentone BFG1... -
Page 12: Model Bfg1 H3
1 ,0 6 ,0 0 ,5 4 ,0 2 ,0 0 ,0 0 ,0 -0 ,5 9 5 1 0 0 1 0 0 Burner output kW Burner output kW Scale value valid at 0 mbar in furnace pressure. Bentone BFG1... - Page 13 General Bentone BFG1...
-
Page 14: Description
General 1.6 Description Bentone BFG1... -
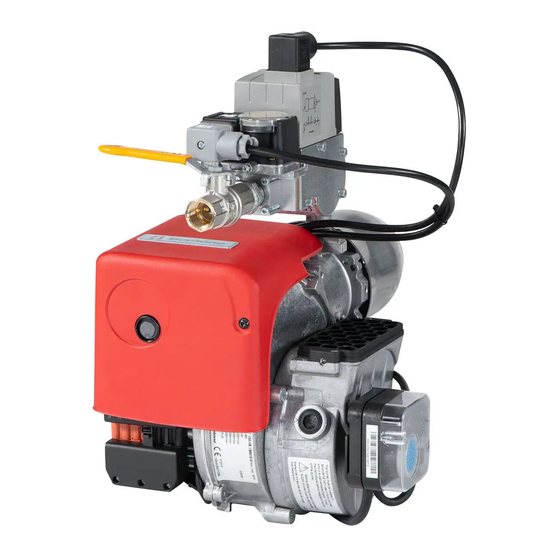
Page 15: Components
Air regulation Electric connection Gas burner control Reset button Nozzle assembly adjustment Screw for division of burner in front and rear part Nozzle assembly Brake plate Ignition electrode Ionisation electrode Nozzle Air low indicator (indicates the air setting) Bentone BFG1... -
Page 16: Skeleton Diagrams
General 2. Skeleton diagrams 2.1 Multi-bloc MBD-LE..B07 Filter cover p Br 1,3,4,6 G 1/8 screw plug Test nipple (option) M4 screwed sealing plug p Br 5 3 4 2.1.1 Electritrical connection MBD-LE..B07 MB-D(LE) B07 S22 / S52 Bentone BFG1... - Page 17 Valve V3 Solenoid V1 Closing spring V3 Gas pressure switch (optional) Armature V3 Electrical connection Solenoid V3 Valve V2 Working diaphragm Closing spring V2 Compensation diaphragm Armature V2 When Bio gas is used, Bentone shall always be contacted. Bentone BFG1...
-
Page 18: Functional Description Of Gas Low
E on the working diaphragm 26 of the regulator. In regulated state, setting spring inlet pressure and pressure of working diaphragm are in force equilibrium. The compensating diaphragm ensures the fast closing function of valve V1 and a high regulating quality. Bentone BFG1... -
Page 19: Delivery Check
If not, use the connectors included. (Refer to connection under Electric equipment) If an electric connection other than the one recommended by Enertech is used, a risk of damage and injury can arise. 2.6 Setting brake plate and air flow Before the placing into service, the burner should be initially set according to diagram. -
Page 20: Burner Installation
X2 according to the wiring diagram. Turn off the main switch. Connect the Eurostecker X2 acc. to Alt. 1 - 3 (Refer to Electric equipment). Install the Eurostecker X2 on the burner. Turn on the main switch. Bentone BFG1... -
Page 21: Control Measures
150 mbar. If leakage is observed when measuring, localise the leaking site with soapy water or leak detection spray. After sealing, leak test the ittings again. After completed trimming, all joints, branching points and outlets on the gas line should be tested for leaks. Bentone BFG1... -
Page 22: Basic Settings
Calculation example: 15°C 945 mbar 15,0 mbar μ (273 + 15) 1013,25 ≈ 1,11 (945 + 15) x f ⇒ V = 7.05 x 1.11 ≈ 7.83 m /h gas low to be read at the gas ° meter Bentone BFG1... -
Page 23: Nozzle Assembly Adjustment
Fig. Ι, a clockwise turn gives a decrease in the air low and a counter- clockwise turn an increase in the air low. If the air intake is pointing upwards as in Fig. Π, a clockwise adjustment Ι increases the air low and a counter-clockwise adjustment decreases it. Π Bentone BFG1... -
Page 24: Inlet Cone, Air Control
A hose connection via a air duct is available in three different dimensions, 48, 68 and 78 mm outer diameter ”D”. The air duct is installed on the air intake at the place where the grid is installed in the standard design. Bentone BFG1... -
Page 25: Burner Service
Install the Eurostecker; switch on the main current and open the gas low. Start the burner and check the combustion. When servicing/replacing components which affect the combustion, gas side leakage analysis and check should be performed on the system. Bentone BFG1... -
Page 26: Fan Motor Replacement
Install the Eurostecker; switch on the main current and open the gas low. Start the burner and check the combustion. When servicing/replacing components which affect the combustion, gas side leakage analysis and check should be performed on the system. Bentone BFG1... -
Page 27: Air Intake And Inlet Cone Service
Install the Eurostecker, switch on the main current and open the gas low. Start the burner and check the combustion*. When servicing/replacing components which affect the combustion, gas side leakage analysis and check should be performed on the system. Bentone BFG1... -
Page 28: Fan Wheel Service
Check that the screw holding the electrical bracket is tightened so that good earth connection between the package and the burner body is obtained. Use only electric components recommended by Enertech. Warning When servicing/replacing components which affect the combustion, gas side leakage analysis and check should be performed on the system. -
Page 29: Complete Electrical Package Replacement
Install the Eurostecker; switch on the main current and open the gas low. Start the burner and check the combustion. When servicing/replacing components which affect the combustion, gas side leakage analysis and check should be performed on the system. Bentone BFG1... -
Page 30: Single Electrical Package Component Replacement
When the ignigtion transformer, air switch, gas switch and gas burner control contained in the electrical package are being replaced, no work needs to be done in the socket. When servicing/replacing components which affect the combustion, gas side leakage analysis and check should be performed on the system. Bentone BFG1... -
Page 31: Multi-Bloc, Mb-Dle
Electrical connection for pressure switch possible on both sides (DIN EN 175 301-803 connector) (option) Outlet lange Test point connection G 1/8 upstream of V1, possible on both sides Test point connection M4 downstream of valve 2 Gas low direction Bentone BFG1... -
Page 32: Mounting K01/1
Rotate setting screw C to ” + ” until switching point is reached. Then rotate the setting screw by another scale division. Check function by activating the valve. Re-set switching point Turn setting screw C back in arrow direction ”–” to the stop; proceed as described in 7. Bentone BFG1... -
Page 33: Adjustment Of Governor
The low adjustment can also be made by means of the governor. Adjust the outlet pressure to a value giving the desired gas low on the fully open valve. At small capacities (gas lows) it is also necessary to adjust as above. Flow adjustment Adjustment of V2 damper e: under cap Bentone BFG1... -
Page 34: General Instructions
UV-detector, when it is lighted, should be at least 70 µA. The current can be measured with a moving coil instrument. A check is necessary only if a malfunction is suspected. 6.1.3 Flame monitoring UV-detector (QRC) LME23... µA DC QRC1... Bentone BFG1... -
Page 35: Setting Of Air Pressure Switch
20%. Turn the wheel to this value. Tolerance on the scale ±15 % Setting area approx.: Type Max. pressure 2-10 mbar GW 10 A5 500 mbar 5-50 mbar GW 50 A5 500 mbar 5-150 GW 150 A5 500 mbar Bentone BFG1... - Page 36 General 6.1.7 Air pressure switch, gas pressure switch (option) 3 Brown Air pressure switch - Low pressure side + High pressure side 1 Black 2 Blue Gas pressure switch Bentone BFG1...
-
Page 37: Air Pressure Switch, Gas Pressure Switch (Option)
• Fill out required test protocols. • Instruct operating staff in the care and maintenance of the system and how to react in case of breakdown. • Review and service should be performed by authorized personnel only. Bentone BFG1... -
Page 38: Electric Equipment
7.2 Wiring diagram If there is no plug-in contact (X2) on the boiler, connect to the contact enclosed. In case the twin thermostat is in series on incoming phase L1, a loop between the terminals T1 and T2 is necessary. Bentone BFG1... -
Page 39: List Of Components
The operation of the burner can now be stopped with the control switch or thermostat If the gas burner control is blocked Red light in the gas burner control is lit. The burner is restarted by pushing the reset button Bentone BFG1... -
Page 40: Control Program At Faults; Fault Mode Indicator Lme
After alarm disconnection, the red alarm signal light is lit continuously. The diagnosing of the alarm cause can be read according to the following sequence: Press the reset Blinking Light period Pause Blinking code button > 3 s code (waiting period ≥ 10 s) Bentone BFG1... -
Page 41: Alarm Code Table
3 s. To go back to the normal position, press and hold the reset button longer than 3 s. If the gas burner control is in the alarm position, it is reset by pressing the reset button 0.5...3 s. Bentone BFG1... -
Page 42: Fault Location Guide
Porcelain on ignition electrodes broken. Replace the ignition electrode(s) Cable terminals have poor contact Improve the contact Ignition cables damaged Replace Ignition transformer damaged, no Replace the ignition transformer voltage on the secondary side. Ignition cable and ionisation cable Switch mixed up. Bentone BFG1... - Page 43 Gas pressure too low Increase the pressure. Contact the gas supplier. Condensation formation in the boiler and in the chimney Flue-gas temperature too low or gas Increase the lue-gas temperature by quantity too small. increasing the gas quantity. Insulate the stack. Bentone BFG1...
- Page 44 Cause Corrective Action Pulsations at start Ignition electrodes maladjusted Readjust. Gas pressure too high Check and adjust with a pressure gauge and pressure regulating valve. Flue-gas side blocked Check the stack lue Incorrectly adjusted burner Adjust the burner The burner pulsates during operation The burner is maladjusted Readjust The burner is dirty...
- Page 45 Open for the air. Check the stack damper. Holes in the gas nozzle blocked by dirt. Clean Fresh air intake too poor Check and make it bigger Crocked lame caused by an out Check the combustion head and of position combustion head. readjust it. Bentone BFG1...
-
Page 47: General Instructions For Gasburners
9. GENERAL INSTRUCTIONS FOR GENERAL INSTRUCTIONS FOR GASBURNERS GASBURNERS Installation Follow standards and instructions applicable to the Check that the input pressure of the gas is correct installation of gas burners Check that the dampers of the boiler are open Ensure that the electric installation is made in Check that there is water in the system accordance with existing regulations... - Page 48 SERVICE AND INSPECTION CARD Installation Boiler Name: Type: Efi ciency kW: Address: Burner Type: Efi ciency kW: Installed by: Date: Date Flue gas Ionisa- gas/h Governor Pressure Efi ciency temp tion current Fire room Chimney Measure- Before After °C µ A mbar mbar % ment...
- Page 52 Enertech AB. P.O Box 309, SE-341 26 Ljungby. www.bentone.se, www.bentone.com...
Need help?
Do you have a question about the Bentone BFG1 and is the answer not in the manual?
Questions and answers