Table of Contents
Advertisement
Available languages
Available languages
Quick Links
Please read all instructions carefully before assembly, installation and/or use of this product.
ASSEMBLY INSTRUCTIONS:
1.
Use key to unlock lock on Collar Bracket.
2.
Pull spring loaded release pin on side of Main Support tube, remove handle
mechanism, and rotate bike Support Arms into the UP position. Re-insert the handle
mechanism. Pull out the spring loaded release pin and push handle all the way
down. Let the spring loaded pin go so that it fully engages the handle mechanism.
3.
Slide the Collar Bracket onto the bike carrier Main Support tube in orientation shown
(see Diagram 1).
4.
Attach Collar Bracket to Main Support tube using one (1) ½" x 3-1/4" lg. hex bolt,
two (2) nylon flat washers, and locknut installed through the "slotted" hole in Collar
Bracket. Tighten locknut until it is snug against the flat washers.
5.
Attach Receiver piece to Collar Bracket using two (2) ½" x 3" hex bolts through the
½" diameter holes (closest to end of tube). (See Diagram 2)
Tighten Receiver piece bolts to 75 Lb.-Ft.
6.
Lock Collar Bracket to Main Support tube so bike carrier is in the upright position.
½" x 3" Hex Bolt
Locknut
(2) Places
Diagram 2
LOADING INSTRUCTIONS:
1.
Place the bike rack receiver into your receiver hitch. Fit rack as close to
vehicle as possible.
2.
Secure rack with 5/8" hitch pin and clip. (See Diagram 3)
3.
The bikes are loaded onto the rack alternating each bike, with the anti-sway
cradle being closest to the seat tube. (See Diagram 4)
4.
Secure the bikes by pulling the bungee straps over the top of the bike frame.
The anti-sway straps wrap around the seat tube prevent the bike from swaying.
5.
Check the bungee straps periodically and after stopping to insure that they are
still tight and that someone has not released them. NOTE: Insure all locks are
locked, that all pins are secured, and that all bungee straps are properly
attached prior to moving the vehicle. Failure to do so will void the warranty.
INSTRUCTIONS FOR FOLDING THE RACK:
1.
Insert the key into the lock mechanism and turn to release the lock pin.
2.
Pull support tube firmly upwards until lower pin slides to the top of its slot.
(See Diagram 5)
3.
Lower the tube slowly back until support tube rests on the stop plate.
NOTE: Do not drop or let the support tube fall freely. Make sure that your
hands and fingers are clear of the hinging area during this operation.
4.
To restore the rack to the upright position, do reverse procedure. Remove
the key from the lock and push the center of the cylinder in to engage the
lock pin. A notable click will indicate that the pin is locked.
5.
Check periodically to insure you have a solid fit between the rack and the
mounting location
Cequent Consumer Products Inc
Solon, OH 44139 USA
Cequent Help Hotline: 1-800-234-6992
Product Name:
Collar Bracket
Lock
Receiver
Piece
5/8" Pin & Clip
Diagram 3
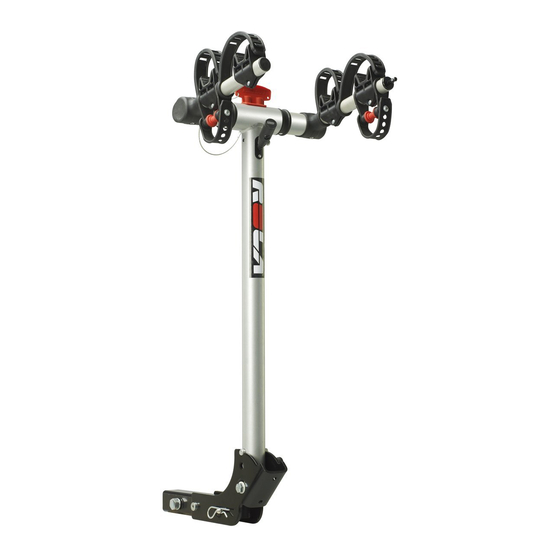
2 Place Bike Carrier - Folding
Product Code:
59400
"Slotted"
Hole
(2) Nylon Flat Washer
www.rolaproducts.com
Handle Mechanism
Drop of Oil
Release Pin
Main Support
Tube
Collar Bracket
½" x 3-1/4" Hex Bolt
Locknut
Diagram 1
Anti-Sway
Cradle
Diagram 4
Diagram 5
59400N Rev B
9-8-05
Advertisement
Table of Contents

Related Manuals for Rola 59400


Summary of Contents for Rola 59400
- Page 1 2 Place Bike Carrier - Folding Product Name: Product Code: 59400 Please read all instructions carefully before assembly, installation and/or use of this product. ASSEMBLY INSTRUCTIONS: Handle Mechanism Use key to unlock lock on Collar Bracket. Pull spring loaded release pin on side of Main Support tube, remove handle Drop of Oil mechanism, and rotate bike Support Arms into the UP position.
- Page 2 (as a result of colliding with or trying to avoid fallen bicycles and/or the rack). • ROLA™ racks are powder coated to help prevent rust. As with any metal equipment it is recommended that you keep the rack clean and remove road salt and debris.
- Page 3 Support à vélos deux places - pliant Product Name: Product Code: 59400 Veuillez lire toutes les instructions attentivement avant d'assembler, d'installer et/ou d'utiliser ce produit. INSTRUCTIONS DE MONTAGE : Mécanisme Utiliser la clé pour déverrouiller le collet. de la poignée Tirer sur la goupille de déverrouillage à...
- Page 4 Support à vélos deux places - pliant Product Name: Product Code: 59 400 Veuillez lire toutes les instructions attentivement avant d'assembler, d'installer et/ou d'utiliser ce produit. REMARQUES IMPORTANTES : • Ce support à vélos a été conçu pour transporter deux (2) vélos, en autant que le poids maximum sur le support ne dépasse pas 30 kg (66 lb).
- Page 5 Cargador para 2 bicicletas - plegable Product Name: Product Code: 59400 Por favor, lea atentamente todas las instrucciones antes de armar, instalar y/ o usar este producto. INSTRUCCIONES DE ENSAMBLE: Mecanismo de manija Use la llave para abrir el bloqueo de soporte del collar.
- Page 6 (ya sea que colisione o al tratar de evitar las bicicletas y/o la bandeja caídas). • Las bandejas ROLA™ están cubiertas con polvo para evitar la oxidación. Al igual que con cualquier equipo de metal, se recomienda que conserve la bandeja limpia y retire las sales y suciedades recogidas en la carretera.
Need help?
Do you have a question about the 59400 and is the answer not in the manual?
Questions and answers