Advertisement
RAMPS 1.4 KIT
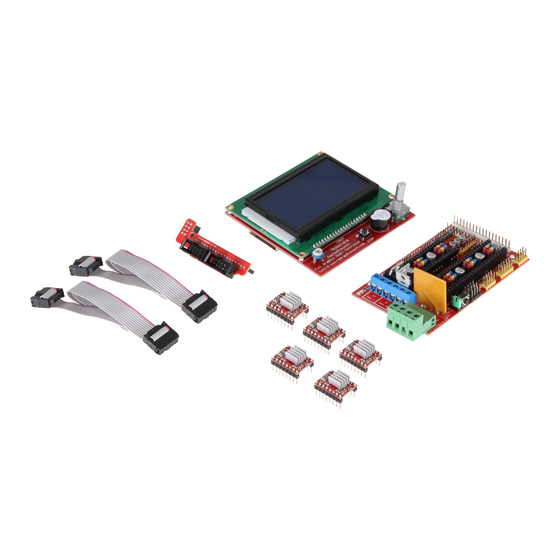
Ramps 1.4 with display & 5x A4988 motor driver
1. GENERAL INFORMATION
Dear customer,
thank you for choosing our product. In the following, we will show you how
to use your product.
Should you encounter any unexpected problems during use, please do not
hesitate to contact us.
With this set you lay the foundation for the installation of your own 3D
printer on the basis of Arduino.
Not only the required stepper motor output stages are included, but
also the board offers connections for up to 3 heating units (printing bed
heating, extruder 1, extruder 2) with each 3 possible inputs for connecting
the required temperature sensors. In addition, fans for component and
extruder cooling can also be connected.
With the fitting installed software on the Arduino Mega, it can show you the
current status or rather information like temperature on the included
LCD-display.
Advertisement
Table of Contents

Subscribe to Our Youtube Channel
Related Manuals for Joy-it RAMPS 1.4 KIT


Summary of Contents for Joy-it RAMPS 1.4 KIT
- Page 1 RAMPS 1.4 KIT Ramps 1.4 with display & 5x A4988 motor driver 1. GENERAL INFORMATION Dear customer, thank you for choosing our product. In the following, we will show you how to use your product. Should you encounter any unexpected problems during use, please do not hesitate to contact us.
-
Page 2: Schematic Drawing
2. SCHEMATIC DRAWING The following schematic drawing shows the detailed pin assignment. 3. CONNECTION TO ARDUINO MEGA First you have to connect the Arduino MEGA with the Ramps 1.4 expansion board. Plug the board on the Arduino that way that the pins on the bottomside of the boards are connected in accordance with the ports of the Arduino. - Page 3 The different jumper slots are shown in the picture above and in the schematic drawing before. The various step configuartion are displayed in the following chart. Jumper 1 Jumper 2 Jumper 3 Steps full step half step 1/4 step 1/8 step 1/16 step 1/32 step 1/128 step...
-
Page 4: Stepper Motor Driver
5. STEPPER MOTOR DRIVER After the jumpers are set, the stepper motor drivers have to be plugged into the black slots which are directly at the jumper slots. Note that the stepper motor driver are rightfully plugged in. You can gather the information from the following picture how to plug in the motor drivers accurately. -
Page 5: Power Supply And Display
7. POWER SUPPLY AND DISPLAY Additionally, the heatbed must be connected to the connector D8 and the HotEnd to the connector D10. D9 can be used for a fan or for an additional HotEnd. You can also now plug in the display into the provided slot. Lastly, the expansion board only needs power to go into operation. - Page 6 9. CONFIGURATION OF THE SOFTWARE Board selection Before the software can be transmitted to the Arduino, the used configuration must be adjusted. For the Ramps 1.4 board is the following configuration intended: #define BOARD_RAMPS_14_EFB //RAMPS 1.4(Power outputs: Hotend,Fan,Bed) #define BOARD_RAMPS_14_EEB //RAMPS 1.4(Power outputs: Hotend0,Hotend1,Bed) #define BOARD_RAMPS_14_EFF //RAMPS 1.4(Power outputs: Hotend,Fan0,Fan1)
- Page 7 Display For the application of the display must be an additional configuration performed. Search therefore in the Configuration.h file for the following section: * LCD TYPE * Enable ULTRA_LCD for a 16x2, 16x4, 20x2 or 20x4 character-based LCD. * Enable DOGLCD for a 128x64 (ST7565R) Full Graphical Display. * (These optionswill be enabled automatically for most displays.) * IMPORTANT:The U8glib library is required for Full Graphic Display! https://github.com/olikraus/U8glib_Arduino...
- Page 8 temperature sensors Even the configuartion of the temperature sensors must be adjusted in accordance with the used sensors. Note the configuration notes in the following section of the Configuration.h file: #define TEMP_SENSOR_0 1 #define TEMP_SENSOR_1 0 #define TEMP_SENSOR_2 0 #define TEMP_SENSOR_3 0 #define TEMP_SENSOR_4 0 #define TEMP_SENSOR_BED 0 Even the maximal permitted temperatures can deviate in accordance to...
- Page 9 We send you a parcel stamp with which you can send us your old appliance free of charge. For this possibility, you must contact us via e-mail at service@joy-it.net or via telephone. Information about packaging: Please package your old appliance safe during transport. Should you not have a suitable packaging material or you do not want to use your own material, you can contact us and we will send you an appropriate package.
Need help?
Do you have a question about the RAMPS 1.4 KIT and is the answer not in the manual?
Questions and answers