Table of Contents
Advertisement
Advertisement
Table of Contents

Subscribe to Our Youtube Channel
Related Manuals for Bresser Weather Center XXL JC + sensor 5in1


Summary of Contents for Bresser Weather Center XXL JC + sensor 5in1
- Page 1 Weather Station · Weather Center XXL JC + sensor 5in1 Instruction manual...
- Page 2 Entonces visite nuestra página web utilizando el siguiente enlace (código QR) para ver las versioneAs disponibles. Desidera ricevere informazioni esaustive su questo prodotto in una lingua specifica? Venga a visitare il nostro sito Web al seguente link (codice QR Code) per conoscere le versioni disponibili. www.bresser.de/P7002590 GARANTIE · WARRANTY · GARANTÍA · GARANZIA www.bresser.de/warranty_terms...
-
Page 3: Table Of Contents
Contents 1 Imprint (German) ............................ 5 2 Validity note .............................. 5 3 Features................................ 5 4 About this Instruction Manual........................ 6 5 Parts overview Base station.......................... 6 6 Parts overview Multisensor ........................... 7 7 Scope of delivery............................ 7 8 Screen display .............................. 8 9 Before starting operation.......................... 8 10 Setting up power supply.......................... 9 11 Attaching rubber pads .......................... 10 12 Assembling and installing the multifunctional remote sensor .............. 10 13 Signal transmission ............................. 11... - Page 4 35 EC Declaration of Conformity ........................ 19 36 Cleaning and maintenance .......................... 19 37 Disposal................................. 19 38 Warranty ................................ 20...
-
Page 5: Imprint (German)
Errors and technical changes excepted. © 2019 Bresser GmbH All rights reserved. The reproduction of this documentation - even in extracts - in any form (e.g. photocopy, print, etc.) as well as the use and distribution by means of electronic systems (e.g. -
Page 6: About This Instruction Manual
4 About this Instruction Manual NOTICE These operating instructions are to be considered a component of the device. Read the safety instructions and the operating manual carefully before using this device. Keep this manual in a safe place for future reference. When the device is sold or given to someone else, the instruction manual must be provided to the new owner/user of the product. -
Page 7: Parts Overview Multisensor
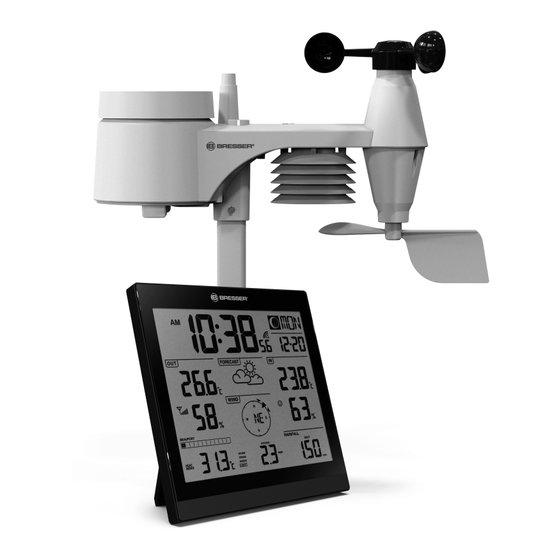
6 Parts overview Multisensor Illustration 2: All parts of the multisensor 1 Rain gauge 2 Antenna 3 Circular level 4 Wind cups (wind speed) 5 wind vane (wind direction) 6 Thermo-Hygrometer 7 Pipe clamp 8 Mounting shoe 9 Mounting bar 10 Battery compartment (cover) 11 RESET button 12 LED function indicator 13 Mounting screws with nuts... -
Page 8: Screen Display
8 Screen display Illustration 3: Screen display for the base station 1 AM/PM information in 12-hour time mode 2 Symbol for radio signal 3 Moon phase 4 Weekday 5 Date (day - month) 6 Indoor temperature 7 Clima indication 8 Indoor humidity 9 Percipitation or barometric pressure 10 Wind speed 11 Wind direction... -
Page 9: Setting Up Power Supply
3. Set up power supply for the remote sensor. 4. Position the base station and the remote sensor within the effective transmission range. 5. Ensure that the base station and remote sensor are assigned to the same channel. When changing batteries always change batteries in the main unit as well as all remote units and re- place them in the correct order, so the remote connection can be re-established. -
Page 10: Attaching Rubber Pads
11 Attaching rubber pads Attach the supplied self-adhesive rubber pads to the clamps as shown to ensure a firmer fitting of the mounting rod. 12 Assembling and installing the multifunctional remote sensor Depending on the desired location, the remote sensor can be installed in two different ways. NOTICE! During the assembly make sure that the upper part of the wind vanve is minimum 1.5 meters off the ground. -
Page 11: Signal Transmission
6. Repeat steps 1 to 4 as before. 7. Place the assembly base with its bottom site first on the tube. Push the tube bracket against the tube from the opposite site. 8. Slide 4 screws through the bore holes of the assemby base and through the bore holes of the tube bracket on the other site. -
Page 12: Receiving Measurements Automatically
17 Receiving measurements automatically Once batteries are installed, the base station will display the measurement readings. Readings from the remote sensor will be displayed within 3 minutes after powering it on. 18 Receiving measurements automatically Once power is restored, the base station will begin to display indoor readings and the first readings re- ceived from the outdoor sensor will be displayed within approximately 3 minutes of commissioning. -
Page 13: Clima Indication (Indoor)
21 Clima indication (indoor) 1 too cold 2 comfortable 3 too warm The clima indication is a pictorial indication based on indoor air temperature and humidity in an at- tempt to determine comfort level. Note: • Comfort indication can vary under the same temperature, depending on the humidity. •... -
Page 14: Moon Phases
4. Press the WIND button to confirm and exit. Note: Changing the hempisphere setting will automatically switch the direction of the moon phase on the dis- play. 24 Moon phases In the Northern hemisphere, the moon waxes from the right. Hence the sun-lit area of the moon moves from right to left in the Northern hemisphere, while in the Southern hemisphere, it moves from left to right. -
Page 15: Barometric / Atmospheric Pressure
3 Cloudy 4 Rain 5 Storm 6 Snow 26 Barometric / Atmospheric Pressure Atmospheric pressure (hereinafter referred to as "air pressure") is the pressure at any place on earth caused by the weight of the layer of air above it. Air pressure is proportional to average pressure and decreases gradually with altitude. -
Page 16: Beaufort Scale
Select display mode Press the WIND button several times until the desired rate is displayed: • AVERAGE: average of all wind speed numbers recorded in the previous 30 seconds • GUST: highest wind speed (gust) recorded from last reading The wind level provides a quick reference on the wind condition and is indicated by a series of text icons: Wind level LIGHT... -
Page 17: Wind Chill Factor
gentle breeze 12-19 km/h | 8-12 mph 7-10 knots | 3.5-5.4 m/s moderate breeze 20-28 km/h | 13-17 mph 11-16 knots | 5.5-7.9 m/s fresh breeze 29-38 km/h | 18-24 mph 17-21 knots | 8.0-10.7 m/s strong gale 39-49 km/h | 25-30 mph 22-27 knots | 10.8-13.8 m/s high wind 50-61 km/h | 31-38 mph... -
Page 18: Dew Point
31 Dew point Press the INDEX button several times until DEW POINT is displayed. Note: The dew point is the temperature below which the water vapor in air at constant barometric pressure condenses into liquid water at the same rate at which it evaporates. The condensed water is called dew when it forms on a solid surface. - Page 19 35 EC Declaration of Conformity Hereby, Bresser GmbH declares that the equipment type with item number 7002590 : is in compli- ance with Directive: 2014/30/EU. The full text of the EU declaration of conformity is available at the following internet address: www.bresser.de/download/7002590/CE/7002590_CE.pdf 36 Cleaning and maintenance •...
- Page 20 You can consult the full guarantee terms as well as information on extending the guarantee period and details of our services at www.bresser.de/warranty_terms. 20 / 24...
- Page 24 (de preferencia por e-mail: service@bresseruk.com e-mail). Telephone*: +44 1342 837 098 BRESSER UK Ltd e-mail: servicio.iberia@bresser-iberia. Suite G3, Eden House Enterprise Way Teléfono*: +34 91 67972 69 Edenbridge, Kent TN8 6HF...
Need help?
Do you have a question about the Weather Center XXL JC + sensor 5in1 and is the answer not in the manual?
Questions and answers