Table of Contents
Advertisement
Quick Links
Advertisement
Table of Contents

Subscribe to Our Youtube Channel
Related Manuals for PCE Instruments Dillon Quick-Check


Summary of Contents for PCE Instruments Dillon Quick-Check
- Page 1 PCE Deutschland GmbH Im Langel 4 D-59872 Meschede Deutschland Tel: 02903 976 99 0 Fax: 02903 976 99 29 info@pce-instruments.com www.pce-instruments.com/deutsch Quick-Check Tension Meter Zugspannungsmesser User Instructions 43079-0014 Issue AD October 2012...
- Page 2 © Avery Weigh-Tronix, LLC 2012. All rights reserved. No part of this publication may be reproduced, stored in an electronic retrieval system, or transmitted in any form or by any means, electronic, mechanical, photocopying, recording or otherwise without the prior written consent of the copyright owner, or as permitted by law or under license.
-
Page 3: Table Of Contents
Table of Contents page Chapter 1 General information and warnings ..................5 About this manual ......................5 Text conventions ......................5 Special messages ....................... 5 Safe handling of equipment with batteries ..............6 Routine maintenance ......................6 Cleaning the machine ......................6 Training .......................... -
Page 4: Chapter 1 General Information And Warnings
General information and warnings 1.1 About this manual This manual is divided into chapters by the chapter number and the large text at the top of a page. Subsections are labeled as shown by the 1 and 1.1 headings shown above. The names of the chapter and the next subsection level appear at the top of alternating pages of the manual to remind you of where you are in the manual. -
Page 5: Safe Handling Of Equipment With Batteries
1.1.3 Safe handling of equipment with batteries CAUTION: Danger of explosion if battery is incorrectly replaced. Replace only with the same or equivalent type recommended by the manufacturer. Dispose of used batteries according to the manufacturer’s instructions. ATTENTION: Il y a danger d'explosion s'il y a remplacement incorrect de la batterie, remplacer uniquement avec une batterie du même type ou d'un type équivalent recommandé... -
Page 6: Fcc And Emc Declarations Of Compliance
1.6 FCC and EMC declarations of compliance United States This equipment has been tested and found to comply with the limits for a Class A digital device, pursuant to Part 15 of the FCC Rules. These limits are designed to provide reasonable protection against harmful interference when the equipment is operated in a commercial environment. -
Page 7: Chapter 2 Introduction
Introduction This manual covers the setup and operation of the Quick-Check Clamp Line Tensiometer from Dillon. The Quick-Check is a simple, accurate strand dynamometer. It is can be clamped onto a cable, accurately determine the wire tension and be removed in seconds. The Quick-Check can handle multiple wire diameters, it can display live tension, dual live/peak tension, average tension captured from several tests, dual tension/ temperature display and a check-tensioning graphical display. -
Page 8: Front Panel And Keys
2.2 Front Panel and Keys The front panel of the Quick-Check is shown in Figure 2.2. Figure 2.2 Quick-Check front panel Following are descriptions of the keys and their functions: ON/OFF key. Press this key to power up and turn off the Quick-Check. ESC key. -
Page 9: Important Features
2.3 Important Features Quick to use Attaches and removes from tensioned line in seconds. Quick-tensioning readout for ultra fast line tensioning. Direct tension readings No more complicated lookup charts! Save time and improve accuracy. Portable & rugged Designed for outdoor use. ®... -
Page 10: Chapter 3 Operation
Operation Typical operation of the Quick-Check is covered below, followed by explanations of the various display modes, how to change wire size, how to change the unit of measure, etc. 3.1 Typical Operation To perform a typical tension measurement, see the note below and follow these steps: Take readings at three different places along the cable, moving the tension meter at least four inches for each reading. -
Page 11: Measurement Practices
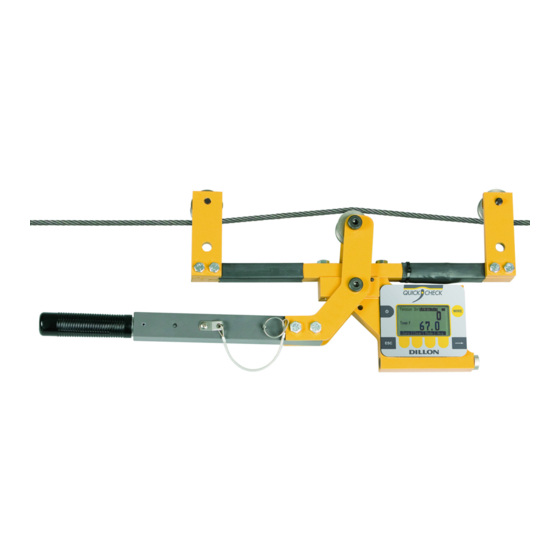
Release the lever arm and you are ready to perform another measurement. Figure 3.2 Quick-Check attached to cable 3.2 Measurement Practices For best measurement, install the Quick-Check at least 2 feet (0.6 m) from terminations, clamps or other hardware. Do not install over the top of wire wrappings. Take readings at three different places along the cable, moving the tension meter at least four inches for each reading. -
Page 12: Softkey Functions
The Quick-Check has an internal temperature sensor inside the electronics cavity. Dramatic temperature changes (such as moving from a warm vehicle to cooler outdoors) requires time for the sensor to reach the same temperature. Direct sunlight will heat the electronics cavity and cause higher readings than actual ambient temperature. - Page 13 You can enter the temperature in one of two ways; let the Quick-Check determine the ambient temperature automatically or key in a temperature manually. Instructions for entering the temperature are under the Temp softkey description on page 15. Upper and lower thresholds are set in the Configuration WIRE menu. See page 18. Check-tensioning Mode: Check-tensioning mode permits quick &...
- Page 14 Temp Press this softkey to choose the source of the temperature reading, the Quick-Check itself (Meter), outside input (Input) or None. If you choose Input, you are prompted to enter the temperature. When finished, press the Enter softkey to accept this value. Next you are prompted to choose Fahrenheit or Centigrade as the temperature unit.
- Page 15 There is a keypad shortcut for increasing and decreasing contrast. While in normal display mode press the Arrow key and the 2nd softkey simultaneously to increase contrast. Press the Arrow key and first softkey simultaneously to decrease contrast. Blite - Not currently used. About Press this softkey to see the following information: Device - Press this softkey to show a list of information about the Quick-Check;...
-
Page 16: Chapter 4 Configuration Mode
Configuration Mode 4.1 Accessing the Configuration Mode You need to access the Configuration mode to perform certain tasks. Access to some of these tasks may be restricted by a supervisor password. To access Configuration mode: From normal operating mode, press the Right Arrow softkey… A new softkey set, shown below, appears: Press the Config softkey…... - Page 17 The unit is now in the Configuration mode. To see the rest of the softkeys available in this mode, press the Right Arrow key. All the Config softkeys are shown below. The softkeys in the Configuration mode are Wire, Setup, Reso, Comm, Mode, Units, Power, ChPwd, and Reset.
- Page 18 Enable lbf - Enable or disable the pound-force unit of measure. Enable kgf - Enable or disable the kilogram-force unit of measure. Enable N - Enable or disable the N unit of measure. Enable CUST1 - Enable or disable the Cust1 unit of measure. Enable CUST2 - Enable or disable the Cust2 unit of measure.
-
Page 19: Chapter 5 Changing Sheaves
Changing Sheaves Do not use the Quick-Check with cable larger than indicated on the sheaves. Overload and damage to the instrument may result. Do not mix sheave sizes. This will result in inaccurate measurement and possible overload. As you use the Quick-Check on different diameter cables you must change to the correct sheave size. -
Page 20: Chapter 6 Achieving Best Accuracy
Achieving Best Accuracy 6.1 Accuracy The Quick-Check is an instrument designed to give accuracy that typically exceeds normal requirements for wire tensioning. You should have an understanding of what factors affect tension measurement accuracy. 6.2 Calibration to Specific Wire Type While it is best to have the instrument calibrated to the specific wire size(s) and type(s) used, the Quick-check can often work adequately in other situations. -
Page 21: Loading Error
6.3 Loading Error A tensiometer works by deflecting the cable, which makes the cable path longer than when a tensiometer is not installed. When the tensiometer is removed, the wire tension decreases as the cable length is restored. This effect is known as loading error. The Quick-Check design elongates the cable by a mere 0.08 inch (2 mm), making loading errors extremely small. -
Page 22: Chapter 7 Troubleshooting
Troubleshooting Problem Possible Cause Solution Powers on momentarily and Low battery Replace with high quality alkaline batteries turns off Does not power on Low battery Replace with high quality alkaline batteries Batteries installed Insure that positive terminals of both batteries backwards or no (nub) face inward –... -
Page 23: Chapter 8 Specifications
Specifications Power 2 AA, common alkaline batteries. Operational battery life over 40 hours at room temperature. Battery life is reduced at lower temperatures. Display Dot graphic LCD display Operational keys Power, Wire, Escape/Clear (Esc), Next ( ) and four softkeys with changing function and label, depending on the specific menu in use Operational annunciators Unit of measure, battery level... - Page 24 Available options Varied wire sizes Operating environment Suitable for outdoor use Dimensions 10˝ x 23˝ x 3˝ (25 cm x 59 cm x 8 cm) approximately Weight 11 lb (5 kg) approximately Quick-Check User Instructions...
Need help?
Do you have a question about the Dillon Quick-Check and is the answer not in the manual?
Questions and answers