Advertisement
Quick Links
Table of Contents
SECTIONS
Models:
FV11D-M - Secure 1-Port DVI-I Video Isolator
FV11H-M - Secure 1-Port HDMI Video Isolator
HSL Secure 2-Port KVM Combiner Quick Setup Guide
FV11P-M - Secure 1-Port DisplayPort Video Isolator
1
2
FI11D-M - Secure 1-Port DVI-I KVM Isolator
FI11H-M - Secure 1-Port HDMI KVM Isolator
FI11P-M - Secure 1-Port DisplayPort KVM Isolator
Secure Isolators | QUICK SETUP GUIDE
3
Secure Isolators
HDC19412 Rev. 1.0
Advertisement

Related Manuals for HighSecLabs FV11D-M


Summary of Contents for HighSecLabs FV11D-M
- Page 1 SECTIONS Secure Isolators Models: FI11D-M - Secure 1-Port DVI-I KVM Isolator FV11D-M - Secure 1-Port DVI-I Video Isolator FI11H-M - Secure 1-Port HDMI KVM Isolator FV11H-M - Secure 1-Port HDMI Video Isolator FI11P-M - Secure 1-Port DisplayPort KVM Isolator HDC19412 Rev. 1.0...
-
Page 2: Table Of Contents
Table of Contents SECTIONS TABLE OF CONTENTS Introduction HSL Secure Isolators Installation Connecting the Isolators Operation Running an EDID Capture HSL Secure 2-Port KVM Combiner Quick Setup Guide... -
Page 3: Introduction
Table of Contents SECTIONS INTRODUCTION HSL Secure Isolators The secure Isolator prevents vulnerable peripherals from mediating between compromised and secure computers by ensuring that video and audio flow in a single direction. HSL Secure 2-Port KVM Combiner Quick Setup Guide... -
Page 4: Installation
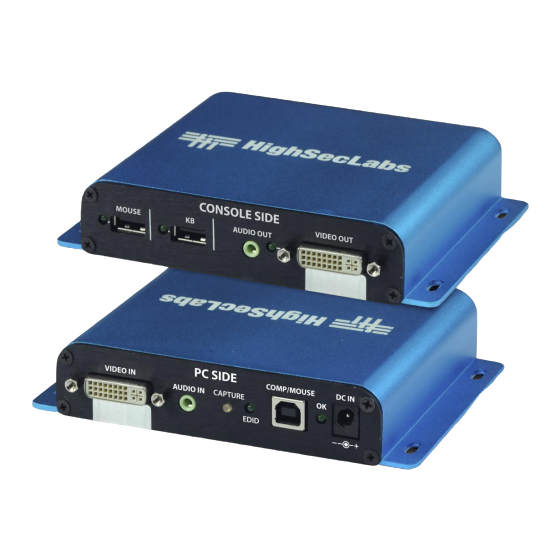
Table of Contents SECTIONS INSTALLATION Connecting the Isolator Step 1 - Connect the PC to the Isolator’s PC SIDE: Audio connection: For all models, connect the PC to the Isolator’s AUDIO IN port, using a 1/8" (3.5mm) stereo plug. Video connection: For all models, connect the PC to the Isolator’s VIDEO IN port, using the corresponding video cable (VGA/HDMI/DVI/DP). - Page 5 Table of Contents SECTIONS INSTALLATION Step 2 - Connect the peripherals to the Isolator’s CONSOLE SIDE: Audio connection: For all models, connect the speakers to the Isolator’s AUDIO OUT port. Note: If either LED remains OFF, the Isolator does not recognize the device;...
- Page 6 Table of Contents SECTIONS INSTALLATION Step 3 - Power ON the Isolator For all models, connect the power adapter to the Isolator’s PC SIDE, DC IN port. Power ON the Isolator by plugging it into an AC wall outlet. The PC SIDE Power LED should light continuously. If not, check the connections.
-
Page 7: Operation
Table of Contents SECTIONS OPERATION Running an EDID Capture Before using the Isolator, run a one-time EDID capture. This Note: An EDID capture needs to be performed for new installations and prevents the continuous transfer of potentially malicious data - when changing a display. - Page 8 Highseclabs.com ©2019 All rights reserved. HSL logo and product names are trademarks or service trademarks of HighSecLabs Ltd (HSL). All other marks are the property of their respective owners. Images for demonstration purposes only. This document may contain confidential and/or proprietary information of HSL...