Daikin VRV IV Series Installation Manual
Hide thumbs
Also See for VRV IV Series:
- Installation manual (22 pages) ,
- Installer and user manual (140 pages)
Advertisement
Table of Contents
- 1 Safety Considerations
- 2 Codes and Regulations
- 3 Table of Contents
- 4 Before Installation
- 5 Selecting Installation Site
- 6 Preparations before Installation
- 7 Branch Selector Unit Installation
- 8 Refrigerant Piping Work
- 9 Electric Wiring Work
- 10 Initial Setting
- 11 Adding an Additional Charge of Refrigerant
- 12 Check Operation and Test Operation
- Download this manual
MODELS
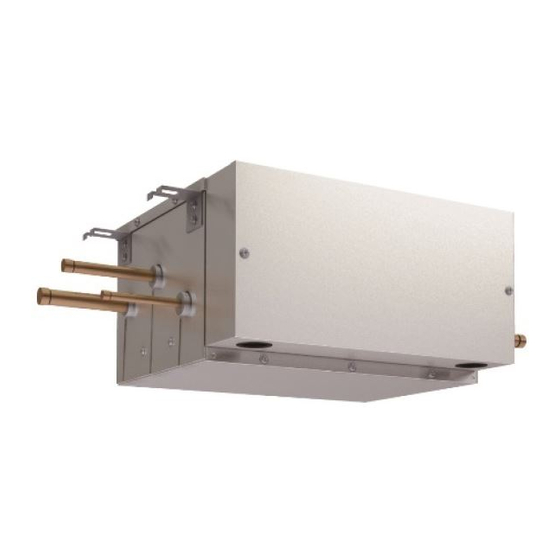
〈Branch Selector unit〉
BSQ36TVJ
BSQ60TVJ
BSQ96TVJ
READ THESE INSTRUCTIONS CAREFULLY BEFORE INSTALLATION.
KEEP THIS MANUAL IN A HANDY PLACE FOR FUTURE REFERENCE.
LIRE SOIGNEUSEMENT CES INSTRUCTIONS AVANT L'INSTALLATION.
CONSERVER CE MANUEL A PORTEE DE MAIN POUR REFERENCE ULTERIEURE.
LEA CUIDADOSAMENTE ESTAS INSTRUCCIONES ANTES DE INSTALAR.
GUARDE ESTE MANUAL EN UN LUGAR A MANO PARA LEER EN CASO DE TENER
ALGUNA DUDA.
3P405106-10
INSTALLATION MANUAL
System Air Conditioners
English
Français
Español
Advertisement
Table of Contents

Related Manuals for Daikin VRV IV Series


Summary of Contents for Daikin VRV IV Series
- Page 1 INSTALLATION MANUAL System Air Conditioners MODELS 〈Branch Selector unit〉 BSQ36TVJ BSQ60TVJ English BSQ96TVJ Français READ THESE INSTRUCTIONS CAREFULLY BEFORE INSTALLATION. KEEP THIS MANUAL IN A HANDY PLACE FOR FUTURE REFERENCE. LIRE SOIGNEUSEMENT CES INSTRUCTIONS AVANT L’INSTALLATION. Español CONSERVER CE MANUEL A PORTEE DE MAIN POUR REFERENCE ULTERIEURE. LEA CUIDADOSAMENTE ESTAS INSTRUCCIONES ANTES DE INSTALAR.
-
Page 2: Safety Considerations
• After completing the installation work, check that the re- specified by Daikin are used, fire or explosion could result. frigerant gas does not leak throughout the system. • Do not install unit in an area where flammable materials are present due to risk of explosions that will result in seri- ous injury or death. -
Page 3: Codes And Regulations
CAUTION (c) Near machinery emitting electromagnetic waves. Electromagnetic waves may disturb the operation of • Do not touch the switch with wet fingers. Touching a switch the control system and cause the unit to malfunction. with wet fingers may result in electric shock. (d) Where flammable gas may leak, where there is car- •... -
Page 4: Table Of Contents
BSQ36TVJ System Air Conditioners Installation manual BSQ60TVJ BSQ96TVJ CONTENTS Safety considerations ......................i Codes and Regulations ......................ii 1. BEFORE INSTALLATION ....................2 2. SELECTING INSTALLATION SITE .................. 3 3. PREPARATIONS BEFORE INSTALLATION ..............4 4. BRANCH SELECTOR UNIT INSTALLATION ..............4 5. -
Page 5: Before Installation
1. BEFORE INSTALLATION 1-1 Precautions • Hold the unit by the hanging brackets (4 points) when opening the box and moving it, and do not lift it hold ing on to any other part especially the refrigerant piping. • About installation of outdoor and indoor unit, refer to the installation manual provided with outdoor and indoor unit. -
Page 6: Selecting Installation Site
1-4 Checklist Exercise particular care concerning the following items during installation work and check again after instal lation is complete: Post-installation checklist Checklist If defective Check here. Has the Branch Selector unit been installed securely? The unit may fall, vibrate, or operate noisily. Did you conduct a gas leak inspection? The unit may fail to heat or cool as designed. -
Page 7: Preparations Before Installation
CAUTION To prevent video and audio interference, install the Branch Selector unit as well as associated power wiring and signal transmission lines at least 40 in. (1 m) away from TVs and radios. However, depending on the reception, interference may result even if a minimum distance of 40 in. (1 m) is main tained. -
Page 8: Refrigerant Piping Work
NOTE • The Branch Selector unit has a top and a bottom, so install it so that the diagonal lines in the Fig. 4 are where the top is. (Failing to do so may prevent the unit from operating properly and increase the volume of the operating noise.) 3), 7) [Before change 5)-1]... - Page 9 • When brazing refrigerant piping, begin working after replacing the nitrogen (*1) or perform brazing while nitrogen is flowing in the refrigerant piping (*2) (refer to Fig. 5). (*1) For details on nitrogen replacement, see the “VRV Installation Manual” (available at any Daikin dealer).
- Page 10 Example of connection 1: When 1 indoor unit is connected downstream from the Branch Selector unit Determine using Table 3 based Select from Table 4 depending on the total capacity of the indoor on the capacity type of the units connected downstream. indoor unit.
- Page 11 5-5 Piping connection Follow the connection example below and connect the site piping. BSQ36TVJ type When the downstream indoor unit total capacity is 36 or less and when one indoor unit with a capacity of 24 to 36 is connected downstream. Branch Suction gas pipe (Site piping) Gas pipe (Site piping)
- Page 12 When one indoor unit with a capacity of 72 is connected downstream Accessory pipe 1)-2 Suction gas pipe (Site piping) Branch Gas pipe (Site piping) Selector High/low pressure gas pipe (Site piping) Liquid pipe (Site piping) unit Liquid pipe (Site piping) (Top) 5-6 Piping insulation • After the gas leak inspection is completed, refer to the following figures and use the included insulation...
-
Page 13: Electric Wiring Work
6. ELECTRIC WIRING WORK 6-1 General instructions • All wiring must be performed by an authorized electrician. • All field supplied parts and materials, electric works must conform to local codes. • Always ground wires. (In accordance with national regulations of the pertinent country.) • Always turn off the power before performing the electric wire installation work. - Page 14 Table 6 Units Power supply Voltage range Model Type Voltage Min. Max. BSQ36TVJ BSQ60TVJ 208/230 BSQ96TVJ MCA: Minimum Circuit Ampacity (A); MOP: Maximum Overcurrent Protective Device (A) NOTE • Table 6 of electrical characteristics refers to one Branch Selector unit. • See the Engineering Data Book for other details.
- Page 15 6-5 Wiring connections Remove the control box cover on the side and follow the directions to connect the wires. 〈Transmission wiring〉 Remove the control box cover and connect the wires to “TO IN/D UNIT (F1, F2)” and “TO OUT/D UNIT (F1, F2)”...
-
Page 16: Initial Setting
NOTE • Use ring-type crimp style terminal for connections to Insulation sleeve Ring-type crimp the power terminal block. (Refer to Fig. 6.) Electric wire style terminal Also, insulate the crimped area by attaching an insula tion sleeve, etc. • Use an appropriate screwdriver for tightening the ter minal screw. -
Page 17: Adding An Additional Charge Of Refrigerant
2. Setting when changing the “Automatic mode differential” in the Cooling/Heating Automatic Oper ation Mode. 〈Setting description〉 • The “Automatic mode differential” can be changed within the range of 0°F (0°C) to 12.6°F (7°C) (0°F (0°C) at factory shipment). • For details regarding the “Automatic mode differential” and indoor unit operation, refer to the Engineering Data Book. - Page 18 5151 San Felipe, Suite 500 Houston, TX 77056 EM14A004A 3P405106-10 [1506] HT...
Need help?
Do you have a question about the VRV IV Series and is the answer not in the manual?
Questions and answers