Daikin VRV IV Series Installation Manual
System air conditioners
Hide thumbs
Also See for VRV IV Series:
- Installation manual (18 pages) ,
- Installer and user manual (140 pages)
Table of Contents
Advertisement
MODELS
〈Branch Selector unit〉
BS4Q54TVJ
BS10Q54TVJ
BS6Q54TVJ
BS12Q54TVJ
BS8Q54TVJ
READ THESE INSTRUCTIONS CAREFULLY BEFORE INSTALLATION.
KEEP THIS MANUAL IN A HANDY PLACE FOR FUTURE REFERENCE.
LIRE SOIGNEUSEMENT CES INSTRUCTIONS AVANT L'INSTALLATION.
CONSERVER CE MANUEL A PORTEE DE MAIN POUR REFERENCE ULTERIEURE.
LEA CUIDADOSAMENTE ESTAS INSTRUCCIONES ANTES DE INSTALAR.
GUARDE ESTE MANUAL EN UN LUGAR A MANO PARA LEER EN CASO DE TENER
ALGUNA DUDA.
3P405106-9
INSTALLATION MANUAL
System Air Conditioners
English
Français
Español
Advertisement
Table of Contents

Subscribe to Our Youtube Channel
Related Manuals for Daikin VRV IV Series


Summary of Contents for Daikin VRV IV Series
-
Page 1: Installation Manual
INSTALLATION MANUAL System Air Conditioners MODELS 〈Branch Selector unit〉 BS4Q54TVJ BS10Q54TVJ BS6Q54TVJ BS12Q54TVJ English BS8Q54TVJ Français READ THESE INSTRUCTIONS CAREFULLY BEFORE INSTALLATION. KEEP THIS MANUAL IN A HANDY PLACE FOR FUTURE REFERENCE. LIRE SOIGNEUSEMENT CES INSTRUCTIONS AVANT L’INSTALLATION. Español CONSERVER CE MANUEL A PORTEE DE MAIN POUR REFERENCE ULTERIEURE. LEA CUIDADOSAMENTE ESTAS INSTRUCCIONES ANTES DE INSTALAR. -
Page 2: Safety Considerations
• After completing the installation work, check that the re- specified by Daikin are used, fire or explosion could result. frigerant gas does not leak throughout the system. • Do not install unit in an area where flammable materials are present due to risk of explosions that will result in seri- ous injury or death. -
Page 3: Codes And Regulations
CAUTION Electromagnetic waves may disturb the operation of the control system and cause the unit to malfunction. • Do not touch the switch with wet fingers. Touching a switch (d) Where flammable gas may leak, where there is car- with wet fingers may result in electric shock. bon fiber, or ignitable dust suspension in the air, or •... -
Page 4: Table Of Contents
BS4Q54TVJ BS10Q54TVJ System Air Conditioners Installation manual BS6Q54TVJ BS12Q54TVJ BS8Q54TVJ CONTENTS Safety considerations ......................i Codes and Regulations ......................ii 1. BEFORE INSTALLATION ....................2 2. SELECTING INSTALLATION SITE .................4 3. PREPARATIONS BEFORE INSTALLATION ..............5 4. BRANCH SELECTOR UNIT INSTALLATION ..............5 5. REFRIGERANT PIPING WORK ..................6 6. -
Page 5: Before Installation
1. BEFORE INSTALLATION 1-1 Precautions • Be sure to verify in advance that the refrigerant used in installation work is R410A. The unit will not operate correctly with a different type of refrigerant. • When moving the unit during or after unpacking, hold it using the 4 hanging brackets and avoid subjecting other parts, particularly refrigerant pipes and the control box, to force. - Page 6 1-3 Combination • This Branch Selector unit is only for systems for models REYQ-T and PC series. It cannot be connected to systems for models REYQ-M, P, PA and PB series. • For series of applicable indoor units, refer to the catalog or other literature. •...
-
Page 7: Selecting Installation Site
2. SELECTING INSTALLATION SITE Consider the following requirements when choosing the installation location and obtain the cus- tomer’s consent: • The location must be able to withstand the weight of the Branch Selector unit. • The location must allow inspection holes to be installed on the control box side. (A separate opening is necessary when lowering the product.) •... -
Page 8: Preparations Before Installation
3. PREPARATIONS BEFORE INSTALLATION Install suspension bolts and hanging brackets as illustrated in the diagram below. • Use a suspension bolt size of 3/8 in.(M8) to 7/16 in.(M10). • Use mold-in inserts and embedded foundation bolts for new installations or hole-in anchor bolts or similar hardware for existing installations, taking care to install in a manner that can withstand the unit’s weight. -
Page 9: Refrigerant Piping Work
5. REFRIGERANT PIPING WORK • For instructions for installing piping between the outdoor unit and the Branch Selector unit, selecting a refrigerant branch kit, and installing piping between the refrigerant branch kit and indoor units, refer to the installation manual and included with the outdoor unit. •... - Page 10 Table 3 Total indoor unit capacity and pipe size Pipe size (Outside diameter) Upstream Downstream Total indoor unit capacity Suction High/low pressure Liquid Gas pipe Liquid pipe f5/8 f15.9 f1/2 f12.7 f5/8 f15.9 x < 54 f3/4 f19.1 f5/8 f15.9 f3/8 f9.5 f3/4...
- Page 11 NOTES • If the number of indoor units to be connected is less than the number of branch ports (so that there are empty branch ports left, or if you plan to increase the number in the future), any of the branch ports can be left open.
-
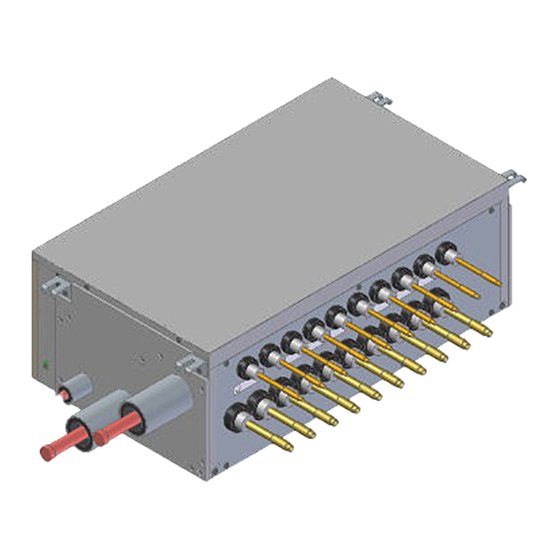
Page 12: Piping Connection
5-3 Piping connection Notes In case of connecting with a 07-18 type indoor unit, there is no need to cut and connect as it is. In case of others, cut the outlet pipe and Liquid pipe (*1) connect to the connecting pipe. Branch Selector unit (top) In accordance with the following instructions. -
Page 13: Piping Insulation
5-5 Piping insulation • After the gas leak inspection is completed, refer to the following figures and use the included insulation tube (2) and clamps (1) to apply the insulation. Liquid pipe Branch Selector unit Suction gas pipe High/low pressure gas pipe Gas pipe Liquid pipe... -
Page 14: Electric Wiring Work
Stopper pipes (accessory(4)) (4)-1 Liquid pipe 3) Use the clamps 3) Use the clamps (4)-2 Gas pipes (accessory(1)) to hold both (accessory(1)) to ends. hold both ends. 1) Attach the insulation tube for stopper pipes. 1) Attach the (accessory(5)) Product Product insulation material. - Page 15 6-2 Example for the whole system Power supply Outdoor unit Circuit protection Power supply wiring safety devices in Main Power supply accordance with local switch Transmission wiring and national codes Main switch BS4Q unit Indoor unit Remote controller BS4Q unit Indoor unit Cooling-dedicated indoor unit...
-
Page 16: Wiring Example
6-4 Wiring example WARNING Install circuit protection safety devices in accordance with local and national codes. Failure to install circuit protection safety devices in accordance with local and national codes may result in electric shock or fire. • Here is shown a wiring example for transmission wiring. •... - Page 17 CAUTION • Use 2-core transmission wiring. Using the same wire with 3 or more cores to connect 2 or more indoor units may cause them to stop with an error. • When the shield wire is used, be sure to ground the one side of the shield wire. The total wiring length is 4,920 ft.
-
Page 18: Wiring Connections
6-5 Wiring connections (Remove the control box cover and connect the wiring as shown in the figure below.) Power supply terminal block Turn slightly so that the area near the terminal Turn so that the terminal is is not subject to tensile not subject to tensile force. - Page 19 • Power supply wiring and ground wires Remove the control box cover and connect the power supply wiring to the power terminal block (X1M). Also connect the ground wire to the ground wire terminal. Pass both the power supply wires and the ground wire together through the wire through hole (left) into the control box and use the included clamps (1) Cup washer to securely hold the wires in place.
-
Page 20: Initial Setting
7. INITIAL SETTING 7-1 Settings in the field Follow the instructions below to set the DIP switches as necessary. WARNING Electric shock hazard! Before performing work, be sure to disconnect any power source con- nected to the unit. Procedure 1. Disconnect the power source. 2. -
Page 21: Adding An Additional Charge Of Refrigerant
2. Setting when joining branch ports Setting when joining branch ports Setting (Example 2) ON (Joined) DIP switch setting OFF (Factory default) (Example 2) (A1P) (A2P) (A3P) DIP switch No. When joining the A and B branches BS4Q54TVJ BS6Q54TVJ DS2 (A1P) BS8Q54TVJ BS10Q54TVJ OFF 1... - Page 22 5151 San Felipe, Suite 500 Houston, TX 77056 3P405106-9 EM14A003A [1506] HT...
Need help?
Do you have a question about the VRV IV Series and is the answer not in the manual?
Questions and answers