Advertisement
Quick Links
www.hadco.com
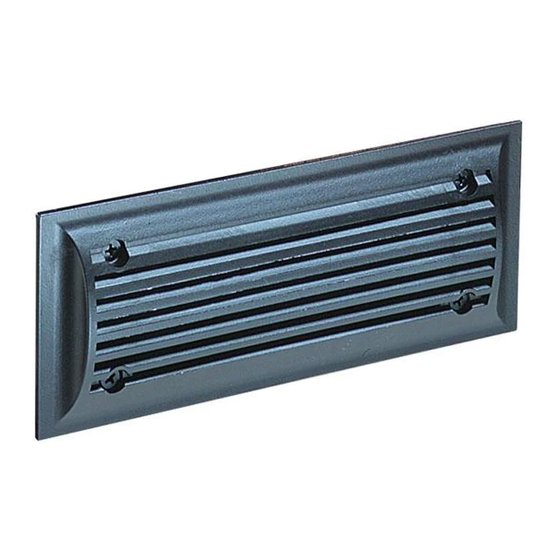
HOUSING
TRAY SCREW
FACE PLATE
READ THESE INSTRUCTIONS CAREFULLY BEFORE INSTALLING THIS FIXTURE.
This system is intended for installation in accordance with the National Electrical Code and local code
specifications.Failure to adhere to these codes and instructions may result in serious injury and/or damage to the
fixture, and will void HADCO's warranty. These instructions cover most installation applications. For any special
applications not covered, please contact HADCO for assistance.
GFI PROTECTION! Fixtures which may come in contact with or be exposed to moisture (i.e. outdoors) shall be
installed on a GFI (Ground Fault Interruptor) protected circuit.
Make sure power is off before installing or servicing this fixture.
Remove face plate by loosening 4 philips screws on front of louver.
Remove electrical tray by loosening one philips screw.
Install housing per instructions on following page, according to specific mounting application: New stud wall,
Existing stud wall, Masonry wall, or concrete pour installation.
For interior or exterior, new or existing walls of plasterboard or wood, a thermal protector is required and insulation
is to be a minimum of 6 inches away from sides of housing. Install thermal protector by removing 1 inch snap-in plug
and pushing protector through hole from inside housing.
Thermal protection is not required for masonry or concrete pour installations. Thermal protection is also not
required for fluorescent lampings since the Recessed Bricklyte ballast is class P and contains thermal protection.
Re-assemble fixture.
Turn power ON.
This fixture is intended for installation in accordance with the National Electrical Code and local code
specifications. Failure to adhere to these codes and instructions may result in serious injury and/or damage
to the ballast and void the warranty. These instructions do not purport to cover all details or variations in
equipment, nor to provide for every possible contingency related to installation, operation, maintenance,
or mounting situation. Should specific problems occur that are not addressed by these instructions, contact
your Sales Representative or distributor for assistance. Retain these instructions for future reference.
Signify North America Corporation
200 Franklin Square Drive
Somerset, NJ 08873, USA
Phone: 855-486-2216
32000896, revision E
INSTALLATION INSTRUCTIONS:
ELECTRICAL TRAY
Signify Canada Ldt./ Signify Canada Ltée
281 Hillmount Road
Markham ON, Canada L6C 2S3
Phone: 800-668-9008
CB100 BRICKLYTE
MOUNTING
SCREW
6"
6"
REMOVE LAMP
(IF SUPPLIED)
TO REMOVE
MOUNTING SCREW
THERMAL PROTECTOR
MOUNTED FROM
INSIDE HOUSING
page 1 of 3
Advertisement

Subscribe to Our Youtube Channel
Related Manuals for SIGNIFY HADCO CB100


Summary of Contents for SIGNIFY HADCO CB100
- Page 1 Should specific problems occur that are not addressed by these instructions, contact your Sales Representative or distributor for assistance. Retain these instructions for future reference. page 1 of 3 Signify North America Corporation Signify Canada Ldt./ Signify Canada Ltée 200 Franklin Square Drive 281 Hillmount Road Somerset, NJ 08873, USA...
- Page 2 CROSS BRACKET TAB CROSS BRACKETS INSTALLATION FOR NEW STUD WALL (NAILS SUPPLIED (USE ACCESSORY KET #MAKNS) BY CUSTOMER) L-BRACKETS (4) WALL BOARD THICKNESS Using the template supplied, cut a level hole through + 1/8 INCH the wall board to fit around the fixture housing. Failure to level the hole will cause the fixture to have a tilted STUD appearance.
- Page 3 INSTALLATION FOR CONCRETE POUR NOTE: LEVEL TEMPLATE BEFORE (HARDWARE INCLUDED WITH FIXTURE) DRILLING OR CUTTING Level supplied template on wood support frame and drill four 3/16" diameter clearance holes. Failure to level will 2" cause fixture to have a tilted appearance. Remove the 1/2"...
Need help?
Do you have a question about the HADCO CB100 and is the answer not in the manual?
Questions and answers