Vimar Elvox 13F5 Installer's Manual
Electronic unit 13f3 (audio) / 13f5 (video) for audio and video door entry systems
Hide thumbs
Also See for Elvox 13F5:
- Programming manual (30 pages) ,
- Instruction sheets (28 pages) ,
- Instruction sheet (20 pages)
Table of Contents
Advertisement
Available languages
Available languages
Quick Links
1
2
3
4
1
START
PREC.
SI / YES
PREV
5
2
STOP
SUCC.
NO
NEXT
6
3
FINE
OK
END
Unità elettronica 13F3 (audio) / 13F5 (video) per targhe audio e videocitofoniche
Electronic unit 13F3 (audio) / 13F5 (video) for audio and video door entry systems
Manuale installatore
Installer guide
1
2
3
4
1
START
PREC.
SI / YES
PREV
5
2
STOP
SUCC.
NO
NEXT
6
3
FINE
OK
END
13F3 - 13F5
Advertisement
Table of Contents

Related Manuals for Vimar Elvox 13F5


Summary of Contents for Vimar Elvox 13F5
- Page 1 Manuale installatore Installer guide START PREC. START PREC. SI / YES PREV SI / YES PREV STOP SUCC. STOP SUCC. NEXT NEXT FINE FINE 13F3 - 13F5 Unità elettronica 13F3 (audio) / 13F5 (video) per targhe audio e videocitofoniche Electronic unit 13F3 (audio) / 13F5 (video) for audio and video door entry systems...
-
Page 2: Table Of Contents
Indice Contents • Regole d’installazione ..............2 • Installation rules ................2 Direttive ..................2 Directives ..................2 • Descrizione ..................3 • Description ..................3 • Caratteristiche tecniche ..............3 • Technical specifications ..............3 Unità elettronica con telecamera ............. 3 Electronic unit with camera ............. -
Page 3: Descrizione
Descrizione Description Le unità elettroniche 13F3 (audio) e 13F5 (video) sono impiegabili esclusi- Electronic units 13F3 (audio) and 13F5 (video) may only be used in systems vamente su impianti con tecnologia Due Fili Plus. with Plus Due Fili technology. Le unità elettroniche sono dotate di tasti di chiamata ai posti interni di tipo The electronic units have traditional internal unit call buttons, and the video tradizionale e nella versione video, di TLC con gruppo illuminatore a LED. -
Page 4: Morsettiera
Terminal block Morsettiera CN1) Connettore per unità elettronica. CN1) Connector for electronic unit. CN2) Connector for programmer art. 950C or inter- CN2) Connettore per programmatore art. 950C o interfac- face art. 692I/U or art. 692I. cia art. 692I/U o art. 692I. Bus (cable riser). Bus (montante). Bus (cable riser). Bus (montante). EXT+) External power supply (+ art. 6923). -
Page 5: Attribuzione Del Codice Identificativo Id
Posizionamento ponticelli Jumper positions inserito condizione Master, ID = 1 activated Master condition, ID = 1 non inserito condizione Slave (ID da configurare) not activated Slave condition (ID to be configured) inserito funzionamento come art. 89F3 -89F5 (3/6 tasti) activated operation as art. 89F3 -89F5 (3/6 buttons) funzionamento come art. 13F3 - 12F3 - 13F5 - operation as art. 13F3 - 12F3 - 13F5 - 12F5 non inserito not activated 12F5 (4/8 tasti) (4/8 buttons) configurazione come unità... -
Page 6: Configurazione Dei Parametri
Procedura di assegnazione automatica identificativo ID secondario Automatic secondary ID assignment procedure for indoor stations posti interni 7) Proceed as indicated in steps 1 and 2 (page 5). 7) Procedere come indicato nei punti 1 e 2 (pag.5) 8) Within about 5 minutes, the system should begin the procedure for pro- 8) Entro 5 minuti circa deve essere iniziata la procedura di programmazio- gramming the secondary ID number of the indoor unit (the procedure for ne ID secondario del posto interno (per la procedura di programmazione... -
Page 7: Parametri
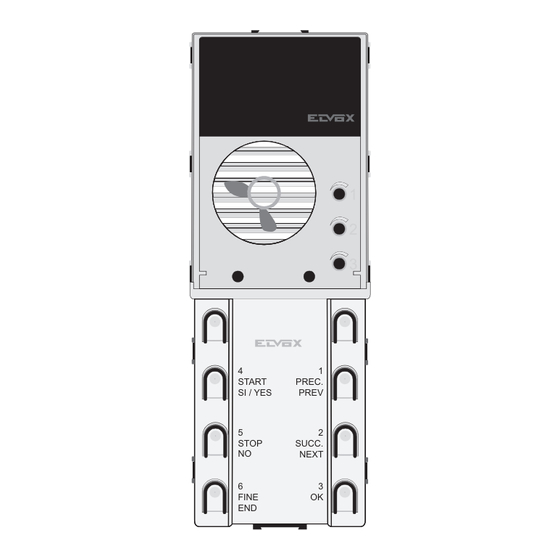
fig.5 START PREC. SI / YES PREV STOP SUCC. NEXT FINE Parameters Parametri The standard configuration can be changed using the buttons on the La configurazione standard è modificabile con i tasti presenti nell’unità elet- electronic unit (standard configuration) or the programmable time switch tronica (configurazione “base”) o con il programmatore art. 950C o con l’in- art. 950C or the interface art. 692I/U connected to a PC on which the Sa- terfaccia art. 692I/U collegata ad un PC con installato il Software SaveProg veProg or EVCom software has been installed (for the advanced configu-... -
Page 8: Procedura Di Configurazione Dei Parametri Dell'unita' Elettronica Attraverso La Tastiera Italiano
- RESET EEPROM Riporta i valori dei parametri a default. SEQUENZA LED spento Da modifica parametro, i led di segnalazione ATTENDERE-OCCUPATO inizieranno DL1 DL2 DL1 DL2 DL1 DL2 DL1 DL2 DL1 DL2 DL1 DL2 LED acceso a lampeggiare per 8 volte e la targa emetterà un tono alto e continuo. Durante il lam- peggio premere in sequenza i tasti PREC.,OK, STOP per avviare la cancellazione SUCC. NEXT DL1 DL2... - Page 9 DL1 DL2 DL1 DL2 DL1 DL2 DL1 DL2 DL3 DL4 DL3 DL4 DL3 DL4 DL3 DL4 - RIPETIZIONE SUONERIA IN TARGA DL5 DL6 DL5 DL6 DL5 DL6 DL5 DL6 Abilita l’unità elettronica all’emissione di un suono da parte dell’unità elettronica da cui si sta eseguendo la chiamata (feedback di invio). Valore di default = abilitata PREC PREV SUCC. NEXT...
-
Page 10: Procedura Di Configurazione Dei Parametri Dell'unita' Elettronica Attraverso La Tastiera Inglese
- EEPROM RESET Lists the default parameter values. SEQUENCE LED spento In parameter modification mode, the WAIT-BUSY indicator LEDs will start to flash 8 DL1 DL2 DL1 DL2 DL1 DL2 DL1 DL2 DL1 DL2 DL1 DL2 times and the entrance panel will emit a continuous high tone. During flashing, press LED acceso the PREV., OK and STOP buttons in sequence to start deletion of the EEPROM. SUCC. NEXT DL1 DL2 DL1 DL2... - Page 11 DL1 DL2 DL1 DL2 DL1 DL2 DL1 DL2 DL3 DL4 DL3 DL4 DL3 DL4 DL3 DL4 - ENTRANCE PANEL CHIME REPETITION DL5 DL6 DL5 DL6 DL5 DL6 DL5 DL6 Enables the electronic unit for the emission of a sound on behalf of the PREC PREV electronic unit from which the call is being made (send feedback).
-
Page 12: Schemi Di Collegamento
Schema di collegamento unità elettronica singola audio o video / Wiring diagram for single audio or video electronic unit (SI692) Montante Cable riser C Unità elettronica audio o video / Audio or video electronic unit F - Alimentatore di sistema / System power supply unit L - Serratura elettrica 12 Vdc / Electric lock 12 Vdc P - Comando apriporta / Door release control X - Cavo twistato / Twisted cable RETE MAINS EXT+ EXT- VLED +12V Schema di collegamento di più unità elettroniche audio /Wiring diagram for several audio electronic units (SI693) Montante Cable riser C -... - Page 13 Schema di collegamento di più targhe video o più targhe video e targhe audio / Wiring diagram for several video entrance pa- nels or several video entrance panels and audio entrance panels (SI685) Montante Montante C - Unità elettroniche video / Video electronic units Cable riser Cable riser MONTANTE MONTANTE F -...
- Page 14 Variante / Version (SI659) Unità elettronica con moduli pulsanti supplementari 12TS o 12TD (fino a 40 pulsanti aggiuntivi) / Electronic unit with additional button modules 12TS or 12TD (up to 40 additional buttons) fino a 5 moduli 12TS o 12TD up to 5 12TS or 12TD modules Montante / Cable riser EXT+ EXT- VLED EXT+ EXT- VLED +12V +12V Fare collegamento 12TS - 12TD Perform wiring 12TS...
- Page 15 Variante / Version (SI695) Collegamento per segnalazione Porta/Cancello aperto / Wiring for Door/Gate open indication. Montante Cable riser EXT+ EXT- VLED P2 - Sensore porta aperta (N.A. a porta chiusa) / Door open sensor (N.O. with door closed) +12V Variante/ Version (SI659) Unità elettronica a tasti e modulo con cartello numero civico retroilluminato / Electronic unit with buttons and module with backlit house number plate. Montante Cable riser EXT+ EXT- VLED +12V Circuito di illuminazione numero civico. Utilizzare solo circuito fornita nella confezione. Backlit house number plate li- ghting circuit Only use the lighting Collegamento supplied...
- Page 16 Vimar SpA: Viale Vicenza, 14 36063 Marostica VI - Italy Tel. +39 0424 488 600 - Fax (Italia) 0424 488 188 49400631A0.MIITEN 03 16 02 Fax (Export) 0424 488 709 VIMAR - Marostica - Italy www.vimar.com...
Need help?
Do you have a question about the Elvox 13F5 and is the answer not in the manual?
Questions and answers