Advertisement
Quick Links
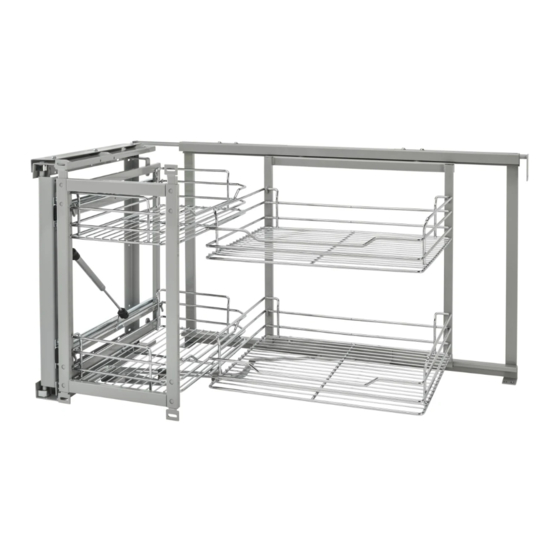
15/5707-18
orner Kit(Soft closing function)
FITTINGS CHECK LIST
FITTING PARTS LIST:
Description
on
QTY
Plastic cover
1
e
1
Screw
2
1
Screw
3
1
4
Screw
2
5
2
Screw
er
6
Gas Spring
1
7
Screw
1
8
Bracket
1
2
et
9
Bracket
Stopper
10
et
2
racket
1
Item No. 5707-15/5707-18
5
K
One Action Corner Kit(Soft closing function)
PANEL PARTS LIST:
PANELS CHECK LIST
Description
Item No. 5707-15/5707-18
One Action Corner Kit(Soft closing function)
A
Inside Frame
PANELS CHECK LIST
FITTINGS CHECK LIST
B
Swivel Frame
Description
QTY
Outside frame
C
1
A
Inside Frame
1
B
Swivel Frame
D
1
2
Up Bracket
3
Outside frame
1
C
Down Bracket
E
4
D
Up Bracket
2
8
Bottom holder
F
Down Bracket
2
5
E
Bottom holder
6
F
1
Connecter
G
7
Connecter
1
G
Support
H
8
Support
H
1
Large Basket
I
Large Basket
2
9
I
Small Basket
2
10
J
Small Basket
J
Adjustable Bracket
K
1
F
Adjustable Bracket
K
7
2
5
2
pre-installed
8
Bottom & Flank dimension
6
Item No. 5707-15/5707-18
One Action Corner Kit(Soft closing function)
(800) 626-1126
www.rev-a-shelf.com
A
B
TOOLS REQUIRED:
C
D
E
F
G
H
I
J
K
QTY
1
2
2
I
2
30
1
4
1
1
J
1
Door dimension
FITTINGS CHECK LIST
Description
QTY
Plastic cover
1
1
Screw
2
1
Description
QTY
Screw
3
1
1
Plastic cover
3
4
Screw
2
Screw
2
Screw
2
5
2
Screw
I
2
Screw
G
6
Gas Spring
1
Screw
30
Gas Spring
7
1
1
Screw
Screw
4
8
Bracket
1
Bracket
1
2
9
Bracket
Bracket
1
Stopper
J
1
Stopper
10
2
1
K
2. Screw the
5
K
1
align side edges.
3
G
FITTINGS CHECK LIST
PANELS CHECK LIST
Description
Description
QTY
1
Plastic cover
Inside Frame
1
Screw
2
Swivel Frame
1
ESTIMATED ASSEMBLY
Screw
3
Outside frame
1
TIME:
4
Up Bracket
Screw
2
60 MIN
Down Bracket
5
Screw
2
Bottom holder
6
1
Gas Spring
7
Screw
Connecter
1
8
Support
Bracket
1
Large Basket
2
9
Bracket
Stopper
Small Basket
2
10
Adjustable Bracket
1
5
2
8
6
7
9
*pre-installed
D
E
Bottom & Flank dimension
QTY
1
2
2
I
2
10
30
1
4
1
C
1
1
H
D
E
Unit: mm
B
with the
K
, make sure to
10
1. According to the Flank dimension,
screw
3
Tighten the pre-installed screw .
INSTALLATION
INSTRUCTIONS
5707 Blind Corner Organizer with Soft Close
QTY
1
2
CARE AND MAINTENANCE:
2
I
2
CLEAN WITH A DAMP CLOTH
30
AND WIPE PARTS DRY.
1
4
1
1
J
1
D
K
3
G
F
C
1
Open angle dimension
B
J
Open angle dimension
E
D
4
A
and
K
on the flank-board.
10
C
E
10
H
A
B
4
1. According to the Flank
screw
A
and
K
Tighten the pre-installe
20140212-01
A
C
3
Unit: mm
H
B
. Align the
F
3.Screw
on
with
by holes then
B
screw it.
Open angle
B
I-5707-0714-TRI
Op
on the f
B
Advertisement

Related Manuals for Rev-A-Shelf 5707


Summary of Contents for Rev-A-Shelf 5707
- Page 1 INSTALLATION INSTRUCTIONS Item No. 5707-15/5707-18 One Action Corner Kit(Soft closing function) (800) 626-1126 5707 Blind Corner Organizer with Soft Close FITTINGS CHECK LIST PANELS CHECK LIST www.rev-a-shelf.com Description Description Plastic cover Inside Frame Screw Swivel Frame TOOLS REQUIRED: ESTIMATED ASSEMBLY...
- Page 2 Screw Screw Outside frame Outside frame Up Bracket Up Bracket Screw Screw Down Bracket Down Bracket Screw Screw Bottom holder Bottom holder Gas Spring Gas Spring Screw Screw Connecter Connecter OPEN 13-1/2” (341.92mm) 39” (990mm) - 48” (1219.2mm) Support Support Bracket Bracket ANGLE DIMENSION...
- Page 3 According to the Flank dimension, screw A and K on the Screw the B with the K, make sure to flank-board. Tighten the pre-installed screw. allign side edges. After adjusting, lock 4 sides screw tightly. Screw H on B. Align the F with B Place the D and E to C.
-
Page 4: Right Side
Place the door brace into the frame then adjust the door angle and screw it. Front and back hole connect: Connecting point is different Place the plastic cover 1 Connect A and G. as well as the side distance. into G first, then tighten to H with 3. - Page 5 Instrucciones de instalación Les instructions d’installation Item No. 5707-15/5707-18 One Action Corner Kit(Soft closing function) Modelo 5707 Organizador de esquina ciega con cierre suave (800) 626-1126 FITTINGS CHECK LIST PANELS CHECK LIST www.rev-a-shelf.com Description Description Système de Rangement pour Coin Mort avec Fermeture en Douceur...
- Page 6 Screw Screw Outside frame Outside frame Up Bracket Up Bracket Screw Screw Down Bracket Down Bracket Screw Screw Bottom holder Bottom holder Gas Spring Gas Spring Screw Screw Connecter Connecter Dimensión de la 13-1/2” (341.92mm) 39” (990mm) - 48” (1219.2mm) Support Support Bracket...
- Page 7 2) Atornille B con K, asegurándose de alinear las orillas de las esquinas. 1) De acuerdo con la dimensión lateral, atornille A con K en la parte lateral de la tabla. Apriete el tornillo pre instalado. Vissez le B avec le K, veillez à aligner les bords latéraux. Selon la dimension de flanc, vissez A et K sur la planche du flanc.
- Page 8 5) Coloque el soporte de la puerta dentro del marco y luego ajuste el ángulo de la puerta y atorníllelo. Placez le renfort de porte dans le cadre puis ajustez l’angle de la porte et le visser. Coloque la cubierta plástica 1 dentro de G primero, luego El orificio frontal y trasero se apriete a G con F...
Need help?
Do you have a question about the 5707 and is the answer not in the manual?
Questions and answers