Table of Contents
Advertisement
Quick Links
Advertisement
Table of Contents

Related Manuals for Uwatec Aladin A1


Summary of Contents for Uwatec Aladin A1
- Page 1 ® Aladin A1 User Manual...
- Page 2 A1 USER MANUAL...
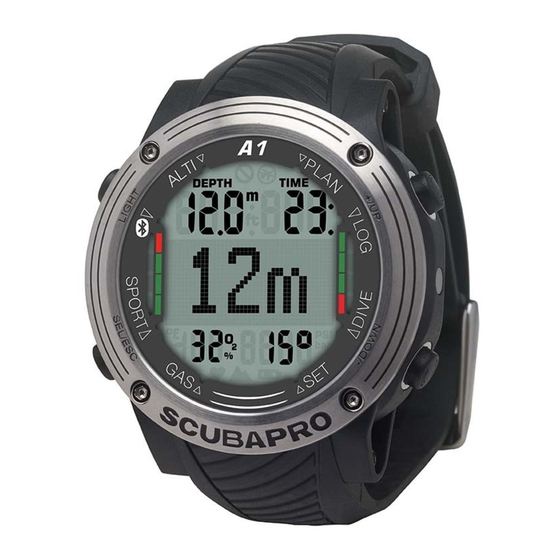
- Page 3 ALADIN A1 USER MANUAL The A1 diving computer watch – designed for everyday life and diving. Welcome to SCUBAPRO dive computers and thank you for purchasing the A1. You are now the owner of an extraordinary partner for your dives and everyday life. This manual provides you with easy access to SCUBAPRO state-of-the-art technology and the A1’s key features...
-
Page 4: Table Of Contents
TABLE OF CONTENTS 1. INTRODUCTION TO THE A1 ................... 8 Switching on the A1 ..................8 The watch screen ..................... 8 A1 buttons ....................... 9 Button lock ....................... 9 Bezel markings and symbols ................10 Battery ......................11 Operation modes ................... 11 Basic settings .................... - Page 5 3.2.3.4 Dive depth incremental alarm..........29 3.2.3.5 Dive time interval alarm ............29 3.2.3.6 Surface interval alarm ............29 3.2.3.7 Ascent speed alarm ...............30 3.2.4 Warning settings ................30 3.2.4.1 Dive time warning ..............30 3.2.4.2 Dive depth warning ..............31 3.2.4.3 MOD alarm ................31 Gas settings ....................
- Page 6 Altitude diving ....................48 4.9.1 Altitude warning after a dive ............... 48 4.9.2 Altitude and the decompression algorithm ......... 49 4.9.3 Prohibited altitude ................49 4.9.4 Decompression dives in mountain lakes ..........50 4.10 Diving with Nitrox ................... 50 4.11 Diving in GAUGE mode .................. 51 4.12 Diving in APNEA mode ...................
- Page 7 A1 USER MANUAL...
-
Page 8: Introduction To The A1
INTRODUCTION TO Switching on the A1 THE A1 The A1 is delivered to you in a deep sleep mode. This is done to preserve battery life Your A1 user manual is divided into the and ensure your A1 arrives with a fresh following main chapters: battery. -
Page 9: A1 Buttons
A1 buttons Button lock The functions of the buttons on the A simultaneous press-and-hold of the SEL/ surface are summarized in the table below ESC and -/DOWN buttons will lock the and explained in detail in the following main time and date display. Once locked, sections. -
Page 10: Bezel Markings And Symbols
Bezel markings and symbols In this section the markings and symbols on the A1’s outer and inner bezel as well as on its display are explained in detail. No Fly symbol 11 Altitude symbol Planner menu indicator 12 Not used in the A1 +/UP button 13 Gas menu indicator Logbook menu indicator... -
Page 11: Battery
Battery Operation modes The A1 uses a CR2450 battery type. The A1’s different modes are shown on the The A1 will alert you when the battery is dial ring of the computer and the current approaching a critical discharge level by function mode is indicated with an arrow. - Page 12 The following chart describes the main menu structure: DOWN TIME & DATE TIME & DATE Dive settings DIVE & menus DOWN SETTINGS User settings User Settings DOWN Gas settings Gas Settings DOWN SPORT Sport settings Sport Settings DOWN Bluetooth Bluetooth BLUETOOTH connection connection...
-
Page 13: Basic Settings
Basic settings The initial activation of your A1 requires some basic set-up (setting time and date, units, etc.). After the minutes 1.8.1 Time and date settings are confirmed the date can be Starting from the adjusted the same main time and date way. -
Page 14: User Settings
A1 AS AN EVERYDAY 1.8.2 User settings user-related settings (backlight WATCH duration, display contrast, units, etc.) can The A1 is more than just a watch. It features: be selected with a press-and-hold of the SEL/ESC button which returns you to the •... -
Page 15: Setting The Alarm Clock
2.1.1 Setting the alarm clock 2.1.3 Setting UTC 2 From the Watch menu press the SEL/ Dual time uses the same “base time” as ESC button to enter the Alarm submenu. the main clock. Therefore, adjusting the Here you can activate or deactivate the time as described in section ‘Setting the alarm clock by pressing the +/UP or -/ time’... -
Page 16: Setting The Date
2.1.6 Display design NOTE: seconds cannot be edited; In this menu you may select the design of they always start counting from 0. the main time and date display to suit your personal preferences by scrolling through 2.1.5 Setting the date the options with the +/ UP or -/DOWN By pressing the SEL/ESC button in the buttons. -
Page 17: Time Format
2.1.7 Time format The functions of the buttons in Sport mode are summarized in the table below Choose your preferred time format by and explained in detail in the following scrolling with the +/ UP or -/DOWN sections. buttons, press the SEL/ESC button to save your settings. -
Page 18: Stopwatch
2.2.1 Stopwatch By pressing-and-holding the SEL/ESC button you can exit the stopwatch and From the Sport menu press SEL/ESC to return to the Sport menu. enter the Stopwatch submenu. NOTE: You can leave the stopwatch actively counting or you can leave the stopped time on the display. -
Page 19: Apnea Mode
NOTE: Swim mode stays active in NOTE: barometric pressure is a shallow water down to 3 meters. This variable, changing with weather and allows flip turns in pool and horizontal atmospheric pressure at a particular dives. An immersion deeper than 3 elevation. -
Page 20: A1 Settings And Menus On The Surface
A1 SETTINGS AND 3.1.1 User settings MENUS ON THE This section allows you to customize your A1 to your liking. Settings like backlight SURFACE duration, display contrast and units can be changed here. In this chapter the settings that can be completed on the surface are described. -
Page 21: Units
3.1.1.5 Desaturation reset When the A1 is still counting down the desaturation, some menu changes are not possible. In the event you decide to reset the desaturation, the safety code 313 must be entered. This procedure prevents unwanted resetting and stores the desaturation reset in memory (in the next dive log the desaturation symbol will 3.1.1.3... -
Page 22: Service Information
3.1.1.6 Service Information 3.1.2 Swim settings The date of the last service by an Next on the Settings menu listing is Swim. authorized SCUBAPRO dealer is shown in Press the SEL/ESC button to enter. this submenu. DOWN SWIM DEPTH DOWN LENGTH DOWN RETURN... -
Page 23: Sound Settings
Stroke length Stroke depth By pressing SEL/ESC in the Swim menu, a step length to convert the distance. You you reach the swim mode settings. By can calibrate this in a swimming pool where pressing SEL/ESC the counter stroke you know the length and can use the A1 threshold (first depth, then length) will be stroke count to calculate the correct length. -
Page 24: Buzzer
3.1.3.1 Buzzer 3.1.3.3 Dive warnings When delivered with factory settings the In this submenu the warnings in dive mode A1 buzzer is active. You can set the A1 to can be enabled or disabled by pressing the a stealth mode in the Buzzer submenu +/UP or -/DOWN button followed by SEL/ which deactivates all sounds. -
Page 25: Dive Settings On Surface
Dive settings on surface From the main menu enter the Dive menu by pressing the SEL/ESC button. DOWN DIVE MODE DOWN SCUBA DOWN APNEA DOWN NOTE: The GAUGE and APNEA WARNING modes do not track tissue saturation so there is a locking interval before DOWN it is possible to change to SCUBA RETURN... -
Page 26: Water Type Selection
3.2.2.1 Water type selection 3.2.2.2 Microbubble level selection The A1 determines depth by measuring By pressing the SEL/ESC button in pressure using water density as a constant. this menu the Microbubble level will be A 10m/33ft depth in salt water corresponds highlighted. -
Page 27: Apnea Mode Settings
3.2.3 Apnea mode settings Apnea diving-related selections grouped in this menu. By pressing the SEL/ESC button the following submenus can be accessed: DOWN TOTAL APNEA EXERCISE DOWN DOWN DEPTH DOWN 3.2.3.2 Surface interval factor DIVE INCREMENTAL Apnea diving organizations provide various recommendations regarding surface... -
Page 28: Dual Depth Alarm
Both depth alarms can be set from 5 to 100 meters (20 to 330 feet) in 1m/5ft increments by pressing the +/UP or -/DOWN buttons. By pressing the SEL/ESC button the first value is confirmed and the second depth can be adjusted. The SIF can be selected from 5 to 20 or disabled with the OFF setting by pressing the +/UP or -/DOWN buttons and then the... -
Page 29: Dive Depth Incremental Alarm
3.2.3.4 Dive depth incremental alarm 3.2.3.5 Dive time interval alarm In initial factory settings the dive depth By pressing the SEL/ESC button the incremental alarm is switched off. function will be highlighted and you may enable or disable the dive time interval You may select the alarm value from 5 to alarm by choosing AUDIBLE or OFF by 100m (20 to 330ft) in 1m/5ft increments,... -
Page 30: Ascent Speed Alarm
3.2.4 Warning settings There are three warnings which can be enabled and edited directly in the A1. The rest of the warnings can only be enabled / disabled SCUBAPRO LogTRAK program. To learn more about the warnings see chapter 4.4 Alarms and warnings during diving. -
Page 31: Dive Depth Warning
3.2.4.2 Dive depth warning WARNING In initial factory settings the dive depth warning is switched off. When you select Diving at oxygen partial pressures higher than dive depth and switch the warning on, the 1.6bar is extremely dangerous and could lead value can be adjusted from 5 to 100m (20 to serious injury or death. -
Page 32: Nitrox Reset Time
NOTE: If you cancel the ppO setting by a press-and-hold of the SEL/ESC button, the oxygen content selection will also be canceled. WARNING Diving with a ppO higher than 1.6 bar is dangerous and may lead to unconsciousness, Planning a dive drowning and fatal injury. -
Page 33: No-Stop Plan
3.4.1 No-stop plan NOTE: The minimum depth for dive If you have completed a dive but plan to planning is 9m/30ft. The planner make another during the desaturation allows only depths in line with phase, you must start the planner by maximum ppO . -
Page 34: Reading The Logbook
Reading the logbook You can check your dive statistics by pressing the SEL/ESC button when in the Logbook menu. By pressing the +/UP button on the above screen the following information will appear as in the screen below: On the display below, the A1 has 11 dives and total of 6 hours of diving in the Logbook, with the deepest dive at 57.0 meters and a longest dive time of 80 minutes. -
Page 35: Diving With The A1
DIVING WITH THE A1 Display information The A1 is a full-featured diving computer Upon immersion, the A1 will automatically capable Nitrox decompression start to monitor the dive regardless of calculations, ascent rate calculations and what state it was in prior to the immersion. warnings. -
Page 36: Dive Ready Mode
4.1.1 Dive ready mode 4.1.2 Display configuration during the dive A press-and-hold of the -/DOWN button in the main time and date display will give Throughout the dive, the A1 displays you access to the dive ready mode which depth and dive time always at the top shows you your current dive settings. -
Page 37: 4.1.2.1.1 Light Version
4.1.2.1.1 Light version 4.1.2.1.2 Classic version No-Stop Time, which is the time at current No-Stop Time depth before decompression stops are required. Current depth is shown in feet or full meters without a Decompression comma. This is the stop larger duplicate of the top row depth. -
Page 38: Gauge Mode Display Selection
4.1.2.2.1 Light version Maximum depth reached during current dive Timer 4.1.2.2 GAUGE mode display selection In GAUGE mode you can choose from two display versions while diving: Light or Current depth Classic. The following screens illustrate the information in the middle of the screen which can be selected as shown in the sections below. -
Page 39: 4.1.2.2.2 Classic Version
4.1.2.2.2 Classic version 4.1.2.3 APNEA mode If the APNEA mode is triggered manually by a press-and-hold of the -/DOWN button, the surface interval starts counting in the middle of the display without a previous Timer dive information (depth is --- at top row and repetitive dive count is 0 at bottom row) as in the screen below. -
Page 40: Safety Stop Timer
Alarms and warnings NOTE: The dive depth displayed in during diving large size in the middle part of the screen is shown with no decimal The A1 can alert you to potentially values rounded up or down, but dangerous situations via warnings and the actual depth is always precisely alarms. -
Page 41: Mod (Ppo ) Alarm
4.4.2 MOD (ppO ) alarm 4.4.5 No-stop time = 2 minute warning If you exceed the maximum partial pressure of the selected gas, the following alarm is If you wish to avoid unintentionally shown: MOD + DEPTH. The alarm remains performing a decompression dive, the A1 active until you ascend to depth where can activate a warning when the no-stop... -
Page 42: Cns O Alarm (100%)
4.4.8 CNS O alarm (100%) The A1 tracks your oxygen uptake via the CNS O clock. If the calculated value of CNS O reaches 100%, the A1 will emit a sequence of audible beeps for 12 seconds and the CNS 100% alarm will be shown. 4.4.11 Missed decompression stop alarm... -
Page 43: Ascent Rate Alarm
level. The display will show the new active MB level. You can set your A1 to warn you when this happens. 4.4.15 If you stay above a depth of 0.8m/3ft for more than 3 minutes without observing a 4.4.14 Ascent rate alarm mandatory decompression stop, the A1 will switch into SOS mode. -
Page 44: Low Battery Alarm
No-Dive warning 4.4.16 Low battery alarm If the A1 detects a situation of increased risk (due to potential microbubble accumulation from previous dives or a CNS O level above 40%), the NO DIVE symbol will appear to advise you against performing another dive right away. -
Page 45: Diving With Mb-Levels
Diving with MB-levels automatically adjust the setting to level L3 or lower. Microbubbles are tiny bubbles that can Comparison of dives with MB level L0 build up inside a diver’s body during a dive and level L5 and normally dissipate naturally during an When two A1 dive computers are used ascent and on the surface after a dive. -
Page 46: Pdis (Profile Dependent Intermediate Stop)
PDIS (Profile Dependent The following figure quantifies the extent of PDIS and illustrates its dependence on Intermediate Stop) cumulative nitrogen uptake for 2 sample dive profiles. This figure also demonstrates 4.8.1 Introduction to PDIS the conceptual difference between PDIS The main purpose of a dive computer is to and the rather rudimentary “deep”... -
Page 47: How Does Pdis Work
8min 16min 24min 32min 40min 48min DIVE TIME PDIS Profile 1 PDIS Profile 2 SAFETY STOP Deep Stop PDI STOP Dive Profile 2 Dive Profile 1 4.8.2 How does PDIS work? very short dives, for which an intermediate stop is not required at all. The mathematical decompression model in the A1, called ZH-L16 ADT MB, tracks NOTE: The PDI stop is not a mandatory... -
Page 48: Diving With Pdis
4.8.3 Diving with PDIS NOTE: The A1 issues no warnings When the calculated PDI stop is deeper relating to a missed PDI stop. When than 8m/25ft, the A1 shows it on the display diving with MB levels, PDIS follows and continues to do so until you reach the the same rules as described above. -
Page 49: Altitude And The Decompression Algorithm
4.9.2 Altitude and the decompression algorithm Atmospheric pressure is a function of altitude and weather conditions. This is an important aspect to consider for diving, because the surrounding atmospheric pressure has an influence on on-gassing and off-gassing of nitrogen in your body. The A1 divides the possible altitude range into 5 classes that are illustrated in the picture below:... -
Page 50: Decompression Dives In Mountain Lakes
4.10 Diving with Nitrox Nitrox is the term used to describe breathing gases made of oxygen-nitrogen mixes with the oxygen percentage higher than 21% (air). Because nitrox contains less nitrogen than air, there is less nitrogen loading on the diver’s body at the same depth as compared to breathing air. -
Page 51: 4.11 Diving In Gauge Mode
4.11 Diving in GAUGE mode Against long exposure effects: The A1 “tracks” the exposure by means of the When the A1 is set to GAUGE mode, CNS O clock. At levels of 100% and higher it will only monitor depth, time, and there is risk of long exposure effects, and temperature, and will not carry out any consequently the A1 will activate an alarm... -
Page 52: 4.12 Diving In Apnea Mode
4.12 Diving in APNEA mode at the bottom row. The timer can be paused and restarted by press-and-hold the +/UP The A1 measures the depth in APNEA button. When the timer is paused, it can be mode every 0.25 seconds to ensure the reset to zero by pressing-and-holding the precise maximum depth. -
Page 53: Interfaces For The A1 And An Introduction To Logtrak
INTERFACES FOR THE A1 AND AN INTRODUCTION TO LOGTRAK Establishing Bluetooth The alternative displays in APNEA mode communication can be scrolled by pressing the +/UP or -/ The A1 can be connected via Bluetooth to DOWN buttons and this changes the dive a desktop, laptop or handheld device for time to the middle of the display as shown downloading dive data, configuring dive... -
Page 54: Logtrak
Once the code is accepted by the device you want to connect to, the link is ready for communication. NOTE: The A1 has a timeout of 5 minutes for a non-active Bluetooth connection. After this interval the A1 will disable Bluetooth and return to time and date mode. -
Page 55: Reading Computer Information
5.2.4 Writing owner information with LogTRAK Owner information can be registered in the Extras -> Read dive computer settings-> Personalization section. 5.2.5 Setting units in LogTRAK You can set your choice of units in your A1 or on your PC by using the following LogTRAK personalization section: Extras->... -
Page 56: Updating Your A1
5.2.6 Updating your A1 In order to update the operating software on your A1 dive computer, you need to download the latest software package for your A1 from the SCUBAPRO website and store the .swu file locally. To perform the software update, select the menu Firmware upload from LogTRAK. -
Page 57: Taking Care Of Your A1
TAKING CARE OF NOTE: LogTRAK doesn’t have YOUR A1 a firmware upload module in all operating systems, in Android this function looks like in the screenshot Changing the watch strap below. The watch straps of the A1 can be removed and replaced by unscrewing the Torx screws at the corners of the watch body. -
Page 58: Display Protection Foil
Display protection foil Technical information You can protect your A1’s glass face with a Operating altitude: SCUBAPRO display guard. This foil can be Sea level to approximately easily replaced if damaged. 4000m/13300ft. Max operating depth: 120m/394ft; resolution is 0.1m until 99.9m, and 1m at depths deeper than 100m. -
Page 59: Maintenance
Maintenance Warranty The A1’s depth accuracy should be verified The A1 has a 2-year warranty covering every 2 years by an authorized SCUBAPRO defects in workmanship and functioning. dealer. The last service date can be The warranty only covers dive computers checked from the menu: Settings ->... -
Page 60: Compliance
Compliance 6.6.1 EU Radio directive Hereby, Uwatec AG, declares that the radio equipment type PAN1740 is in compliance with Directive 2014/53/EU. The full text of the EU declaration of conformity is available from the official SCUBAPRO importers in 6.6.3.4 FCC Class B Digital Device Notice 6.6.2... -
Page 61: Manufacturer
Products marked with the recycling symbol on the left must not be disposed of in normal household waste. Manufacturer UWATEC AG Bodenäckerstrasse 3 CH-8957 Spreitenbach SWITZERLAND A1 USER MANUAL... -
Page 62: Glossary
GLOSSARY Average Depth. Calculated from the beginning of the dive or from the time of reset. CNS O Central Nervous System Oxygen toxicity. DESAT Desaturation Time. The time needed for the body to completely eliminate any nitrogen taken up during diving. Dive Time The time spent below a depth of 0.8m/3ft. -
Page 63: Index
INDEX Units ........14, 20, 21, 55 UTC ..........15, 15 Active backlight ......11, 20, 40 Wake-up alarm ........15 Altimeter ..........19 Warnings ......24, 30, 40, 55 Apnea mode ......19, 27, 39, 52 Warranty ..........59 Ascent rate ........43, 46 Water contact ........10, 59 Battery ........11, 24, 44, 59 Water type ........26, 32 Buttons ..........9, 9... - Page 64 ®...
Need help?
Do you have a question about the Aladin A1 and is the answer not in the manual?
Questions and answers