Table of Contents
Advertisement
Available languages
Available languages
Quick Links
Advertisement
Table of Contents

Related Manuals for OTC CPTX 270


Summary of Contents for OTC CPTX 270
- Page 1 CPTX 270 / CPTX 330...
-
Page 2: Table Of Contents
5. Technische Daten ........................10 5.1 Außenansicht CPTX 270 ......................11 5.2 Außenansicht CPTX 330 ......................11 6. Frontplatte und Beschreibung der Funktionen(CPTX 270/CPTX 330) ......12 7. Vorbereitung des Gerätes zum Schweißen ................13 7.1 Netzanschluss .......................... 13 7.2 Drahtrolle ........................... 13 7.3 Einfädeln des Drahtes (Position 5) .................. - Page 3 5. Specifications ..........................35 5.1 External view CPTX 270 ......................36 5.2 External view CPTX 330 ......................36 6. Front panel and description of the functions(CPTX 270/CPTX 330) ......37 7. Preparations for welding ......................38 7.1 Power connection........................38 7.2 Wire spool ..........................
-
Page 4: Vorwort
Vielen Dank, dass sie sich für unser Produkt entschieden haben. Ihr neues Schweißgerät der Firma OTC DAIHEN EUROPE GmbH bietet ihnen höchste Qualität und neuste Technologie. Um die Leistungsfähigkeit des Gerätes voll ausnutzen zu können und viele Jahre Freude an ihrem Gerät zu haben, lesen Sie bitte vor dem Anschließen und der Inbetriebnahme diese... - Page 5 Einbau eines Filters auf die Netzeinspeisung der Anlage. Verwendung von Kabeln mit Abschirmung. Ordnungsgemäße Instandhaltung der Anlage. Das Gehäuse muss während der Bedienung festgeschraubt sein. Die Schweißkabel so kurz wie möglich halten. Erdung des Werkstückes. CPTX 270/CPTX 330...
-
Page 6: Vorschriften Zur Vorbeugung Von Unfällen
Schutzhandschuhe und Arbeitsschuhe mit Gummisohle. Die Anlage bei jeder Unterbrechung, auch bei plötzlichem Stromausfall, ausschalten. Versehentlicher Massekontakt kann zur Überhitzung der Anlage führen und ein Feuer verursachen. Die Anlage darf daher nie ohne Aufsicht eingeschaltet sein. CPTX 270/CPTX 330... -
Page 7: Personenschutz
Entfernen sie alle brennbaren Gegenstände in der Umgebung der Schweißmachine bzw. decken sie diese mit feuerfesten Materialen ab. Zu diesen brennbaren Gegenständen gehören unter anderem folgende: Holz, Sägespäne, Kleidung, Lacke und Lösungsmittel, Benzin, Brennöl, Erdgas, Azetylen, Propan, etc. CPTX 270/CPTX 330... -
Page 8: Vergiftungsgefahr
Die Anzeichen für eine unzureichende Belüftung oder eine mögliche Vergiftung sind Reize in den Augen, der Nase und des Rachenraumes. In diesem Fall unterbrechen Sie die Schweißarbeiten und lüften Sie den Arbeitsbereich. Falls Sie sich weiterhin unwohl fühlen müssen Sie die Schweißarbeiten sofort beenden. CPTX 270/CPTX 330... -
Page 9: Aufstellen Der Maschine
Das Gerät darf nur an dem dafür vorgesehenen Griff angehoben und transportiert werden. Vor dem Heben und dem Transport müssen alle Stecker und Anschlusskabel ordnungsgemäß entfernt werden. Das Gerät darf niemals am Kabel oder Stecker gezogen werden. CPTX 270/CPTX 330... -
Page 10: Sicherheitsvorkehrungen
Kühlkanäle strömen kann. Das Gerät reguliert die Kühlung automatisch! Achten sie jedoch darauf, dass kein Schleifstaub eingesaugt werden kann. Stabilität: Das Gerät kann auf eine bis zu 15° geneigten Fläche installiert werden. Bei einer steileren Neigung besteht die Gefahr, dass die Schweißmaschine umstürzt! CPTX 270/CPTX 330... -
Page 11: Beschreibung Der Schweißmaschine
Probleme öffnen, womit ein leichter Wechsel der Drahtrolle ermöglicht wird. 4.2 Der Transformator Die CPTX 270/CPTX 330 verfügen über einen Motor der Isolationsklasse „H“, wobei die Primär- und Sekundärwicklung galvanisch getrennt voneinander verlaufen. Die CPTX 270/CPTX 330 sind für eine Netzspannung von 3x400V ausgelegt. -
Page 12: Gleichrichter
Beschreibung, Konstruktion und Ausführung des Gerätes 4.3 Gleichrichter Bei der CPTX 270/CPTX 330 ist der Gleichrichter aus Einpressioden und Kühlkörpern gefertigt und dient zur Gleichrichtung des Schweißstroms. 4.4 Drossel Die eingebaute Drossel verbessert die Schweißdynamik der Geräte um ein vielfaches. -
Page 13: Technische Daten
0,2 – 2,5 sek. Punktschweißzeit 02 – 2,5 sek. 0,2 – 2,5 sek. Zeit der Pause Schutzart IP21s IP21s Isolationsklasse Kühlung Ventilator Ventilator Gewicht 76 kg 88 kg Masse L x B x H (mm) 850x540x780 850x540x780 CPTX 270/CPTX 330... -
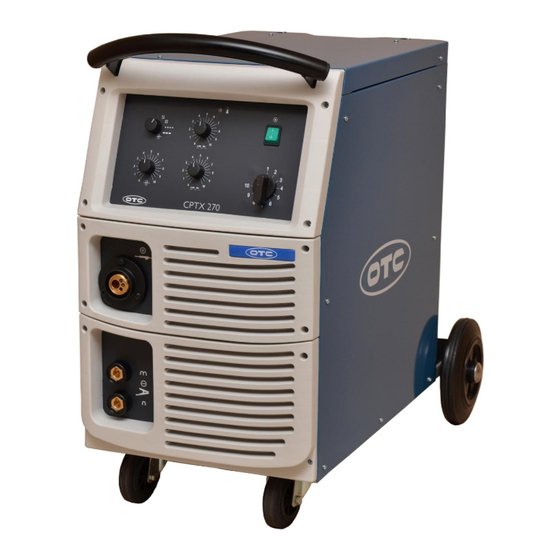
Page 14: Außenansicht Cptx 270
Technische Daten 5.1 Außenansicht CPTX 270 5.2 Außenansicht CPTX 330 CPTX 270/CPTX 330... -
Page 15: Frontplatte Und Beschreibung Der Funktionen(Cptx 270/Cptx 330)
Frontplatte und Beschreibung der Funktionen (CPTX 270/CPTX 330) 6. Frontplatte und Beschreibung der Funktionen (CPTX 270/CPTX 330) CPTX 270 / CPTX 330 Pos. Bezeichnung Funktion CPTX 270 CPTX 330 • • AN/AUS Schalter Schalter zum Einschalten des Gerätes Grobe Regulierung des •... -
Page 16: Vorbereitung Des Gerätes Zum Schweißen
Vorbereitung des Gerätes zum Schweißen 7. Vorbereitung des Gerätes zum Schweißen 7.1 Netzanschluss Das CPTX 270/CPTX 330 Schutzgasschweißgeräte sind mit einem Anschlusskabel und Standardstecker für 3x400V und 50Hz ausgerüstet und können an jede, für diese Spannung ausgelegte, Steckdose mit entsprechenden Schutzkontakten angeschlossen werden. -
Page 17: Schweißen
Brenner nach einer der drei oben gezeigten Methoden geführt. 8.1 Das Einstellen des Schweißstroms Der Schweißstrom wird durch das Drehen der Stufenschalter wie folgt eingestellt: Drehen nach rechts = Erhöhung des Schweißstroms Drehen nach links = Reduzierung des Schweißstroms CPTX 270/CPTX 330... -
Page 18: 2T - (2-Takt Funktion)
Drahtes ein. Durch das Drücken des Brennertasters beginnt das Gerät an zu schweißen. Während den eingestellten Zwischenpausen, sind das Schutzgas sowie der Kontaktor weiterhin aktiv. Der Vorschubmotor schaltet jedoch ab. Halten sie den Brennertaster während des gesamten Sachweißvorgangs gedrückt. CPTX 270/CPTX 330... -
Page 19: Automatischer Softstart
Thermostat die Maschine automatisch aus (die gelbe Lampe leuchtet und nur der Ventilator läuft). In diesem Zustand ist es unmöglich weiter zu schweißen! Bitte warten sie bis das Gerät abgekühlt ist und sich wieder automatisch einschaltet (die gelbe Lampe erlischt). Wichtig! Das Gerät während der Kühlung nie ausschalten! CPTX 270/CPTX 330... -
Page 20: Wartung
Das Massekabel und die Klemme überprüfen. Die Vorschubrollen reinigen. 9.3 Alle 6 Monate Die Seitenwände entfernen und das Gerät im Inneren mit Druckluft ausblasen. Wenn nötig, alle Schrauben nachziehen. Das Gerät vor dem Öffnen immer vom Strom trennen! CPTX 270/CPTX 330... -
Page 21: Dienstleistungen Und Garantie
Der ausgewählte Höheren Strom auswählen Schweißstrom ist zu gering Klemme überprüfen und Masseanschluss falsch befestigen Kein Schweißstrom Netzschalter Stromkabel im eingeschaltet Schweißbrenner Brenner tauschen unterbrochen Keine Funktion nach Drücken der Brennertaste Schweißbrenner defekt Schweißbrenner austauschen Netzschalter eingeschaltet CPTX 270/CPTX 330... - Page 22 Gasmagnetventil, Schutzgas Gasanschluss, etc. überprüfen Schweißbrenner undicht Schweißbrenner wechseln Schlechte Schweißeigenschaften Falsches oder Kontaktrohr wechseln ausgeschliffenes Kontaktrohr Eingelegte Drahtrolle kontrollieren Falsche Drahtlegierung bzw. falscher Drahtdurchmesser Verschweissbarkeit des Grundwerkstoffes prüfen Schutzgas für Drahtlegierung Korrektes Schutzgas nicht geeignet verwenden CPTX 270/CPTX 330...
- Page 23 Verschmutzung, etc. prüfen Drahtvorschubrollen für Passende verwendeten Schweißdraht Drahtvorschubrollen nicht geeignet verwenden Falscher Anpressdruck der Anpressdruck optimieren Drahtvorschubrollen Schweißbrenner wird Schweißbrenner zu schwach Einschaltdauer und sehr heiß dimensioniert Belastungsgrenzen beachten Zu geringe Kühlleistung Ventilator defekt Ventilator erneuern/tauschen CPTX 270/CPTX 330...
-
Page 24: Ersatzteilliste Cptx 270
Ersatzteilliste CPTX 270 12. Ersatzteilliste CPTX 270* Bild 1 Bild 2 Bild 3 Bild 4 CPTX 270/CPTX 330... - Page 25 Ersatzteilliste CPTX 270 Bild Pos. Beschreibung CPTX 270 Schalter mit Lampe 0073-04-0001 Wahlschalter 1-10 0073-04-0004 Kontrolllampe 0072-04-0003 Aufkleber der Frontplatte 0406-04-0003 0403-04-0001 Potentiometer-Knopf Zentralanschluss 0071-04-0010 0071-04-0005 Steckdose Bockrolle 200 0410-04-0003 Abdeckkappe 0411-04-0002 Achse 0302-04-0002 Lenkrolle 0410-04-0004 0080-04-0003 Trenntransformator Primär Wicklung 0081-04-0001 Sekundär Wicklung...
-
Page 26: Schaltplan Cptx 270
Schaltplan CPTX 270 12.1 Schaltplan CPTX 270 Steuerplatine Sicherung (Träge) Thermostathalter Schütz Drossel M1,2 Ventilator Elektromotor Schalter mit Lampe Stufenschalter 1-2 Stufenschalter 1-10 Taster SLK Varistor Transformator Trenntransformator Gasmagnetventil Gleichrichter CPTX 270/ CPTX 330... -
Page 27: Ersatzteilliste Cptx 330
Ersatzteilliste CPTX 330 13. Ersatzteilliste CPTX 330* Bild 1 Bild 2 Bild 3 Bild 4 CPTX 270/ CPTX 330... - Page 28 0407-04-0001 Seitendeckel links 0310-04-0017 Deckel oben 0310-04-0015 0310-04-0016 Seitendeckel rechts Seitentür 0310-04-0021 Verschluss 0320-04-0001 Mutter 0100-04-0002 Sicherung 0075-04-0004 Vorschubmotor 0082-04-0001 0030-04-0008 Vorschubmechanismus Vorschubrolle 0,6 - 0,8 0430-04-0002 Vorschubrolle 1,0-1,2 0430-04-0004 Schütz 0079-04-0002 Drossel 0078-04-0001 * Änderungen vorbehalten CPTX 270/CPTX 330...
-
Page 29: Schaltplan Cptx 330
Schaltplan CPTX 330 13.1 Schaltplan CPTX 330 Steuerplatine Sicherung (Träge) Thermoshalter Schütz Drossel M1,2 Ventilator Elektromotor Schalter mit Lampe Stufenschalter 1-10 Taster SLK Varistor Transformator Trenntransformator Gasmagnetventil Gleichrichter CPTX 270/CPTX 330... -
Page 30: Foreword
Foreword Foreword Thank you for choosing our product. Your new welding equipment from the company OTC DAIHEN EUROPE GmbH offers you the highest quality and latest technology. To exploit the full capabilities of this device and to enjoy it for many years, please read these instructions carefully before connecting and commissioning the device. - Page 31 Installation of a filter on the supply. Use of cables with protective wrapping. Proper maintenance of the system. The housing must be tightened during the operation. The weld cables as short as possible. Grounding of the work piece. CPTX 270/CPTX 330...
-
Page 32: Regulations For The Prevention Of Accidents
The system has to be cut off at each interruption, even at sudden loss of power. Accidental ground contact can lead to overheating of the system and cause a fire. The system must therefore never be turned on without supervision. CPTX 270/CPTX 330... -
Page 33: Operator Protection
A fire extinguisher, sand or water must always be present in the workplace in order to be able to react quickly in case of fire. Never weld at adjoining tanks or piping. Also do not weld in open containers or pipes that may contain flammable substances. CPTX 270/CPTX 330... -
Page 34: Risk Of Poisoning
The unit including all cables should not impede the ability to work and the passage to other rooms. The unit must be secured against falling down. Setting up objects higher, increases the risk that it may fall off during the work. CPTX 270/CPTX 330... -
Page 35: Transport Of The Power Source
The welding equipment can’t be used in areas, where it is exposed to shock or vibration. Areas that should be avoided necessarily are for example, road-, rail- and cable handling equipment, aircraft, water crafts, cranes and parts of machine tools. CPTX 270/CPTX 330... -
Page 36: Description Of The Welding Equipment
4. Execution of the instruments 4.1 The housing The housing is made from high quality steel. The door on the side can be opened easily so that a smooth change of the wire spool is possible. CPTX 270/CPTX 330... -
Page 37: Rectifier
Description, Construction and execution of the instruments 4.2 The transformer The CPTX 270/CPTX 330 includes a motor insulation class "H", the primary and secondary windings run electrically isolated from each other. The CPTX 270/CPTX 330 is designed for a mains voltage of 3x400V. -
Page 38: Specifications
Time of spot-welding 02 – 2,5 sek. 0,2 – 2,5 sek. Interval time Safety class IP21s IP21s Insulation class Cooling system Ventilator Ventilator Weight 76 kg 88 kg Dimensions L x B x H (mm) 850x540x780 850x540x780 CPTX 270/CPTX 330... -
Page 39: External View Cptx 270
Specifications 5.1 External view CPTX 270 5.2 External view CPTX 330 CPTX 270/CPTX 330... -
Page 40: Front Panel And Description Of The Functions(Cptx 270/Cptx 330)
Front panel and description of the functions (CPTX270/CPTX 330) 6. Front panel and description of the functions (CPTX 270/CPTX 330) CPTX 270 / CPTX 330 Pos. Bezeichnung Funktion CPTX 270 CPTX 330 • • On/OFF Switch Turns the device on and off •... -
Page 41: Preparations For Welding
7. Preparations for welding 7.1 Power connection The CPTX 270/CPTX 330 MIG welders are equipped with a standard cable and plug for 3x400V and 50Hz, and can be connected to any, for thus voltage designed socket contacts which are connected with appropriate protection. -
Page 42: Welding
Pressing the torch switch the unit starts to weld. The torch is handled by one of the three methods shown above. 8.1 Setting of welding current The welding current is adjusted by turning the tap changer as follows: Turn right = increase of welding current Turn left = decrease of welding current CPTX 270/CPTX 330... -
Page 43: 2T - (2-Stroke Mode)
During the adjusted interval periods, the shielding gas and the contactor are still active. The feed motor turns off. Please press the torch switch during the whole welding process. 8.6 Softstart With a sufficient wire speed (min.0, 5 m/min) the softstart switches on automatically. CPTX 270/CPTX 330... -
Page 44: Anti-Stick-Function
(the yellow light is on and only the ventilator is rotating). In this state it is impossible to weld! Please wait until the device is cooled down and turns on automatically (the yellow light switches off). Important! Never turn off the power source during the cooling process! CPTX 270/CPTX 330... -
Page 45: Maintenance
Maintenance 9. Maintenance Under normal operating conditions the CPTX 270/CPTX 330 requires very little maintenance operations. To ensure a longtime durability, you should pay attention to the following aspects: Temporary the device must be blown out with compressed dry air. -
Page 46: Services And Warranty
No welding power power switch is on The power cable in the Change the torch welding torch is broken Nothing happens after pressing the torch switch Welding torch is defect Change the welding torch Power switch is on CPTX 270/CPTX 330... - Page 47 Incorrect or grounded Change the contact tip contact tip Control the pickled wire reel Incorrect wire alloy or incorrect wire diameter Test the weldability of the base material Gas for wire alloy is not Use proper gas suitable CPTX 270/CPTX 330...
- Page 48 Incorrect contact pressure Optimize the pressure of the rolls Observe the duty cycle and Welding torch is very hot Torch too weak maximum limits Insufficient cooling capacity Ventilator defect Change the ventilator CPTX 270/CPTX 330...
-
Page 49: Spare Parts List Cptx 270
Spare parts list CPTX 270 12. Spare parts list CPTX 270* Figure 1 Figure 2 Figure 3 Figure 4 CPTX 270/CPTX 330... - Page 50 Spare parts list CPTX 270 Figure Pos. Description CPTX 270 Switch with lamp 0073-04-0001 Selector switch 1-10 0073-04-0004 Control lamp 0072-04-0003 Lable of the front panel 0406-04-0003 0403-04-0001 Button potentiometer Main cable 0071-04-0010 0071-04-0005 Electrical socket Wheel 200 0410-04-0003 Cover panel...
-
Page 51: Connection Diagram Cptx 270
Connection diagram CPTX 270 12.1 Connection diagram CPTX 270 Control board Fuse Thermo protection Switcher Choke M1,2 Ventilator Electric motor Switch with lamp Step switch 1-2 Step switch 1-10 Feeler SLK Varistor Transformer Control transformer Gas valve Rectifier CPTX 270/CPTX 330... -
Page 52: Spare Part List Cptx 330
Spare part list CPTX 330 13. Spare part list CPTX 330* Figure 1 Figure 2 Figure 3 Figure 4 CPTX 270/CPTX 330... - Page 53 Side door 0310-04-0021 Catch 0320-04-0001 Nut bolt 0100-04-0002 Safety fuse 0075-04-0004 Feed motor 0082-04-0001 0030-04-0008 Feed mechanism Wire feed roll 0,6 - 0,8 0430-04-0002 Wire feed roll 1,0-1,2 0430-04-0004 Contactor 0079-04-0002 Choke 0078-04-0001 * Subject to modifications CPTX 270/CPTX 330...
-
Page 54: Connection Diagram Cptx 330
Connection diagram CPTX 330 13.1 Connection diagram CPTX 330 Control board Fuse Thermo protection Switcher Choke M1,2 Ventilator Electric motor Switch with lamp Step switch 1-10 Feeler SLK Varistor Transformer Control transformer Gas valve Rectifier CPTX 270/CPTX 330...
Need help?
Do you have a question about the CPTX 270 and is the answer not in the manual?
Questions and answers