Table of Contents
Advertisement
Quick Links
Advertisement
Table of Contents

Related Manuals for Vermeiren Pluo


Summary of Contents for Vermeiren Pluo
- Page 1 Pluo I N S T R U C T I O N M A N U A L...
-
Page 3: Table Of Contents
Pluo 2019-10 CONTENTS Contents ................1 Preface ................ 2 Your product ..............3 2.1 Accessories .............. 4 Before use ..............5 3.1 Intended use ............5 3.2 General safety instructions ........5 3.3 Symbols on the shower chair ........6 Scope of delivery ............ -
Page 4: Preface
Damage to your product caused by improper use or lack of maintenance will cause the warranty to lapse. This manual reflects the latest product developments. Vermeiren has the right to implement changes to this type of product without being imposed to any obligation to adapt or replace similar products previously delivered. -
Page 5: Your Product
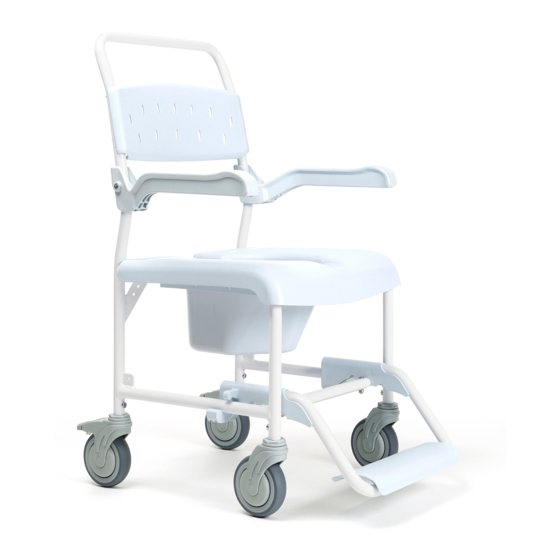
Pluo 2019-10 YOUR PRODUCT This mobile shower chair with optional toilet bucket is easy to use in bathrooms and is available with 4 swivelling wheels or with 24” rear wheels. 24” model front 5” model back FRONT WHEEL (STEERING) BACKREST FRAME / PUSH BAR REAR WHEEL 24”... -
Page 6: Accessories
Pluo 2019-10 Accessories The following options and accessories are available for Pluo: 1. Adjustable leg height (only 5”) 2. Head rest 3. Safety belt 4. Safety vest 5. PU seat and back 6. Gel seat 7. Lateral support 8. Safety bracket... -
Page 7: Before Use
• The 5” shower chair is meant to be operated by an attendant; the 24” model can be operated by occupant as well. • If applicable, only use accessories and spare parts approved by Vermeiren. Please read all technical details and limits of your shower chair in §8. -
Page 8: Symbols On The Shower Chair
Pluo 2019-10 Symbols on the shower chair The symbols in following list are applicable for your shower chair. Symbols can be found in the relevant ISO standard (ISO 7000, ISO 7001 and IEC 417). Maximum weight of the user in kg... -
Page 9: Assembly And Adjustments
Pluo 2019-10 ASSEMBLY AND ADJUSTMENTS Tools To (dis)assemble and adjust the shower chair, the following tools are needed: • Wrench set no. 13 • Allen keyset n° 3 - 4 - 5 (Dis) Assembly The following description explains the assembly of the chair. To disassemble, follow the steps in reverse order. - Page 10 Pluo 2019-10 4. Mount the front wheels (2x): • Insert the tube ends of the wheel supports in the frame-tube ends. • Tighten both wheel supports firmly with the socket screw (21). • Verify that the fronts wheels are well secured.
-
Page 11: Mounting And Adjusting The Headrest
Pluo 2019-10 Mounting and adjusting the headrest 1. Loosen the two screws (25) on the headrest support. 2. Clasp the headrest to the backrest frame (26). 3. Firmly tighten the two screws (25). Make sure that the headrest is well secured. -
Page 12: Using Your Shower Chair
Pluo 2019-10 USING YOUR SHOWER CHAIR Risk of injuries and/or damage CAUTION Be aware that the shower chair may get very hot or cold due to ambient temperature, solar radiation, heating devices or cleaning water. Be careful when touching. Make sure that your hands, clothes, belts, buckles or jewellery won’t get caught by wheels. -
Page 13: Armrest
Pluo 2019-10 6.1.2 Parking brakes for 5” model Releasing brakes [C]: Use your foot to press the top of the brake lever backwards. Applying brakes [D]: Use your foot to press the brake lever down towards the castor wheel. Armrest •... -
Page 14: Toilet Bucket
Pluo 2019-10 Toilet bucket To insert: • Place the toilet bucket at the rear side, with its rim on the two guides. • Slide it to the front against the bucket stop. To remove: • Slide the bucket backward while supporting it with your other hand. -
Page 15: Maintenance
Pluo 2019-10 Risk of injuries and damage CAUTION • Before every usage, make sure that: o all parts are firmly secured, see § 5. o brakes are working properly, see §6.1. • Keep your feet on the footplate. • Thresholds and obstacles should to be taken backwards. -
Page 16: Technical Specifications
Pluo 2019-10 TECHNICAL SPECIFICATIONS The technical details below are only valid for this shower chair, at standard settings and optimal ambient conditions. Take these details into account during use. The values are no longer applicable if your shower chair has been modified, damaged or suffers from severe wear. - Page 17 Pluo 2019-10 Description Dimensions Dimensions 5” standard 24” rear wheels brakes) Hand -rim diameter 530 mm Use temperature 5°C ~ +50°C Clean temperature 85°C for max. 3 minutes Storage temperature +5°C ~ +65°C We reserve the right to introduce technical changes.
- Page 19 Service registration form Service registration form This product (name): …………………………………….. was inspected (I), serviced (S), repaired (R) or disinfected (D): By (stamp): By (stamp): By (stamp): Kind of work: I / S / R / D Kind of work: I / S / R / D Kind of work: I / S / R / D Date: Date:...
- Page 20 No part of this manual may be reproduced in any form what so ever (print, photocopy, microfilm or any other process) without written permission of the publisher, or processed, duplicated or distributed by using electronic systems. © Vermeiren Group 2019...
Need help?
Do you have a question about the Pluo and is the answer not in the manual?
Questions and answers