Table of Contents
Advertisement
Quick Links
Advertisement
Chapters
Table of Contents

Related Manuals for LEGRAND Radiant Series


Summary of Contents for LEGRAND Radiant Series
- Page 1 Smart Switch WTRL10...
-
Page 2: Table Of Contents
table of contents before you start ........3 faqs ..........23 what you need ........4 regulatory information ..24–27 installation and setup ....6–19 warranty ........28 getting to know your switch ..20-21 support ........29 specifications ........22... -
Page 3: Before You Start
• Do not use to power medical equipment. • Install in a non-metallic electrical box to protect wireless signal strength. • Not suitable as a disconnecting means. Visit the Legrand website at www.legrand.us/radiant/smart-lighting.aspx to learn more about your smart device. -
Page 4: What You Need
what you need REQUIRED: Phillips-head screwdriver Flat blade screwdriver YOU MAY ALSO NEED: Non-contact voltage tester, pliers, wire cutter, wire stripper, electrical tape, flashlight, radiant screwless wallplate (included), wiring leads (included), and ® wire nuts (included) NOTE: Exercise caution when using power tools. Overtightening the screws can damage the device. -
Page 6: Installation And Setup
installation & setup step one turn off the power for your device at the circuit breaker Flip the existing light switch multiple times to confirm the power is off. NOTES: • If there are multiple devices next to your existing light switch, make sure power is off at the circuit breaker for all of those devices. - Page 8 installation & setup step two remove the existing device Check for the following wires: HOT or LINE: Receives power from the circuit box. Referred to as “Hot” for the purposes of this guide. LOAD: Directs power to your light(s). NEUTRAL: Creates a path to return current to the power source when the device is off.
- Page 9 Load Supply “Hot”...
- Page 10 installation & setup step three wire the smart switch When connecting each wire, loosen the terminal screw, insert the wire into a terminal slot, and tighten the terminal screw until the wire is secured. Connect the neutral wires to the WHITE terminal slots. Connect the load wire to any LOAD terminal slot.
- Page 11 Terminal screw Load Terminal slot Supply “Hot” NOTE: For multi-gang installations, refer to “specifications” on page 22.
- Page 12 installation & setup step four secure the smart switch Gently fold the wires into the electrical box. Be careful not to pinch a wire or loosen any wire caps. Use the device screws to secure the smart switch to the electrical box. Do not fully tighten the screws.
- Page 14 installation & setup step five test the smart switch NOTE: See page 20 for feature details. Turn the power back on at the circuit breaker. Press the paddle switch to turn your light on and off. TROUBLESHOOTING TIP: If the device is not powering, reference the “faqs” on page 23 to determine if you have reversed the “hot”...
- Page 16 installation & setup step six attach the screwless wall plate Noting which side faces out, align the sub-plate over the device screws. Use the sub-plate screws (provided) to secure the sub-plate to the smart switch. Tighten the device screws to secure the smart switch to the electrical box. Angle the end of the screwless wall plate over the top edge of the sub-plate.
- Page 19 Download and launch the Smart Lights Thread app by Legrand. The app is available on the App Store or on Google Play. Connect your smart hub (WTH1) by following the smart hub installation guide instructions and the self-guided app instructions.
-
Page 20: Getting To Know Your Switch
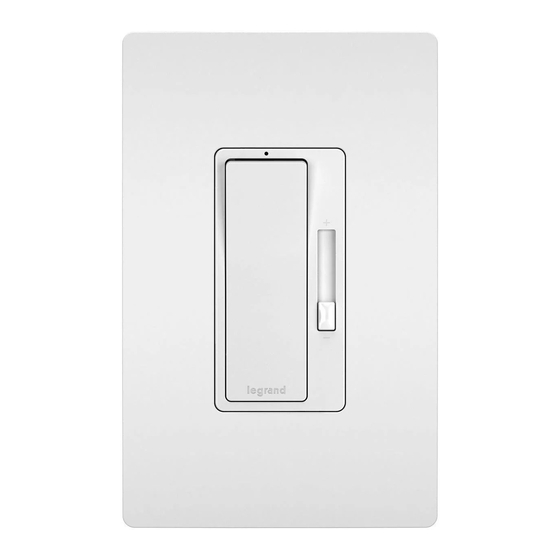
getting to know your switch Item Name Description • Press the top of the paddle to turn the light on and the bottom to turn the light off. • To return the switch to factory default, press and hold the top of the paddle for 15 seconds. Paddle Switch The LED illuminates a solid amber color. - Page 21 LED LOCATOR LIGHT EXPLANATIONS State of Explanation Color Light Solid Factory default; ready to Amber connect to your hub Flashing Device is attempting to Amber connect to the network Solid Device is connected to your White hub and is switched off...
-
Page 22: Specifications
Load Rating Resistive 120 VAC, 60 Hz,15 A Incandescent/halogen 1800 W Ballast 15 A standard/electronic Motor 1/2 HP Legrand reserves the right to change specifications without notice. -
Page 23: Faqs
faqs Which wire is the “hot” wire versus the “load” wire? To determine this safely, begin by confirming that power is off to the device location at the circuit breaker. Cap all of the exposed wires in the electrical box, then turn the power back on to the device location. Find your non- contact voltage tester. -
Page 24: Regulatory Information
regulatory information FCC NOTICE This device complies with Part 15 of the FCC rules. Operation is subject to the following two conditions: (1) this device may not cause harmful interference, and (2) this device must accept any interference received, including interference that may cause undesirable operation. - Page 25 If this equipment does cause harmful interference to radio or television reception, which can be determined by turning the equipment off and on, the user is encouraged to try to correct the interference by one or more of the following measures: •...
- Page 26 regulatory information This equipment complies with FCC radiation exposure limits set forth for an uncontrolled environment. This equipment should be installed and operated with a minimum distance of 20 cm between the transmitter’s radiating structure(s) and the body of the user or nearby persons. NOTE: Any changes or modifications to this device that are not expressly approved by the manufacturer will void the warranty and the user’s authority to operate the equipment.
- Page 27 IC NOTICE This device complies with Industry Canada license-exempt RSS standards. Operation is subject to the following two conditions: (1) this device may not cause interference; and (2) this device must accept any interference, including interference that may cause undesired operation of the device. RF EXPOSURE STATEMENT This equipment meets the SAR evaluation limits given in RSS-102 Issue 5 requirements at the minimum separation distance of 15 mm to the human body.
-
Page 28: Warranty
1-877-833-3303. A dated sales receipt must be provided for all replacement requests (legible copies are acceptable). Additional warranty details are available at http://www.legrand.us under your device’s product page. -
Page 29: Support
IF YOU NEED HELP INSTALLING YOUR DEVICE, TALK TO OUR TECHNICAL SUPPORT TEAM: PHONE: 1-877-833-3303 8:00 a.m. to 8:00 p.m. EST (M-F) EMAIL: smartlights@legrand.us CHAT: https://www.legrand.us/radiant/smart-lighting.aspx (Click on the icon to open a dialogue box) - Page 30 Legrand, North America 301 Fulling Mill Rd, Ste. G Middletown, PA 17057 1-877-833-3303 www.legrand.us ©2018 Legrand All Rights Reserved 1507282 Rev D 08/18...
- Page 31 Smart Remote Switch WTRL20...
- Page 32 table of contents before you start ........3 warranty ........23 what you need ........4 regulatory information ..24–27 installation and setup ....6–19 support ........28 getting to know your switch ..20–21 notes ..........29 faqs ...........22...
-
Page 33: Before You Start
• The remote switch pairs ONLY with the codes. smart switch (WTRL10) and plug‑in • Install in a non‑metallic electrical box switch (WTP10) for multi‑location to protect wireless signal strength. control. Visit the Legrand website at www.legrand.us/radiant/smart‑lighting.aspx to learn more about your device. -
Page 34: What You Need
what you need REQUIRED: Phillips‑head screwdriver Flat blade screwdriver YOU MAY ALSO NEED: Non‑contact voltage tester, pliers, wire cutter, wire stripper, electrical tape, flashlight, radiant screwless wallplate (included), wiring leads (included), and ® wire nuts (included) NOTE: Exercise caution when using power tools. Overtightening the screws can damage the device. -
Page 36: Installation And Setup
• If you are installing your master device at the same time as the remote device, make sure power is off to both devices. • For detailed instructions on how to install your three-way remote product, please visit www.legrand.us/3wayinstallationinstructions.aspx. - Page 38 installation & setup step two remove the existing device Check for the following wires: HOT or LINE: Receives power from the circuit box. Referred to as “hot” for the purposes of this guide. Do not touch or let “hot” wires contact other wires. NEUTRAL: Creates a path to return current to the power source, when the device is off.
- Page 39 NOTE: Supply “Hot” This illustration depicts the location for the remote product. For detailed instructions on how to install your three- way remote product, please visit: www.legrand.us/ 3wayinstallation Master instructions.aspx (Smart Switch)
- Page 40 installation & setup step three wire the smart remote switch When connecting each wire, loosen the terminal screw, insert the wire into a terminal slot, and tighten the terminal screw until the wire is secured. Master Remote Connect the neutral wires to the Connect the neutral wires to the WHITE terminal slots.
- Page 41 MASTER REMOTE Terminal screw Supply Load “Hot” Terminal slot NOTE: IThe master device is always on the load side. If you are unsure about your wiring, consult the “faqs” on page 22, technical support, or a licensed electrician.
- Page 42 installation & setup step four secure the smart remote switch Gently fold the wires into the electrical box. Be careful not to pinch a wire or loosen any wire nuts. Use the device screws to secure the smart remote switch to the electrical box. Do not fully tighten the screws.
- Page 44 installation & setup step five test the smart remote switch NOTE: See 20 for feature details. Turn the power back on at the circuit breaker. Look for a solid amber light on the device’s LED indicator. The remote switch will not be able to control the load until it is paired in the app to the hub and master smart switch.
- Page 46 installation & setup step six attach the screwless wall plate Noting which side faces out, align the sub‑plate over the device screws. Use the sub‑plate screws (provided) to secure the sub‑plate to the smart remote switch. Tighten the device screws to secure the smart remote switch to the electrical box.
- Page 49 Download and launch the Smart Lights Thread app by Legrand. The app is available on the App Store or on Google Play. Connect your smart hub (WTH1) by following the smart hub installation guide instructions and the self‑guided app instructions.
-
Page 50: Getting To Know Your Switch
getting to know your remote switch Item Name Description • Press the top of the paddle to turn the light on and the bottom to turn the light off. • To return the switch to factory default, press and hold the top of the paddle for 15 seconds. Paddle Switch The LED illuminates a solid amber color. - Page 51 LED LOCATOR LIGHT EXPLANATIONS State of Explanation Color Light Solid Factory default; ready to Amber connect to your hub Blinking Device is attempting to Amber connect to the network Solid Device is connected to your hub White and is switched off...
-
Page 52: Faqs
faqs Which device location has the “hot” wire versus the “load” wire? To determine this safely, begin by confirming that power is off to all of the device locations controlling the three‑way load at the circuit breaker. Remove both devices and cap all of the exposed wires in the electrical box to make sure no wires in the box are accidentally touching. - Page 53 1‑877‑833‑3303. A dated sales receipt must be provided for all replacement requests (legible copies are acceptable). Additional warranty details are available at http://www.legrand.us under your device’s product page.
- Page 54 regulatory information FCC NOTICE This device complies with Part 15 of the FCC rules. Operation is subject to the following two conditions: (1) this device may not cause harmful interference, and (2) this device must accept any interference received, including interference that may cause undesirable operation.
- Page 55 If this equipment does cause harmful interference to radio or television reception, which can be determined by turning the equipment off and on, the user is encouraged to try to correct the interference by one or more of the following measures: •...
- Page 56 regulatory information This equipment complies with FCC radiation exposure limits set forth for an uncontrolled environment. This equipment should be installed and operated with a minimum distance of 20 cm between the transmitter’s radiating structure(s) and the body of the user or nearby persons. NOTE: Any changes or modifications to this device that are not expressly approved by the manufacturer will void the warranty and the user’s authority to operate the equipment.
- Page 57 IC NOTICE This device complies with Industry Canada license‑exempt RSS standards. Operation is subject to the following two conditions: (1) this device may not cause interference; and (2) this device must accept any interference, including interference that may cause undesired operation of the device. RF EXPOSURE STATEMENT This equipment meets the SAR evaluation limits given in RSS‑102 Issue 5 requirements at the minimum separation distance of 15 mm to the human body.
- Page 58 IF YOU NEED HELP INSTALLING YOUR DEVICE, TALK TO OUR TECHNICAL SUPPORT TEAM: PHONE: 1‑877‑833‑3303 8:00 a.m. to 8:00 p.m. EST (M‑F) EMAIL: smartlights@legrand.us CHAT: https://www.legrand.us/radiant/smart‑lighting.aspx (Click on the icon to open a dialogue box)
- Page 59 notes...
- Page 60 Legrand, North America 301 Fulling Mill Rd, Ste. G Middletown, PA 17057 1-877-833-3303 www.legrand.us ©2018 Legrand All Rights Reserved 1507283 Rev C 08/18...
- Page 61 Smart Tru-Universal Dimmer WTRL50...
- Page 62 table of contents before you start ........3 faqs ..........24 what you need ........4 warranty ........25 installation and setup ....6–19 regulatory information ..26–29 getting to know your dimmer ... 20–21 support ........30 specifications ......22-23 notes ..........31...
-
Page 63: Before You Start
• Use ONLY with dimmable lighting loads. • Install in a non-metallic electrical box to protect wireless signal strength. • Do not use to power medical equipment. Visit the Legrand website at www.legrand.us/radiant/smart-lighting.aspx to learn more about your smart device. -
Page 64: What You Need
what you need REQUIRED: Phillips-head screwdriver Flat blade screwdriver YOU MAY ALSO NEED: Non-contact voltage tester, pliers, wire cutter, wire stripper, electrical tape, flashlight, radiant screwless wallplate (included), wiring leads (included), and ® wire nuts (included) NOTE: Exercise caution when using power tools. Overtightening the screws can damage the device. -
Page 66: Installation And Setup
installation & setup step one turn off the power for your device at the circuit breaker Flip the existing light switch multiple times to confirm the power is off. NOTES: • If there are multiple devices next to your existing light switch, make sure power is off at the circuit breaker for all of those devices. - Page 68 installation & setup step two remove the existing device Check for the following wires: HOT or LINE: Receives power from the circuit box. Referred to as “Hot” for the purposes of this guide. LOAD: Directs power to your light(s). NEUTRAL: Creates a path to return current to the power source when the device is off.
- Page 69 Load Supply “Hot”...
- Page 70 installation & setup step three wire the smart dimmer When connecting each wire, loosen the terminal screw, insert the wire into a terminal slot, and tighten the terminal screw until the wire is secured. Connect the neutral wires to the WHITE terminal slots. Connect the load wire to any LOAD terminal slot.
- Page 71 Terminal screw Load Terminal slot Supply “Hot” NOTE: For multi-gang installations, refer to “specifications” on page 22.
- Page 72 installation & setup step four secure the smart dimmer Gently fold the wires into the electrical box. Be careful not to pinch a wire or loosen any wire nuts. Use the device screws to secure the smart dimmer to the electrical box. Do not fully tighten the screws.
- Page 74 installation & setup step five test the smart dimmer NOTE: See page 20 for feature details. Turn the power back on at the circuit breaker. Press the paddle switch to turn your light on and off. Use the dimmer paddle to adjust the level of your light(s). TROUBLESHOOTING TIP: If the device is not powering, reference the “faqs”...
- Page 76 installation & setup step six attach the screwless wall plate Noting which side faces out, align the sub-plate over the device screws. Use the sub-plate screws (provided) to secure the sub-plate to the smart dimmer. Tighten the device screws to secure the smart dimmer to the electrical box. Angle the end of the screwless wall plate over the top edge of the sub-plate.
- Page 79 Download and launch the Smart Lights Thread app by Legrand. The app is available on the App Store or on Google Play. Connect your smart hub (WTH1) by following the smart hub installation guide instructions and the self-guided app instructions.
-
Page 80: Getting To Know Your Dimmer
getting to know your dimmer Item Name Description • Press the top of the paddle to turn the light on or double-tap to raise the dimming percentage to 100%. • Press the bottom of the paddle to turn the light off. Paddle •... - Page 81 LED LOCATOR LIGHT EXPLANATIONS State of Explanation Color Light Solid Factory default; ready to Amber connect to your hub Flashing Device is attempting to Amber connect to the network Solid Device is connected to your hub White and is switched off Flashing Warns of an overload or short circuit while your device is on...
-
Page 82: Specifications
450 W / 450 W 450 W / 450 W / 450 W Legrand reserves the right to change specifications without notice. NOTE: The dimmer ships in forward phase mode to accommodate most load types. For loads that require reverse phase dimming, such as ELV loads, adjust the phase using the app. - Page 83 NOTES: For multi-gang installations, use pliers to break off the device fins.
-
Page 84: Faqs
faqs Which wire is the “hot” wire versus the “load” wire? To determine this safely, begin by confirming that power is off to the device location at the circuit breaker. Cap all of the exposed wires in the electrical box, then turn the power back on to the device location. Find your non- contact voltage tester. -
Page 85: Warranty
1-877-833-3303. A dated sales receipt must be provided for all replacement requests (legible copies are acceptable). Additional warranty details are available at http://www.legrand.us under your device’s product page. -
Page 86: Regulatory Information
regulatory information FCC NOTICE This device complies with Part 15 of the FCC rules. Operation is subject to the following two conditions: (1) this device may not cause harmful interference, and (2) this device must accept any interference received, including interference that may cause undesirable operation. - Page 87 If this equipment does cause harmful interference to radio or television reception, which can be determined by turning the equipment off and on, the user is encouraged to try to correct the interference by one or more of the following measures: •...
- Page 88 regulatory information This equipment complies with FCC radiation exposure limits set forth for an uncontrolled environment. This equipment should be installed and operated with a minimum distance of 20 cm between the transmitter’s radiating structure(s) and the body of the user or nearby persons. NOTE: Any changes or modifications to this device that are not expressly approved by the manufacturer will void the warranty and the user’s authority to operate the equipment.
- Page 89 IC NOTICE This device complies with Industry Canada license-exempt RSS standards. Operation is subject to the following two conditions: (1) this device may not cause interference; and (2) this device must accept any interference, including interference that may cause undesired operation of the device. RF EXPOSURE STATEMENT This equipment meets the SAR evaluation limits given in RSS-102 Issue 5 requirements at the minimum separation distance of 15 mm to the human body.
-
Page 90: Support
IF YOU NEED HELP INSTALLING YOUR DEVICE, TALK TO OUR TECHNICAL SUPPORT TEAM: PHONE: 1-877-833-3303 8:00 a.m. to 8:00 p.m. EST (M-F) EMAIL: smartlights@legrand.us CHAT: https://www.legrand.us/radiant/smart-lighting.aspx (Click on the icon to open a dialogue box) -
Page 91: Notes
notes... - Page 92 Legrand, North America 301 Fulling Mill Rd, Ste. G Middletown, PA 17057 1-877-833-3303 www.legrand.us ©2018 Legrand All Rights Reserved 1507284 Rev C 08/18...
- Page 93 Smart Remote Dimmer WTRL60...
- Page 94 table of contents before you start ........3 warranty ........23 what you need ........4 regulatory information ..24–27 installation and setup ....6–19 support ........28 getting to know your dimmer ... 20–21 notes ..........29 faqs ...........22...
-
Page 95: Before You Start
• The remote dimmer pairs ONLY with codes. the tru-universal dimmer (WTRL50) • Install in a non-metallic electrical box and plug-in dimmer (WTP20) for to protect wireless signal strength. multi-location control. Visit the Legrand website at www.legrand.us/radiant/smart-lighting.aspx to learn more about your smart device. -
Page 96: What You Need
what you need REQUIRED: Phillips-head screwdriver Flat blade screwdriver YOU MAY ALSO NEED: Non-contact voltage tester, pliers, wire cutter, wire stripper, electrical tape, flashlight, radiant screwless wallplate (included), wiring leads (included), and ® wire nuts (included) NOTE: Exercise caution when using power tools. Overtightening the screws can damage the device. -
Page 98: Installation And Setup
• If you are installing your master device at the same time as the remote device, make sure power is off to both devices. • For detailed instructions on how to install your three-way remote product, please visit www.legrand.us/3wayinstallationinstructions.aspx. - Page 100 installation & setup step two remove the existing device Check for the following wires: HOT or LINE: Receives power from the circuit box. Referred to as “hot” for the purposes of this guide. Do not touch or let “hot” wires contact other wires. NEUTRAL: Creates a path to return current to the power source when the device is off.
- Page 101 NOTE: Supply “Hot” This illustration depicts the location for the remote product. For detailed instructions on how to install your three- way remote product, please visit: www.legrand.us/ 3wayinstallation Master instructions.aspx (Smart Dimmer)
- Page 102 installation & setup step three wire the smart remote dimmer When connecting each wire, loosen the terminal screw, insert the wire into a terminal slot, and tighten the terminal screw until the wire is secured. Master Remote Connect the neutral wires to the Connect the neutral wires to the WHITE terminal slots.
- Page 103 MASTER REMOTE Terminal screw Supply Load “Hot” Terminal slot NOTE: IThe master device is always on the load side. If you are unsure about your wiring, consult the “faqs” on page 22, technical support, or a licensed electrician.
- Page 104 installation & setup step four secure the smart remote dimmer Gently fold the wires into the electrical box. Be careful not to pinch a wire or loosen any wire nuts. Use the device screws to secure the smart remote dimmer to the electrical box.
- Page 106 installation & setup step five test the smart remote dimmer NOTE: See page 20 for feature details. Turn the power back on at the circuit breaker. Press the paddle switch to turn your light on and off. Use the dimmer paddle to adjust the level of your light(s). Test the other switch for proper three-way operation.
- Page 108 installation & setup step six attach the screwless wall plate Noting which side faces out, align the sub-plate over the device screws. Use the sub-plate screws (provided) to secure the sub-plate to the smart remote dimmer. Tighten the device screws to secure the smart remote dimmer to the electrical box.
- Page 111 Download and launch the Smart Lights Thread app by Legrand. The app is available on the App Store or on Google Play. Connect your smart hub (WTH1) by following the smart hub installation guide instructions and the self-guided app instructions.
-
Page 112: Getting To Know Your Dimmer
getting to know your remote dimmer Item Name Description • Press the top of the paddle to turn the light on or double-tap to raise the dimming percentage to 100%. • Press the bottom of the paddle to turn the light off. Paddle •... - Page 113 LED LOCATOR LIGHT EXPLANATIONS State of Explanation Color Light Solid Factory default; ready to Amber connect to your hub Blinking Device is attempting to Amber connect to the network Solid Device is connected to your hub White and is switched off NOTE: When it is turned on, the dimmer recalls the most recent dimming level.
-
Page 114: Faqs
faqs Which device location has the “hot” wire versus the “load” wire? To determine this safely, begin by confirming that power is off to all of the device locations controlling the three-way load at the circuit breaker. Remove both devices and cap all of the exposed wires in the electrical box to make sure no wires in the box are accidentally touching. -
Page 115: Warranty
1-877-833-3303. A dated sales receipt must be provided for all replacement requests (legible copies are acceptable). Additional warranty details are available at http://www.legrand.us under your device’s product page. -
Page 116: Regulatory Information
regulatory information FCC NOTICE This device complies with Part 15 of the FCC rules. Operation is subject to the following two conditions: (1) this device may not cause harmful interference, and (2) this device must accept any interference received, including interference that may cause undesirable operation. - Page 117 If this equipment does cause harmful interference to radio or television reception, which can be determined by turning the equipment off and on, the user is encouraged to try to correct the interference by one or more of the following measures: •...
- Page 118 regulatory information This equipment complies with FCC radiation exposure limits set forth for an uncontrolled environment. This equipment should be installed and operated with a minimum distance of 20 cm between the transmitter’s radiating structure(s) and the body of the user or nearby persons. NOTE: Any changes or modifications to this device that are not expressly approved by the manufacturer will void the warranty and the user’s authority to operate the equipment.
- Page 119 IC NOTICE This device complies with Industry Canada license-exempt RSS standards. Operation is subject to the following two conditions: (1) this device may not cause interference; and (2) this device must accept any interference, including interference that may cause undesired operation of the device. RF EXPOSURE STATEMENT This equipment meets the SAR evaluation limits given in RSS-102 Issue 5 requirements at the minimum separation distance of 15 mm to the human body.
-
Page 120: Support
IF YOU NEED HELP INSTALLING YOUR DEVICE, TALK TO OUR TECHNICAL SUPPORT TEAM: PHONE: 1-877-833-3303 8:00 a.m. to 8:00 p.m. EST (M-F) EMAIL: smartlights@legrand.us CHAT: https://www.legrand.us/radiant/smart-lighting.aspx (Click on the icon to open a dialogue box) -
Page 121: Notes
notes... - Page 122 Legrand, North America 301 Fulling Mill Rd, Ste. G Middletown, PA 17057 1-877-833-3303 www.legrand.us ©2018 Legrand All Rights Reserved 1507285 Rev D 08/18...
- Page 123 Smart Plug-in Switch WTP10...
- Page 124 table of contents before you start ............. 3 installation and setup ........... 4–7 getting to know your switch ........8–9 specifications ............10 regulatory information .......... 12–15 warranty ..............16 support..............17...
-
Page 125: Before You Start
(grounding) pin. This plug will only fit into a grounding type outlet. If the plug does not fit into the outlet, contact a qualified electrician to install the proper outlet. Do not change the plug in any way. Visit the Legrand website at www.legrand.us/radiant/smart-lighting.aspx to learn... -
Page 126: Installation And Setup
installation & setup step one plug in the smart switch Insert the lamp or device to be controlled into the outlet on the smart plug-in switch. NOTE: See page 8 for feature details. - Page 128 installation & setup step two test the smart plug-in switch NOTE: See page 8 for feature details. When the device is off, press the button to turn your device on. Press the button to turn your device off. TROUBLESHOOTING TIP: If the lamp is not responding to the switch, confirm that the outlet is powered, that any switch that normally powers the lamp is on, and that the bulb(s) are functional.
- Page 129 Download and launch the Smart Lights Thread app by Legrand. The app is available on the App Store or on Google Play. Connect your smart hub (WTH1) by following the smart hub installation guide instructions and the self-guided app instructions.
-
Page 130: Getting To Know Your Switch
getting to know your switch Item Name Description • Turns the device on or off. • To return the switch to factory default, press and hold the button for 15 seconds. The LED illuminates a solid amber color. Button • To complete the factory reset, you must also remove the device from your Samsung Artik Cloud account before it can be recommissioned with your existing Hub or a new Hub. - Page 131 LED LOCATOR LIGHT EXPLANATIONS State of Explanation Color Light Factory default; Solid ready to connect to Amber your hub Device is attempting Flashing to connect to the Amber network Device is connected Solid to your hub and is White switched off...
-
Page 132: Specifications
Load Rating Resistive 120 VAC, 60 Hz, 15 A Incandescent/halogen 1800 W Ballast 15 A standard/electronic Motor 1/2 HP Legrand reserves the right to change specifications without notice. -
Page 134: Regulatory Information
regulatory information FCC NOTICE This device complies with Part 15 of the FCC rules. Operation is subject to the following two conditions: (1) this device may not cause harmful interference, and (2) this device must accept any interference received, including interference that may cause undesirable operation. - Page 135 If this equipment does cause harmful interference to radio or television reception, which can be determined by turning the equipment off and on, the user is encouraged to try to correct the interference by one or more of the following measures: •...
- Page 136 regulatory information This equipment complies with FCC radiation exposure limits set forth for an uncontrolled environment. This equipment should be installed and operated with a minimum distance of 20 cm between the transmitter’s radiating structure(s) and the body of the user or nearby persons. NOTE: Any changes or modifications to this device that are not expressly approved by the manufacturer will void the warranty and the user’s authority to operate the equipment.
- Page 137 IC NOTICE This device complies with Industry Canada license-exempt RSS standards. Operation is subject to the following two conditions: (1) this device may not cause interference; and (2) this device must accept any interference, including interference that may cause undesired operation of the device. RF EXPOSURE STATEMENT This equipment meets the SAR evaluation limits given in RSS-102 Issue 5 requirements at the minimum separation distance of 15 mm to the human body.
-
Page 138: Warranty
1-877-833-3303. A dated sales receipt must be provided for all replacement requests (legible copies are acceptable). Additional warranty details are available at http://www.legrand.us under your device’s product page. -
Page 139: Support
IF YOU NEED HELP INSTALLING YOUR DEVICE, TALK TO OUR TECHNICAL SUPPORT TEAM: PHONE: 1-877-833-3303 8:00 a.m. to 8:00 p.m. EST (M-F) EMAIL: smartlights@legrand.us CHAT: https://www.legrand.us/radiant/smart-lighting.aspx (Click on the icon to open a dialogue box) - Page 140 Legrand, North America 301 Fulling Mill Rd, Ste. G Middletown, PA 17057 1-877-833-3303 www.legrand.us ©2018 Legrand All Rights Reserved 1507289 Rev C 08/18...
- Page 141 Smart Plug-in Tru-Universal Dimmer WTP20...
- Page 142 table of contents before you start ............. 3 installation and setup ........... 4–7 getting to know your dimmer ........ 8–9 specifications ............10 regulatory information .......... 12–15 warranty ..............16 support..............17...
-
Page 143: Before You Start
If the plug does not fit into the outlet, contact a qualified electrician to install the proper outlet. Do not change the plug in any way. • This smart plug-in dimmer is intended for lamps with dimmable bulbs ONLY. Visit the Legrand website at www.legrand.us/radiant/smart-lighting.aspx to learn... -
Page 144: Installation And Setup
installation & setup step one plug in the smart dimmer Insert the lamp to be controlled into the outlet on the smart plug-in dimmer. The smart dimmer up/down buttons can be reversed for use in outlets with the ground-plug up: •... - Page 146 installation & setup step two test the smart plug-in dimmer NOTE: See page 8 for feature details. When the lamp is off, press the top button to turn your lamp on. Hold the bottom button to decrease the light level. Hold the top button to increase the light level.
- Page 147 Download and launch the Smart Lights Thread app by Legrand. The app is available on the App Store or on Google Play. Connect your smart hub (WTH1) by following the smart hub installation guide instructions and the self-guided app instructions.
-
Page 148: Getting To Know Your Dimmer
getting to know your dimmer Item Name Description Button Control Features • Top button: Press to turn the light on or double-tap to raise the Top Button dimming percentage to 100%. • Bottom button: Press to turn the light off. •... - Page 149 LED LOCATOR LIGHT EXPLANATIONS State of Explanation Color Light Solid Factory default; ready Amber to connect to your hub Flashing Device is attempting to Amber connect to the network Device is connected Solid to your hub and is White switched off Warns of an overload Flashing or short circuit while...
-
Page 150: Specifications
300 W 300 W LED/Electronic Ballast Legrand reserves the right to change specifications without notice. NOTE: The dimmer ships in forward phase mode to accommodate most load types. For loads that require reverse phase dimming, such as ELV loads, adjust the... -
Page 152: Regulatory Information
regulatory information FCC NOTICE This device complies with Part 15 of the FCC rules. Operation is subject to the following two conditions: (1) this device may not cause harmful interference, and (2) this device must accept any interference received, including interference that may cause undesirable operation. - Page 153 If this equipment does cause harmful interference to radio or television reception, which can be determined by turning the equipment off and on, the user is encouraged to try to correct the interference by one or more of the following measures: •...
- Page 154 regulatory information This equipment complies with FCC radiation exposure limits set forth for an uncontrolled environment. This equipment should be installed and operated with a minimum distance of 20 cm between the transmitter’s radiating structure(s) and the body of the user or nearby persons. NOTE: Any changes or modifications to this device that are not expressly approved by the manufacturer will void the warranty and the user’s authority to operate the equipment.
- Page 155 IC NOTICE This device complies with Industry Canada license-exempt RSS standards. Operation is subject to the following two conditions: (1) this device may not cause interference; and (2) this device must accept any interference, including interference that may cause undesired operation of the device. RF EXPOSURE STATEMENT This equipment meets the SAR evaluation limits given in RSS-102 Issue 5 requirements at the minimum separation distance of 15 mm to the human body.
-
Page 156: Warranty
1-877-833-3303. A dated sales receipt must be provided for all replacement requests (legible copies are acceptable). Additional warranty details are available at http://www.legrand.us under your device’s product page. -
Page 157: Support
IF YOU NEED HELP INSTALLING YOUR DEVICE, TALK TO OUR TECHNICAL SUPPORT TEAM: PHONE: 1-877-833-3303 8:00 a.m. to 8:00 p.m. EST (M-F) EMAIL: smartlights@legrand.us CHAT: https://www.legrand.us/radiant/smart-lighting.aspx (Click on the icon to open a dialogue box) - Page 158 Legrand, North America 301 Fulling Mill Rd, Ste. G Middletown, PA 17057 1-877-833-3303 www.legrand.us ©2018 Legrand All Rights Reserved 1507290 Rev D 08/18...
- Page 159 Smart Outlet WTRR10...
- Page 160 table of contents before you start ........3 faqs ..........24 what you need ........4 warranty ........25 installation and setup ....6–19 regulatory information ..26–29 getting to know your outlet ..20–21 support ........30 specifications ......22-23 notes ..........31...
-
Page 161: Before You Start
• Install in a non-metallic electrical box • For dry, indoor use only. to protect wireless signal strength. • Do not use with loads exceeding the device load rating (see page 22). Visit the Legrand website at www.legrand.us/radiant/smart-lighting.aspx to learn more about your smart device. -
Page 162: What You Need
what you need REQUIRED: Phillips-head screwdriver Flat blade screwdriver YOU MAY ALSO NEED: Non-contact voltage tester, pliers, wire cutter, wire stripper, electrical tape, flashlight, radiant screwless wallplate (included), wiring leads (included), and ® wire nuts (included) NOTE: Exercise caution when using power tools. Overtightening the screws can damage the device. -
Page 164: Installation And Setup
installation & setup step one turn off the power for your device at the circuit breaker Test a plugged-in device to confirm the power is off. - Page 166 installation & setup step two remove the existing device Take a picture of the wiring, then check for the following wires: HOT or LINE: Receives power from the circuit box. Referred to as “Hot” for the purposes of this guide. NEUTRAL: Creates a path to return current to the power source when the device is off.
- Page 168 installation & setup step three wire the smart outlet When connecting each wire, loosen the terminal screw, insert the wire into a terminal slot, and tighten the terminal screw until the wire is secured. Connect the neutral wire to any WHITE terminal slot. Connect the hot wire to any HOT terminal slot.
- Page 169 Terminal slot Terminal screw Supply “Hot”...
- Page 170 installation & setup step four secure the smart outlet Gently fold the wires into the electrical box. Be careful not to pinch a wire or loosen any wire nuts. Use the device screws to secure the smart outlet to the electrical box. Do not fully tighten the screws.
- Page 172 installation & setup step five test the smart outlet NOTE: See page 20 for feature details. Turn the power on at the circuit breaker and look for an amber indicator light on the smart outlet to indicate that it is active. Plug a lamp or device into the controlled outlet.
- Page 174 installation & setup step six attach the screwless wall plate Noting which side faces out, align the sub-plate over the device screws. Use the sub-plate screws (provided) to secure the sub-plate to the smart outlet. Tighten the device screws to secure the smart outlet to the electrical box. Angle the end of the screwless wall plate over the top edge of the sub-plate.
- Page 177 Download and launch the Smart Lights Thread app by Legrand. The app is available on the App Store or on Google Play. Connect your smart hub (WTH1) by following the smart hub installation guide instructions and the self-guided app instructions.
-
Page 178: Getting To Know Your Outlet
getting to know your outlet Item Name Description Controlled Outlet “Switched” plug socket Indicates operation. See “Indicator Light Indicator Light Explanations” for detail. On/Off Button Turns the outlet on or off Uncontrolled Outlet “Always on” plug socket... - Page 179 INDICATOR LIGHT EXPLANATIONS State of Explanation Color Light Solid Factory default; ready to Amber connect to your hub Flashing Device is attempting to Amber connect to the network Solid Device is connected to your White hub and is switched off...
-
Page 180: Specifications
Load Rating Resistive 120 VAC, 60 Hz, 15 A Incandescent/halogen 1500 W Motor 1/2 HP Legrand reserves the right to change specifications without notice. -
Page 182: Faqs
faqs What are the additional wires in my wall box? You may have one of the following applications: 1. Your existing outlet may be controlled from a wall switch. The wire feeding power from the switch is not necessary and should be capped with a wire nut. -
Page 183: Warranty
1-877-833-3303. A dated sales receipt must be provided for all replacement requests (legible copies are acceptable). Additional warranty details are available at http://www.legrand.us under your device’s product page. -
Page 184: Regulatory Information
regulatory information FCC NOTICE This device complies with Part 15 of the FCC rules. Operation is subject to the following two conditions: (1) this device may not cause harmful interference, and (2) this device must accept any interference received, including interference that may cause undesirable operation. - Page 185 If this equipment does cause harmful interference to radio or television reception, which can be determined by turning the equipment off and on, the user is encouraged to try to correct the interference by one or more of the following measures: •...
- Page 186 regulatory information This equipment complies with FCC radiation exposure limits set forth for an uncontrolled environment. This equipment should be installed and operated with a minimum distance of 20 cm between the transmitter’s radiating structure(s) and the body of the user or nearby persons. NOTE: Any changes or modifications to this device that are not expressly approved by the manufacturer will void the warranty and the user’s authority to operate the equipment.
- Page 187 IC NOTICE This device complies with Industry Canada license-exempt RSS standards. Operation is subject to the following two conditions: (1) this device may not cause interference; and (2) this device must accept any interference, including interference that may cause undesired operation of the device. RF EXPOSURE STATEMENT This equipment meets the SAR evaluation limits given in RSS-102 Issue 5 requirements at the minimum separation distance of 15 mm to the human body.
-
Page 188: Support
IF YOU NEED HELP INSTALLING YOUR DEVICE, TALK TO OUR TECHNICAL SUPPORT TEAM: PHONE: 1-877-833-3303 8:00 a.m. to 8:00 p.m. EST (M-F) EMAIL: smartlights@legrand.us CHAT: https://www.legrand.us/radiant/smart-lighting.aspx (Click on the icon to open a dialogue box) -
Page 189: Notes
notes... - Page 190 Legrand, North America 301 Fulling Mill Rd, Ste. G Middletown, PA 17057 1-877-833-3303 www.legrand.us ©2018 Legrand All Rights Reserved 1507286 Rev D 08/18...
- Page 191 Smart Hub WTH1...
- Page 192 table of contents before you start ............. 3 installation and setup ........... 4–7 getting to know your hub ........8–11 regulatory information .......... 12–15 warranty ..............16 support..............17...
-
Page 193: Before You Start
DCaution: To reduce the risk of injury and/or overheating and damage to other equipment: • Connect the smart hub to a 120 VAC, 60 Hz power source ONLY. • For dry, indoor use only. Visit the Legrand website at www.legrand.us/radiant/smart-lighting.aspx to learn more about your smart hub. -
Page 194: Installation And Setup
installation & setup step one plug in your smart hub Place your smart hub in a location where there is good Wi-Fi signal strength. ® NOTE: If attaching to the wall, use the two mounting holes on the bottom of the hub. Wi-Fi is a registered trademark of Wi-Fi Alliance ®... - Page 197 Download and launch the Smart Lights Thread app by Legrand. The app is available on the App Store or on Google Play. Set up your smart hub by following the self-guided app instructions.
-
Page 198: Getting To Know Your Hub
getting to know your hub Item Name Description Solid: indicates that the hub is plugged in and Power LED receiving power Solid: indicates that the hub is connected to the home network Wi-Fi LED Flashing: indicates that the hub is updating software Solid: indicates that endpoints are connected on the Thread network Thread LED... - Page 200 getting to know your hub Item Name Description Power Port Micro USB power adapter (provided) connection point Reset Button Device Reboot: press and release Solid: Bluetooth is paired to your device Bluetooth LED Flashing: Hub is ready to pair to the device that is commissioning the system After app prompt: press for 2 seconds to activate Bluetooth...
-
Page 202: Regulatory Information
regulatory information FCC NOTICE This device complies with Part 15 of the FCC rules. Operation is subject to the following two conditions: (1) this device may not cause harmful interference, and (2) this device must accept any interference received, including interference that may cause undesirable operation. - Page 203 If this equipment does cause harmful interference to radio or television reception, which can be determined by turning the equipment off and on, the user is encouraged to try to correct the interference by one or more of the following measures: •...
- Page 204 regulatory information This equipment complies with FCC radiation exposure limits set forth for an uncontrolled environment. This equipment should be installed and operated with a minimum distance of 20 cm between the transmitter’s radiating structure(s) and the body of the user or nearby persons. NOTE: Any changes or modifications to this device that are not expressly approved by the manufacturer will void the warranty and the user’s authority to operate the equipment.
- Page 205 IC NOTICE This device complies with Industry Canada license-exempt RSS standards. Operation is subject to the following two conditions: (1) this device may not cause interference; and (2) this device must accept any interference, including interference that may cause undesired operation of the device. RF EXPOSURE STATEMENT This equipment meets the SAR evaluation limits given in RSS-102 Issue 5 requirements at the minimum separation distance of 15 mm to the human body.
-
Page 206: Warranty
1-877-833-3303. A dated sales receipt must be provided for all replacement requests (legible copies are acceptable). Additional warranty details are available at http://www.legrand.us under your device’s product page. -
Page 207: Support
IF YOU NEED HELP INSTALLING YOUR DEVICE, TALK TO OUR TECHNICAL SUPPORT TEAM: PHONE: 1-877-833-3303 8:00 a.m. to 8:00 p.m. EST (M-F) EMAIL: smartlights@legrand.us CHAT: https://www.legrand.us/radiant/smart-lighting.aspx (Click on the icon to open a dialogue box) - Page 208 Legrand, North America 301 Fulling Mill Rd, Ste. G Middletown, PA 17057 1-877-833-3303 www.legrand.us ©2018 Legrand All Rights Reserved 1507288 Rev D 08/18...
Need help?
Do you have a question about the Radiant Series and is the answer not in the manual?
Questions and answers