Table of Contents
Advertisement
Quick Links
ERGOVATION
Designed in Conjunction with
Patented 8,333,262
®
The Ergovation
is a revolutionary ergonomically designed sit harness tested to the ASTM F887 standard as well as CE standards
EN 358, Standard for Work Positioning and EN 813, Standard for Sit Harnesses.
®
Notes: Ergovation
Saddle / Sit harness pictured with Omega suspension.
Hardware / material colors may vary from that shown below.
FRONT VIEW
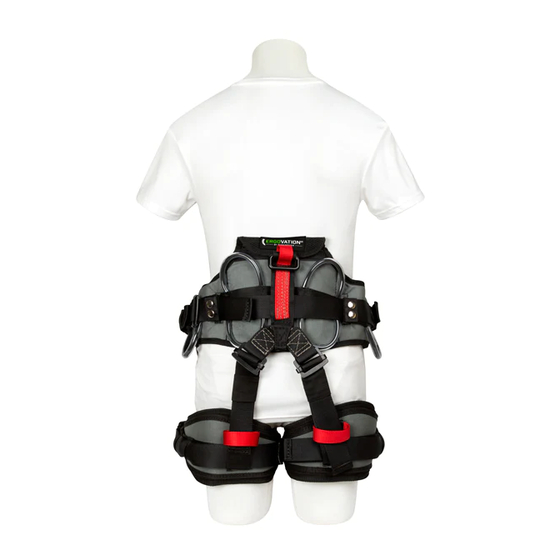
BACK VIEW
Sizing Information
The Ergovation
®
sit harness features a revolution in both fit and design. Due to the adjustable work positioning "D" rings, the load
bearing webbing that hosts the "D" can be adjusted to fit a range of sizes from 24" waist all the way to a size 44" waist! What this
means is that the user can adjust the "D" pieces to create a customizable fit never before seen. The back pad design is size
specific to the end user, however it can accommodate a range of up to 3 different waist sizes per each back pad.( For example a
size Medium back pad can accommodate a size 32in., 34in., and 36in. waist.) When measuring the waist, measure slightly below
where pants are typically worn. (Note: Be sure to allow for wearing of heavy clothing in colder months.) To obtain a
customized fit, the user should size the back pad to their own body. The wings of the back pad should wrap around the front of the
hips by about 2-3in. (5 cm - 7.6 cm) to allow for adequate adjustment of the work positioning "D" rings. If the wings of the back pad
sit flush with or behind the hip area, the user should go up one size to allow for adequate adjustment and maximized comfort.
(Note: Addition of the lumbar support can affect sizing; place lumbar pad in back pad pocket before sizing to ensure fit is
adequate)
Ergovation.Doc 11-3-08 (Rev. 8-18-17)
BUCKINGHAM MFG.
®
Series Sit Harness (PN 16906 – Series)
ERGOVATION
1) Ergonomic back pad with customizable lumbar support
2) Abdominal stabilization system
3) Enhanced closed cell foam padding along pelvic rim
4) Ergonomically designed leg pads
5) Load distributing polymers along pelvic region below work positioning "D" ring area
6) Aluminum Work Positioning "D" rings for increased comfort and decreased weight
7) Articulating suspension point
8) Load distributing tie in point with multiple tie in options and adjustable bridge
9) Quick connect waist strap buckle
10) Quick connect leg strap buckle
11) 2:1 Waist adjustment friction buckle
12) 1 ¾" Elastic webbing keepers
13) Adjustable suspension point for customizable balance.
14) Interchangeable lower suspension assembly
15) Hook and loop fastener attached load bearing webbing
16) 6 Gear loops
17) Snap webbing keepers
18) Leg strap retainer adjustment buckle
19) Carabiner attachment loop for chainsaw or retro harness attachment
20) Rear attachment buckle for retro harness attachment
21) Lumbar pocket closure
®
Features Key
PN 230216
Advertisement
Table of Contents

Related Manuals for Buckingham ERGOVATION Series


Summary of Contents for Buckingham ERGOVATION Series
- Page 1 BUCKINGHAM MFG. ® ERGOVATION Series Sit Harness (PN 16906 – Series) Designed in Conjunction with Patented 8,333,262 ® The Ergovation is a revolutionary ergonomically designed sit harness tested to the ASTM F887 standard as well as CE standards EN 358, Standard for Work Positioning and EN 813, Standard for Sit Harnesses.
-
Page 2: Attachment Points
Waist size (A) Back Thigh size Chest Size Inches Millimeters Size Universal Universal Measurements for Sizing 24-28” 610-711 Waist Measurement 28-32” 711-813 Thigh Measurement Chest Measurement 32-36” 813-914 36-40” 914-1016 40-42” 1016-1067 42-44” 1067-1118 SIZING - Fit is important to comfort. Be sure to allow for wear over heavy clothing. In order to obtain an optimum fit, the work positioning D-rings should be positioned slightly forward of the hip bones. -
Page 3: Parts Layout
WARNING: Activities involving the use of this equipment are extremely dangerous. The user of this equipment assumes all responsibility for their own actions. Before using this equipment the user must: Receive training to its proper use and specifications. Gain an understanding of all capabilities, uses, and (most importantly) limitations ... - Page 4 Abdominal Stabilizer Assembly Instructions Step 1 ® Gather the following components: Ergovation back pad (C) with long loop (I) and short hook (J) pieces of Abdominal Stabilizer. Step 2 Lie the Back Pad (C) so the inside is facing up. Insert the snap fastener ends of the Abdominal Stabilizer (I and J) through the designated slots in Back Pad (C).
- Page 5 Attach the loop fastener of the Long “D” Piece (A) to the hook fastener on the other side of the Back Pad (C). Align the Long “D” Piece so that the heel of the D-ring is slightly forward of the projection of your hip bone. Step 2 Remove the Back Pad and lie it face down on a flat surface.
- Page 6 Step 4 Pull the excess webbing back through the slot in the tail piece of the Back Pad. Once through the tail piece align the Long “D” Piece and fasten it back to itself by using the snap fasteners (if needed) as shown. Waist Strap Attachment Instructions Step 1 Once the “D”...
- Page 7 Step 3- Once assembled, place the Back Pad on your waist. To ensure proper fit: 1: Connect two halves of Quick Connect Waist Buckle for proper securement. Visually inspect that buckle is secured. Do not rely on only hearing the click. Look for both sides to be locked.
- Page 8 Step 4 Place the leg pad with the narrow side towards the inside of the thigh and the curve going up towards the buttocks so that the long strap is to the inside of the thigh and the buckle is on the outside (this configuration is shown in Step 2 (Attachment #1).
- Page 9 The Back Pad with Leg Strap Retainer Anchor should appear as shown when Leg Strap Retainers are properly attached. Final assembly of Back Pad with Leg Straps, Leg Pads, Leg Strap Retainers, and Leg Strap Retainer Anchor should appear as shown. Suspension Bridge Assembly Assembled View Omega Suspension pictured and featured in assembly (additional suspension bridge...
- Page 10 Step 4- Insert buckle (which is attached to the small D ring of the waist strap) through the triangular buckle slot in the climbing plate as shown. climbing plate Step 5- With the buckle through the climbing plate, pull excess webbing as shown. large buckle frame large buckle frame...
- Page 11 (Omega) Suspension Bridge Replacement / Assembly Instructions Assembled View (Front) Note: The Omega Suspension Bridge is supplied from the manufacturer with the minimum required tail length labels shown in step 5. These labels are not shown throughout this document for clarity purposes. To tie the termination knots in the Omega Suspension Bridge, follow the steps below.
-
Page 12: Front View
Only Buckingham Mfg. Co. or those people authorized in writing by Buckingham Mfg. Co. may make repairs to this equipment. ... - Page 13 The rear loop centered at the top of the back pad on Buckingham arborist saddles is not to be used for belay, suspension or work positioning due to the potential of the user being inverted in the event of a fall.
-
Page 14: Cleaning, Storage And Transportation
E-mail – sales @buckinghammfg.com Web site – www.buckinghammfg.com Information contained in these written instructions supersedes all other information (written, audio, video etc.) produced by Buckingham Mfg. prior to the revision date of this document. Ergovation.Doc 11-3-08 (Rev. 8-18-17) PN 230216...
Need help?
Do you have a question about the ERGOVATION Series and is the answer not in the manual?
Questions and answers