Table of Contents
Advertisement
Advertisement
Table of Contents

Related Manuals for Proline CDW655P-U


Summary of Contents for Proline CDW655P-U
-
Page 2: Table Of Contents
CONTENTS ELECTRICAL CONNECTION (UK ONLY) ..................2 IMPORTANT SAFETY INSTRUCTIONS ..................3 DESCRIPTION ........................4 INSTALLATION INSTRUCTIONS ....................5 Levelling ..........................5 Water Pressure ........................5 Connecting Your Dishwasher ..................... 5 Disconnecting Your Dishwasher ..................6 OPERATION ........................... 6 General Warnings and Recommendations ................. 6 Loading the Basket ...................... -
Page 3: Electrical Connection (Uk Only)
ELECTRICAL CONNECTION (UK ONLY) For your safety please read the following information. Warning: This appliance must be earthed. The appliance must be connected to a 220-240 volts 50 cycle AC supply by means of a three pin socket, suitably earthed. The appliance is supplied with a rewireable 13 amp 3 pin mains plug fitted with a 13 amp fuse. -
Page 4: Important Safety Instructions
IMPORTANT SAFETY INSTRUCTIONS This appliance must be earthed. Improper connection of the grounding conductor can result in the risk of an electric shock. Do not modify the plug provided with the appliance if it does not fit the outlet. Have a proper outlet installed by a qualified electrician. -
Page 5: Description
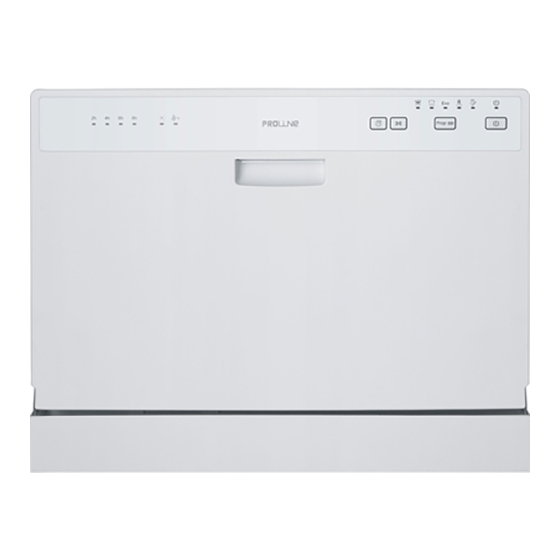
DESCRIPTION Front View Rear View Salt container Spray arm Cup shelf Detergent dispenser Basket Cutlery basket Drain connector Filter assembly Water inlet valve Rinse aid dispenser Control Panel ON/OFF button Programme indicator light Power indicator light Salt indicator light Programme button Rinse aid indicator light Start/Reset button Delay time indicator light... -
Page 6: Installation Instructions
INSTALLATION INSTRUCTIONS Your dishwasher can be installed in various locations in your kitchen as long as there is space and accessibility to connect your dishwasher to the water/drainage and electrical supply. NOTE: The plug must be accessible at all times. Levelling Place the dishwasher on an even, stable surface. -
Page 7: Disconnecting Your Dishwasher
Connect the other end of the drain hose (L-shaped) to the drain connector at the back of dishwasher cabinet. Tighten the drain hose end on to the drain connector using the metal clip included in the package. If you so wish, you may connect the water inlet hose on to the kitchen sink tap. You must obtain correct fittings/adapters to match the inlet hose connectors to ensure secure connection. -
Page 8: Loading The Basket
Before loading the dishes into the baskets it is necessary to: Remove coarse food remains, e.g. bones, which may clog the filter or damage the wash pump. Soak any pots or pans with burnt-on food remains on the bottom then load them into the basket. There is no need to pre-wash the dishes under running water before loading them into the basket. - Page 9 To make full use of the space in the basket when large dishes are loaded, the basket has tilting plate supports which can be stowed horizontally. Cutlery basket The cutlery should be arranged in an order inside the basket, with the handles pointing downwards. Knives and forks should be placed with handles up for safety.
-
Page 10: Using The Water Softener
Using the Water Softener The hardness of the water varies from place to place. If hard water is used in the dishwasher, deposits will be formed on the utensils. This appliance is equipped with a water softener which uses a salt specifically designed to eliminate the minerals from the water. - Page 11 Adding the rinse aid Rotate the dispenser cap anticlockwise and remove it. Add the rinse aid until the container is full (approximately 110ml). The optical level indicator on the side of the cap should be completely obscured. Replace the cap and turn it clockwise. NOTE: Refill the rinse aid when the optical level indicator becomes clear again, or when the rinse aid warning light comes on.
- Page 12 Adding the detergent To open the detergent dispenser cap, gently press the release button. Add the detergent and close the cap carefully. detergent for main wash cycle detergent for pre-wash cycle NOTE: Use only detergent specifically formulated for dishwashers. For optimal washing results it is important to sue a good quality detergent.
-
Page 13: Washing Programmes
Washing Programmes Programme Degree of soil Cycle Description Recommended Washing Energy Water Rinse quantity of detergent time (Kwh) pre-wash / main wash (min.) needed? Heavy soil Pre-wash (50℃) 3 g / 15 g 0.94 Wash (70℃) (or 3 in 1) Intensive Rinse Rinse... - Page 14 5. Close the dishwasher door securely. 6. Press the ON/OFF button to switch the dishwasher on. The power indicator light will come on. 7. Repeatedly press the PROG. button to select the desired programme. The corresponding programme indicator light will come on. 8.
-
Page 15: Maintenance And Cleaning
MAINTENANCE AND CLEANING Always unplug the unit from the mains before cleaning. Do not use chemical solvents or strong detergents as these may damage the cosmetic finish. Clean the outer surfaces and the tank of the dishwasher with a damp cloth. Cleaning the Filter Unit The filter unit consists of a main filter (1), micro filter (2) and central filter (3). -
Page 16: Cleaning The Spray Arm
Cleaning the Spray Arm The spray arm can be easily removed for periodic cleaning of the nozzles, to prevent possible clogging. To remove the spray arm, hold and raise it to release it from the tank. Wash it under running water and carefully replace it in the seat, checking that the rotary movement is in on way impeded. - Page 17 Suds in the tub Improper detergent Use only the detergent special for dishwasher to avoid suds. If this occurs, open the door and let the suds evaporate. Close the door securely then start the soak wash cycle to drain the water out. Repeat if necessary. Spilled rinse aid Always wipe up rinse aid spills immediately.
-
Page 18: Specifications
The dishes are not Improper loading Refer to “Loading the Basket”. quite dry. The rinse aid has run Increase or refill the amount of rinse aid. out or too little is being used. Wrong programme Choose a programme with long washing selection time.
Need help?
Do you have a question about the CDW655P-U and is the answer not in the manual?
Questions and answers