
Related Manuals for Motorola solutions WAVE TLK 100i


Summary of Contents for Motorola solutions WAVE TLK 100i
- Page 1 WAVE™ TWO-WAY RADIO TLK 100i USER GUIDE en-XA APRIL 2019 © 2019 Motorola Solutions, Inc. All rights reserved. MN005652A01-AA...
-
Page 2: Table Of Contents
English Contents Audio Tones..........18 Indicator Tones........18 Chapter 4: Radio Calls ..........19 Important Safety Information.......... 4 Talkgroup and Contact List........19 Notice to Users...............5 Switching Groups or Contacts....19 Handling Precautions............. 6 Group Calls............19 Software Version............7 Responding to Group Calls.....19 Copyrights and Trademarks........... - Page 3 English Turning Radio Location On or Off......25 Turning Wi-Fi On or Off........25 Turning Radio Cellular On or Off....... 26 Bluetooth............26 Turning Bluetooth On or Off....27 Searching for Bluetooth Devices.... 27 Connecting to Bluetooth Devices....27 Disconnecting from Bluetooth Devices... 28 Scan..............
-
Page 4: Important Safety Information
Compliance with applicable standards and Regulations. For a list of Motorola Solutions-approved antennas and other accessories, visit the following website: http://www.motorolasolutions.com Any modification to this device, not expressly authorized by Motorola Solutions, may void the user's authority to operate this device. -
Page 5: Notice To Users
• This device must accept any interference received, including interference that may cause undesired operation. CAUTION: Changes or modifications made to this device, not expressly approved by Motorola Solutions, could void the authority of the user to operate this equipment. -
Page 6: Handling Precautions
English Handling Precautions • Keep your radio clean and exposure to water should be avoided to help ensure proper functionality and performance. • To clean the exterior surfaces of the radio, use a diluted solution of mild dishwashing detergent and fresh water (for example, one teaspoon of detergent to one gallon of water). -
Page 7: Software Version
English Software Version All the features described in the following sections are supported by the software version R01.01.40.0000 or later. Check with your dealer or system administrator for more information. -
Page 8: Copyrights And Trademarks
Open Source Software rights for copyrighted computer programs. Accordingly, any copyrighted Motorola Solutions computer programs This Motorola Solutions product described in this document contained in the Motorola Solutions products described in may contain Open Source Software. For information this document may not be copied or reproduced in any... -
Page 9: Disclaimer
Please refer to your Motorola Solutions contact for further information. -
Page 10: Getting Started
English Getting Started How to Use This Guide This user guide covers the basic operation of the TLK 100i Wave Two-Way Radio. Your dealer or system administrator can customize your radio for your specific needs. Check with your dealer or system administrator for more information. -
Page 11: Chapter 1: Basic Operations
English Basic Operations 2 Attach the battery cover by aligning it in place and slide the battery latch until it snaps into place. This chapter explains the operations to get you started on using the radio. Attaching the Battery 1 Align the battery contacts with the contacts inside the battery compartment. -
Page 12: Charging The Battery
Your radio is powered by a Lithium-Ion (Li-Ion) battery. Antenna • To comply with warranty terms and avoid damages, charge the battery using a Motorola Solutions CAUTION: charger exactly as described in the charger user If you must replace the antenna, ensure that you guide. -
Page 13: Turning The Radio On Or Off
English • To attach the antenna, set the antenna in the NOTICE: receptacle and turn clockwise. To turn on your radio when your radio is charging, press and hold the Power/Info button. The green LED illuminates and the display shows a power-on animation. -
Page 14: Chapter 2: Radio Controls
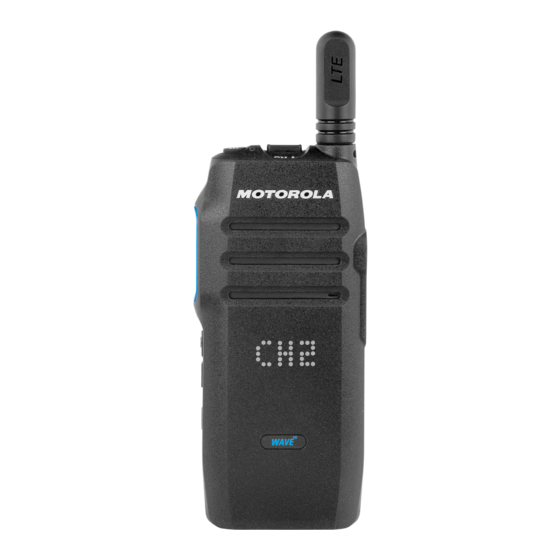
English Radio Controls 5 Volume Up and Volume Down buttons 6 Menu/Contact List Button This chapter explains the buttons and functions to control 7 LED Display the radio. 8 Microphone 9 USB Port 10 Audio Accessory Port 11 High-Output Speaker 12 LTE Antenna 13 Charging Contacts 1 Talkgroup/Contact List Scroll Rocker... -
Page 15: Chapter 3: Status Indicators
English Status Indicators Icon Description Brightness Level ..This chapter explains the Icons, battery capacity •••• information, LED indicators, and tones used in the radio. Do Not Disturb On ..•••• Icons Do Not Disturb Off ... -
Page 16: Battery Capacity
English Battery Capacity Icon Description Radio Location On The following table provides the battery capacity information of your radio. Icons and LED Indication appear when you press Power/Info button. Radio Location Off Table 2: Battery Capacity Downloading Software/Software Available Icon LED In- Voice An- Descrip-... -
Page 17: Led Indicators
English Icon LED In- Voice An- Descrip- LED Indica- Operational Mode Charge Only dication nouncement tion tion Mode Battery low Blink- Less than • During call hang- 5% capacity ing red time Solid red Not applicable Rapid charge LED Indicators Blinking red •... -
Page 18: Tones
English LED Indica- Operational Mode Charge Only Periodic Tone tion Mode Sounds periodically depending on the duration set by • Radio is idle the radio. Tone starts, stops, and repeats itself. Tones Repetitive Tone A single tone that repeats itself until it is terminated by The following are the tones that sound through on the radio the user. -
Page 19: Chapter 4: Radio Calls
English Radio Calls • The green LED blinks. • Your radio generates a momentary incoming call alert tone before unmuting to the caller's audio. This chapter explains the operations to receive, respond to, make, and stop calls. Calls supported are Group, Private, 1 To respond to the call, press PTT button. -
Page 20: Private Calls
English 3 Wait for the Talk Permit Tone to end and speak 2 To select contact, scroll contact list using clearly into the microphone. Talkgroup/Contact List Scroll Rocker until the right contact is displayed. 4 Release the PTT button to listen. NOTICE: The green LED blinks when the target radio If "X"... - Page 21 English • You hear a short alert tone the moment the transmitting radio releases the PTT button, indicating the channel is free for you to respond. 1 To respond to the call, press PTT button. The green LED lights up. 2 Wait for the Talk Permit Tone to end and speak clearly into the microphone.
-
Page 22: Chapter 5: Utilities
English Utilities 9 Radio Name This chapter explains the operations of the utility functions Checking Battery Strength available in your radio. Follow the procedure to check the battery level of your Checking Radio Information radio. Press the Power/Info button. Short press the Power/Info button repeatedly. The radio displays one of the following depending on One of the following occurs: the mode/state. -
Page 23: Cellular And Wi-Fi Values
English Cellular and Wi-Fi Values Turning DND On or Off The number of bars displayed represents the radio signal 1 To scroll through a list of menu items, short press strength. the Menu/Contact List button. Four bars indicate the strongest signal. This icon is only displayed while receiving. -
Page 24: Turning Voice Announcement On Or Off
English Turning Voice Announcement On or • All Voice Announcement tones are turned off. Turning Radio Alert Tones On or Off The Voice Announcement feature enables radio audible feedback. 1 To scroll through a list of menu items, press the Menu/Contact List button. -
Page 25: Adjusting The Display Brightness
English Adjusting the Display Brightness 3 To turn on Radio Location, press the Volume Up button. To turn off, press the Volume Down button. 1 To scroll through a list of menu items, press the If Location is on, the following occurs: Menu/Contact List button. -
Page 26: Turning Radio Cellular On Or Off
Voice Announcement sounds Wi-Fi Off. enabled device (accessory) through a Bluetooth • The display shows an "X" mark beside the Wi-Fi icon. connection. Your radio supports both Motorola Solutions and Commercially available Off-The-Shelf (COTS) Turning Radio Cellular On or Off Bluetooth-enabled devices. -
Page 27: Turning Bluetooth On Or Off
English Device (POD). Multiple connections with Bluetooth-enabled Searching for Bluetooth Devices devices of the same type are not supported. Refer to the user manual of your respective Bluetooth- To search for other Bluetooth devices, press the enabled device for more details on the full capabilities of Power/Info button until you see the Bluetooth icon. -
Page 28: Disconnecting From Bluetooth Devices
English Disconnecting from Bluetooth Devices NOTICE: If the DND mode is enabled during the scan mode, your radio prioritizes the DND mode. 1 When the Bluetooth accessory goes out of range or turn off, it will be disconnected from the radio Turning Scan On or Off automatically. -
Page 29: Chapter 6: Authorized Accessories List
English Chargers Authorized Accessories List Multi-unit Charger, Aus/NZ Plug (PMLN7103_) • Motorola Solutions provides a list of accessories to improve Single Unit Charger, Aus/NZ Plug (PMLN7111_) • the productivity of your radio. Single unit charger ext. (PMLN7094_) • Power supply adapter (PS000042A14 _) •... - Page 30 English • Operational Critical Wireless Earpiece with PTT (PMLN7969_) Miscellaneous Accessories • Battery Door (HKLN4684_)
-
Page 31: Batteries And Chargers Warranty
English Batteries and Chargers Warranty The Workmanship Warranty The workmanship warranty guarantees against defects in workmanship under normal use and service. TLK 100i Batteries 12 Months The Capacity Warranty The capacity warranty guarantees 80% of the rated capacity for the warranty duration. Lithium-Ion (Li-lon) Batter- 12 Months...
Need help?
Do you have a question about the WAVE TLK 100i and is the answer not in the manual?
Questions and answers