Advertisement
Quick Links
The Path Pilot
INSTRUCTIONS PERTAINING TO A RISK OF FIRE OR INJURY TO PERSONS
WARNING: To reduce the risk of FIRE OR INJURY TO PERSONS: Do not overdrive fixtures with greater
!
than 12 volts or fixture over-heating and short lamp life will occur. Do not overload the transformer by
installing (or relamping) higher wattage lamps than planned. Note: Total wattage of all lamps connected to one
transformer must not exceed the capacity of that transformer. Do not install luminaire within 10 feet (3.04 m) of
a pool, spa or fountain.
SAFETY WARNING: When relamping, be sure electrical supply is OFF. Lighted lamp is HOT! Low voltage
!
fixtures can become very hot depending on the lamp wattage used.
& around the lamp can become hot enough to blister hands. Use discretion when touching fixture and be sure
to allow fixture to cool before relamping. When relamping fixture avoid touching the lamp envelope with bare
hands. If touching the lamp is necessary during installation, clean the envelope with alcohol and dry with a
clean, soft cloth before turning ON. Contamination of the envelope may reduce lamp performance. Particular
care should be taken not to locate fixtures where small children can reach them if higher wattages are used.
NOTE: Keep the lamp free from impact while burning, as this may deform the filament and shorten the lamp life.
NOT INTENDED FOR INDOOR USE. All electrical work should be done by a qualified electrician.
KEEP THIS SHEET FOR FUTURE REFERENCE.
Tools Required:
Flat Head Screwdriver
!
Make certain electrical supply is OFF before starting fixture installation.
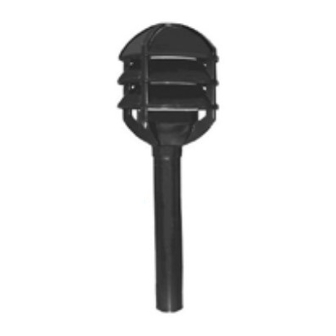
Fixture
Head
Fixture Wire
. 1
t A
a t
c
h
x i f
u t
e r
s
e t
m
o t
x i f
Globe
Top Cap
Screws
4a. KLV106 only - Remove top cap, louvers
and globe.
Revised 7/16/10
ECN 100715008
P.O. Box 60080 • 16555 East Gale Ave.
City of Industry, California 91716-0080
626/968-5666 • FAX 626/330-3861
KLV101/106 Installation Instructions
®
IMPORTANT SAFETY INSTRUCTIONS!
Fixture Stem
Spear Mount
Stem
u t
e r
h
e
a
. d
2. Attach complete assembly to de-
sired mounting. Note: KLV
Mounting Options can be installed
before fixture is attached.
Louvers
Status 15
Glass lenses and metal areas above
Silicone Grease
Fixture
Wire
Flat Blade
Screwdriver
. 3
T
head screws from bottom of husk.
Top Cap
Screws
4b. KLV101 only - Remove top cap and globe.
KLV101
KLV106
o
n i
t s
l l a
a l
m
, p
e r
m
o
v
e
o f
r u
Globe
Part No. 95477
l f
t a
Advertisement

Subscribe to Our Youtube Channel
Related Manuals for Hubbell KIM Path Pilot KLV101


Summary of Contents for Hubbell KIM Path Pilot KLV101
- Page 1 P.O. Box 60080 • 16555 East Gale Ave. City of Industry, California 91716-0080 626/968-5666 • FAX 626/330-3861 KLV101 KLV106 The Path Pilot KLV101/106 Installation Instructions ® INSTRUCTIONS PERTAINING TO A RISK OF FIRE OR INJURY TO PERSONS IMPORTANT SAFETY INSTRUCTIONS! WARNING: To reduce the risk of FIRE OR INJURY TO PERSONS: Do not overdrive fixtures with greater than 12 volts or fixture over-heating and short lamp life will occur.
- Page 2 The Path Pilot ® - KLV 101/106 Installation Instructions Gasket Lamp KIM LIGHTING LIMITED WARRANTY (T-4) When installed in accordance with Kim Installation Instructions and accepted trade practices, the following shall apply: General Product Limited Warranty Coverage All material and component parts used in the manufacture of Kim Products, are warranted to be free from defects of material and/or workmanship for a period of 1 year from date of sale, with the following exceptions: 5.
Need help?
Do you have a question about the KIM Path Pilot KLV101 and is the answer not in the manual?
Questions and answers