Contour RollerMouse Free3 Product Manual
Hide thumbs
Also See for RollerMouse Free3:
- User manual (14 pages) ,
- User manual (10 pages) ,
- User manual (12 pages)

Subscribe to Our Youtube Channel
Related Manuals for Contour RollerMouse Free3


Summary of Contents for Contour RollerMouse Free3
- Page 1 RollerMouse Free3 Wireless Product Manual...
-
Page 2: Box Contents
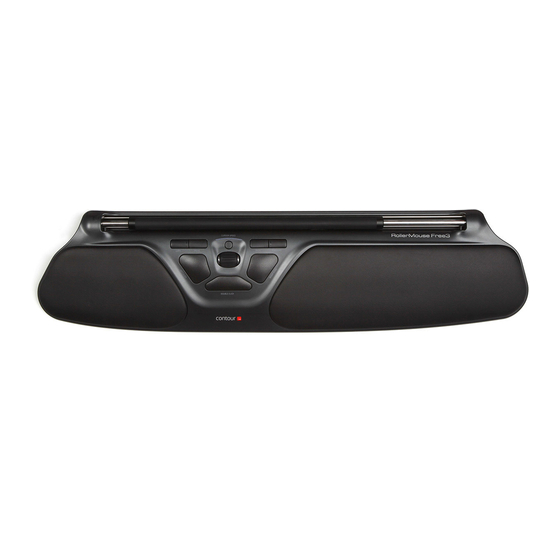
Box Contents RollerMouse Free3 Wireless Two short keyboard risers Two long keyboard risers Dongle (Wireless receiver) USB extender Charging cable RollerMouse Free3 Wireless... - Page 3 RollerMouse Functions Rollerbar Cursor speed/Battery level indicator (LED) Copy Paste Back Forward Left-click Right-click Scroll wheel “One Touch” double-click For additional mouse features and specific Mac settings, please download our driver at support.contour-design.co.uk RollerMouse Free3 Wireless...
- Page 4 Positive Tilt keyboard should be as close to the rollerbar. Contour Design’s Balance Keyboard is a perfect option for the Free3 Wireless. Designed specifically for the RollerMouse, the Balance Keyboard sits level with the rollerbar and can be easily adjusted to a positive, neutral, or negative tilt.
- Page 5 Inserting the Keyboard Risers Fit the end of the riser into the slot on the back of the RollerMouse Free3 Line up the short and long risers then press the two parts Wireless. together until you hear them snap into place.
- Page 6 Adjusting the Keyboard Risers Negative Tilt Neutral Elevated Positive Tilt Neutral Flat RollerMouse Free3 Wireless...
-
Page 7: Power Switch
ON before pairing with your computer. the computer’s USB port. Allow your computer a few seconds to automatically install. The Free3 Wireless features an optimized power management. Turning off the device is only necessary for permanent storage or during travel. RollerMouse Free3 Wireless... - Page 8 If you find the reception of the device is not optimal, please use the included USB cable adapter for your convenience. * For more information on USB 2.0 wireless products in connection with USB 3.0 hubs, please visit our website at www.contour-design.co.uk. RollerMouse Free3 Wireless...
- Page 9 Use the click force tension slider located under your • Cursor movement is performed by moving the rollerbar RollerMouse Free3 Wireless. Simply slide it until you find the click control that from side to side, and up and down.
- Page 10 Turn Bar-Click ON/OFF To turn off the click functionality in the rollerbar, hold down Cursor Speed button, and press the rollerbar . . Repeating this process will re-activate the click functionality in the rollerbar. RollerMouse Free3 Wireless...
-
Page 11: Battery Level
Battery Level Your RollerMouse Free3 comes pre-charged and has an expected battery life of up to 3 months with average daily use.* 100% RollerMouse Free3 has a built-in rechargeable battery. To see the battery level on yourdevice, press the cursor speed button once. The RollerMouse will first display the current cursor speed (DPI), then display the current battery level. - Page 12 There are ten speed selections which range from slow (600 DPI) to fast (2800 DPI). Speed can be identified by the LED lights as shown. To see the current DPI level, press the Cursor Speed button once. RollerMouse Free3 Wireless...
-
Page 13: Operating System
Operating System Different Mode Settings RollerMouse Free3 Wireless has 3 modes. PC- mode , Mac-mode and HID-mode. Use the following key commands to switch settings to best fit your operating system. LED’s light up from Window PC - Mode : PC Mode (Hold down the Cursor Speed and press Copy) - Page 14 LED indicator turns green and pulses twice in sccession. buttons for two seconds until LED lights flash to confirm. Repeating this process will revert back to double click functionality. RollerMouse Free3 Wireless...
- Page 15 Phone: +45 70 27 02 27 - Reorient or relocate the receiving antenna. Email: info@contour-design.com - Increase the separation between the equipment and receiver. - Connect the equipment into an outlet on a circuit different from that to which the receiver is connected.
Need help?
Do you have a question about the RollerMouse Free3 and is the answer not in the manual?
Questions and answers