Table of Contents
Advertisement
Quick Links
USER GUIDE
!!! Please refer to our website: www.geemarc.com for an up to date user
guide, as there may be important updates and changes you need to be
aware of !!!
What's in the box
● Wake & Shake Light ● Power supply unit ● This instructions guide ● 1 Shaker
Signs and symbols
The following symbols appear in the instructions for use and on the battery door.
WARNING :
Warning instruction indicating a risk of injury or damage to
health.
IMPORTANT : Safety note indicating possible damage to the device/
accessory.
NOTE :
Note on important information.
1. Safety notes
WARNING
Only operate the device with the power supply unit provided and the mains voltage
specified on the power supply unit.
Do not operate the device if it is visibly damaged.
In the event of defects or operational faults, switch the device off immediately and
disconnect it from the mains socket.
Do not pull on the mains cable or on the device to disconnect the power supply unit
from the socket.
Never plug in or unplug the power supply unit when you have wet hands.
Never hold or carry the device by the mains cable.
Keep packaging material away from children (risk of suffocation).
Arrange the mains cable so that no-one will trip over it.
Never use the device in proximity to moisture.
1
2. Intended use
The Wake-up Light wakes you from sleep in a gentle and natural manner. The LED
light gradually becomes brighter like a rising sun, allowing your eyes to slowly become
accustomed to the light conditions and your body to gently prepare itself for waking up.
The light intensity can be set to your personal preferences. Along with the simulated
sunrise, you can set an acoustic alarm to help you wake up. Choose between the
radio, a beep or five natural sounds or you can select shaker vibration. The Wake-up
Light provides a rested and pleasant start to your day.
3. Device functions:
5 natural sounds
Clock display
Shaker vibrations Goodnight function
Wake-up function with simulated
LED light can be used as a lamp
sunrises and alarm
Two alarms selection Simulated
Mood light function.
sunrise
USB Smart Phone charger.
Radio
MP3 Input.
WARNING
The device is only intended for the purpose described in these instructions for use.
The manufacturer is not liable for damage resulting from improper or careless use.
4. Initial use
Remove the packaging material.
Check that all parts listed are present.
Check the device, mains plug and cable for damage. Place the device on a firm,
even surface.
Position the device approx, 40 cm from your head.
Remove the battery compartment cover on the rear of the device and insert the 4 x
AA batteries with corrected polarity battery symbol on compartment. The battery
supplies power to the device in the event of a power failure and is not intended to
be used as a permanent power supply.
Plug the power supply connector into the power supply socket on the underside of
the device.
Insert the main plug into a suitable socket. The time will display and you can set the
hour format.
NOTE:
All settings will go back to normal time mode after 6 seconds, press the
TONE button to exit if you want to exit the settings.
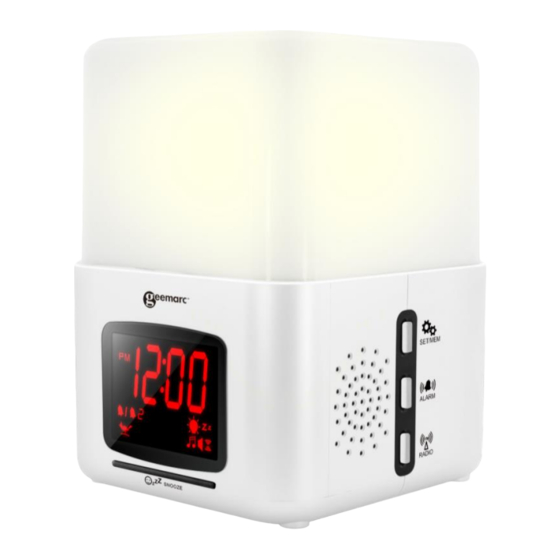
5. Unit description
FRONT
A1. LED light
A2. SET/MEM button (for adjusting time and radio station storage)
A3. ALARM button (for adjusting the alarm time n alarm source)
A4. RADIO button (for activating the radio function)
A5. SNOOZE button (for activating snooze function, goodnight function or Wake up
light function)
2
LEFT
A6. TONE button (for adjusting the volume and selecting alarm tone)
A7. LIGHT button (for switching on/off the light and adjusting the back light and color
mood light selecting)
A8. UP/Down button (For adjusting time, alarm and volume)
A9. Aux Input Jack (For connecting the MP3 input)
A10. USB port (for charging the smart phone)
A11. Battery compartment with cover
A12. Shaker Jack (for connecting the shaker)
A13. Reset-Hole (Resetting the device to factory settings)
A14. Switching power adapter (Select the good adaptor)
6. Display description
RIGHT
B1. Time / alarm time or radio frequency
B2. Light symbol
B3. Good night
B4. Shaker
B5. Beep Alarm sound
B6. Radio
B7. Seagull sound
B8. Wind sound
7. Operation
NOTE
: All settings will go back to normal time mode after 6 seconds, press the
TONE button to exit the settings.
REAR
B9. Rain forest sound
B10. Frog sound
B11. Bird sound
B12. FM radio frequency
B13. Alarm 1
B14. Alarm 2
B15. Sleep
B16. Radio station memory
3
Advertisement
Table of Contents

Related Manuals for Geemarc Wake'n'Shake Light


Summary of Contents for Geemarc Wake'n'Shake Light
- Page 1 Insert the main plug into a suitable socket. The time will display and you can set the !!! Please refer to our website: www.geemarc.com for an up to date user hour format. guide, as there may be important updates and changes you need to be...
- Page 2 If Alarm 2 is selected, Alarm 2 icon lit up. From the moment your Geemarc product is purchased, Geemarc guarantee it for the The default Volume U06 will show on the display. period of two years. During this time, all repairs or replacements (at our discretion) are ...
Need help?
Do you have a question about the Wake'n'Shake Light and is the answer not in the manual?
Questions and answers