Zimmer GEH8000 Series Installation And Operating Instructions Manual
Gripper, electric
Hide thumbs
Also See for GEH8000 Series:
- Installation and operating instructions manual (64 pages) ,
- Installation and operating instructions manual (54 pages)

Related Manuals for Zimmer GEH8000 Series


Summary of Contents for Zimmer GEH8000 Series
- Page 1 INSTALLATION AND OPERATING INSTRUC- TIONS GEH8000 series Gripper, electric DDOC00262 THE KNOW-HOW FACTORY www.zimmer-group.com...
-
Page 2: Table Of Contents
INSTALLATION AND OPERATING INSTRUCTIONS: 2-jaw parallel gripper, electric, GEH8000 series Contents 1 Supporting documents ...............................3 2 Safety notes ..................................3 3 Proper use ....................................4 4 Personnel qualification ...............................4 5 Product description ................................4 Forces and torques ......................................4 Type plate .........................................4 Protection class .........................................4 6 Function ....................................5... -
Page 3: Supporting Documents
3. The gripper may be used only in accordance with its proper use and technical data. Zimmer GmbH shall ac- cept no liability for any damage caused by improper use. -
Page 4: Proper Use
For information on forces and torques, please visit our website www.zimmer-group.com Ö If you should have further questions about forces and torques, please contact Zimmer GmbH Cus- tomer Service. Type plate A type plate is attached to the housing of the gripper. -
Page 5: Function
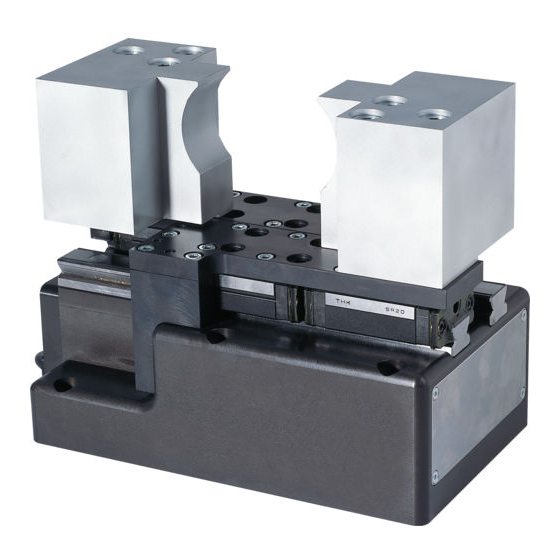
2-jaw parallel gripper, electric, GEH8000 series 6 Function The GEH8000 series gripper has a very high gripping force. This allows secure handling of even the heaviest workpiec- The combination of servo drive (position, speed and force control) and mechanical self-locking mechanism ensures a high degree of functionality. -
Page 6: Installation
INSTALLATION AND OPERATING INSTRUCTIONS: 2-jaw parallel gripper, electric, GEH8000 series 7 Installation Safety notices NOTICE: Switch off the energy supply for the electronics before any assembly, installation or maintenance work. ► Electronics may get damaged. CAUTION: Switch off the energy supply for the electronics before any assembly, installation or maintenance work. ► Injuries are possible. WARNING: Risk of injury in case of unexpected movement of the machine or system into which the gripper is to be installed. ► Switch off the power supply to the machine before all work. ► Secure the machine against being switched on unintentionally. - Page 7 Ö Make sure the mounting surface is sufficiently rigid and level. INFORMATION: For a complete overview of assembly options, visit our website Ö www.zimmer-group.com. If you still have questions about accessories, please contact Zimmer GmbH Customer Service. Zimmer GmbH Im Salmenkopf 5 D-77866 Rheinau, Germany +49 7844 9138 0 +49 7844 9138 80 www.zimmer-group.com...
-
Page 8: X3" Connector
INSTALLATION AND OPERATING INSTRUCTIONS: 2-jaw parallel gripper, electric, GEH8000 series “X3” connector INFORMATION: The terminal variants depicted in the figure absolutely must be observed. Zimmer GmbH shall accept no liability for any damage caused by improper use. Ö For further information about the connection assignment for the BOSCH Rexroth HCS01 series servo amplifier please refer to the manufacturer's planning instructions. 3x380V 3x110V 3x230V 1x230V Power supply installation An extension cord for connecting a servo amplifier can be joined to the gripper using threaded couplings. -
Page 9: Commissioning
INSTALLATION AND OPERATING INSTRUCTIONS: 2-jaw parallel gripper, electric, GEH8000 series 8 Commissioning Initial commissioning "Easy Startup Mode" NOTICE: The gripper must be connected to the converter (power supply = power line+ sensor cable). In addi- tion, the converter must be connected to the network. - Page 10 Please refer to the software manufacturer to learn how to use the software version avail- able to you. Ö Zimmer GmbH accepts no liability in case of damage due to improper or incorrect functioning. Observe the following steps when starting and running the software: ► Start the “Indraworks Ds” software.
- Page 11 INSTALLATION AND OPERATING INSTRUCTIONS: 2-jaw parallel gripper, electric, GEH8000 series Ö The main software window opens after successfully connecting. Ö The navigation pane is located on the left. Various system functions can be displayed and run using the navigation pane. Ö When starting, the “Axis Status” window appears to the right of the navigation pane. Ö Possible error messages are displayed in the menu bar. NOTICE: IMPORTANT: The controller's firmware must correspond to the parameter set's firmware.
- Page 12 INSTALLATION AND OPERATING INSTRUCTIONS: 2-jaw parallel gripper, electric, GEH8000 series Observe the following work steps when loading axis-specific parameter sets: ► Select the correct parameter set. Ö The parameter set designation consists of the following: • Product type (e.g. GEH8660) • Motor type (e.g. M5) • Firmware version (e.g. MPB-18V etc.) • Mode (e.g. “EasyStart”) - the unit can be operated in this mode.
- Page 13 INSTALLATION AND OPERATING INSTRUCTIONS: 2-jaw parallel gripper, electric, GEH8000 series After the parameter set has been successfully transmitted to the controller, it must be restarted. To do this, you can either briefly disconnect the controller's power supply or use the software to reboot. ► Select “Master Communication” in the navigation pane. Ö The “Master Communication Basic Settings” appear on the right side of the window.
- Page 14 INSTALLATION AND OPERATING INSTRUCTIONS: 2-jaw parallel gripper, electric, GEH8000 series There must be no errors in order to be able to move the unit. Current error messages are displayed in the “Axis Status” window. The error messages can be acknowledged using the “Clear Error” button. Zimmer GmbH Im Salmenkopf 5 D-77866 Rheinau, Germany ...
- Page 15 IMPORTANT: By clicking on the “OK” button, you confirm that have carefully read and understood the software's safety notes. Ö Zimmer GmbH accepts no liability in case of damage from ignoring these warning notices. WARNING: Noncompliance may result in severe injury to persons and material damage Always follow and comply with the warning notices displayed by the software.
- Page 16 INSTALLATION AND OPERATING INSTRUCTIONS: 2-jaw parallel gripper, electric, GEH8000 series The “Jog +” and “Jog -” buttons are enabled after confirming with “OK” and after the “Warning Notice” window has closed. The unit can be moved manually using these buttons. At the same time, a window with the “Drive OFF” button appears in the top right screen. Pressing this button disables the controller and the drive stops.
- Page 17 INSTALLATION AND OPERATING INSTRUCTIONS: 2-jaw parallel gripper, electric, GEH8000 series INFORMATION: Differences in the “Easy Startup Mode” parameter sets: • GEH8660_M5_MPx18_EasyStart.par At initial commissioning, Zimmer GmbH recommends an actual speed value of 100 to 500 [mm/min]. This ensures that the speed is sufficient enough to identify movement but not so fast as to pose a danger.
- Page 18 INSTALLATION AND OPERATING INSTRUCTIONS: 2-jaw parallel gripper, electric, GEH8000 series ► Next, change into the “Motor Encoder Reference” navigation window using the “Motor, Brake, Measuring System” navigation pane. ► Enter the reference position. ► Next, click on the “Set Absolute Position” button. Ö Another window opens. In this window, the “Set Absolute Position” button must be clicked as well.
-
Page 19: Gripping Force Charts
Dismantling and reassembling the gripper without authorization may result in complications, as special installation equipment is required in some cases. Zimmer GmbH shall not be liable in the event of unauthorized dismantling and reassembling of the gripper or in the event of any malfunction or damage resulting from this. -
Page 20: Rohs Declaration
14 RoHS declaration ... in terms of the EU Directive 2011/65/EU Name and address of the manufacturer: Zimmer GmbH, Im Salmenkopf 5, D-77866 Rheinau, +49 7844 9138 0, www.zimmer-group.com We hereby declare that the incomplete machine described below Product designation:... -
Page 21: Declaration Of Incorporation
16 Declaration of Incorporation ... in terms of the EU Machinery Directive 2006/42/EC (Annex II 1 B) Name and address of the manufacturer: Zimmer GmbH, Im Salmenkopf 5, D-77866 Rheinau, +49 7844 9138 0, www.zimmer-group.com We hereby declare that the incomplete machine described below, Product designation: 2-jaw parallel grippers with long stroke, electric... - Page 22 INSTALLATION AND OPERATING INSTRUCTIONS: 2-jaw parallel gripper, electric, GEH8000 series Zimmer GmbH Im Salmenkopf 5 D-77866 Rheinau, Germany +49 7844 9138 0 +49 7844 9138 80 www.zimmer-group.com ● ● ● ● ●...
- Page 23 INSTALLATION AND OPERATING INSTRUCTIONS: 2-jaw parallel gripper, electric, GEH8000 series Zimmer GmbH Im Salmenkopf 5 D-77866 Rheinau, Germany +49 7844 9138 0 +49 7844 9138 80 www.zimmer-group.com ● ● ● ● ●...
- Page 24 INSTALLATION AND OPERATING INSTRUCTIONS: 2-jaw parallel gripper, electric, GEH8000 series Zimmer GmbH Im Salmenkopf 5 D-77866 Rheinau, Germany +49 7844 9138 0 +49 7844 9138 80 www.zimmer-group.com ● ● ● ● ●...
Need help?
Do you have a question about the GEH8000 Series and is the answer not in the manual?
Questions and answers