Table of Contents
Advertisement
INTRODUCTION ..............................................................
WARNINGS & CAUTIONS ..............................................
FUNCTIONS / FEATURES ..............................................
VL110 ILLUSTRATIONS ..................................................
HEAD UNIT ...............................................................
COMPONENTS ........................................................
BUTTON FUNCTIONS .....................................................
SCREEN DISPLAY SEQUENCE: BI-LEVEL MEMORY ...........
(T2X MODEL ONLY) .........................................................................................
SETUP & PROGRAMMING .............................................
INITIAL SETUP .........................................................
System Check ....................................................
NOM SETUP .............................................................
Setup: Dual Bike ................................................
Setup: Wheel Circumference .............................
Setup: Service Timer ..........................................
Setup: Speed Units ............................................
1
Setup: Temperature Units ..................................
1
Setup: Clock .......................................................
2
Setup: Odometer ................................................
3
Setup: SmartLite ON/OFF ..................................
3
Setup: SmartLite Interval - From .......................
4
Setup: SmartLite Interval - To ............................
5
Exit .....................................................................
7
System Check ....................................................
PRIMARY SCREEN MODES ...........................................
8
UPPER SCREEN MODES .......................................
10
SPD/DST ............................................................
10
RT/TT ................................................................
10
AVG/MAX ...........................................................
10
SPD*/CAD* ........................................................
11
LOWER SCREEN MODES .......................................
11
CLK/ODO ...........................................................
13
SPD/TMP ...........................................................
14
STP/IDS .............................................................
ENGLISH
CONTENTS
14
14
15
15
16
16
16
17
18
18
18
19
20
20
21
21
22
22
I
Advertisement
Table of Contents

Related Manuals for Vetta VL110


Summary of Contents for Vetta VL110
-
Page 1: Table Of Contents
Setup: Temperature Units ........WARNINGS & CAUTIONS ..........Setup: Clock ............FUNCTIONS / FEATURES ..........Setup: Odometer ..........VL110 ILLUSTRATIONS ..........Setup: SmartLite ON/OFF ........HEAD UNIT ............... Setup: SmartLite Interval – From ....... COMPONENTS ............Setup: SmartLite Interval – To ...... - Page 2 ENGLISH CONTENTS SECONDARY SCREEN MODES ........RESET ..............AVG CAD*/MAX CAD* ..........RIDE DATA RESET ..........MAX TMP/MIN TMP ..........STOPWATCH & INTERMEDIATE DISTANCE RESET . OTHER FEATURES ............ALL CLEAR TOTAL RESET ........ TROUBLE SHOOTING ..........SLEEP MODE ............TECHNICAL SPECIFICATIONS ........
-
Page 3: Introduction
Thank you for purchasing a Vetta VL110 cycle computer. Please take time to familiarize yourself with all the functions of the VL110 model so you can take full advantage of its programs. And don’t forget to store this manual in a safe place for future reference! WARNINGS &... -
Page 4: Functions / Features
FUNCTIONS / FEATURES Smart Signal Ambient Temperature ● ● ● ● Current / Average / Maximum Speed Maximum / Minimum Temperature ● ● ● ● ● ● Speed Comparator Dual Bike Memory ● ● ● ● ● ● Cumulative Odometer Freeze Frame Memory ●... -
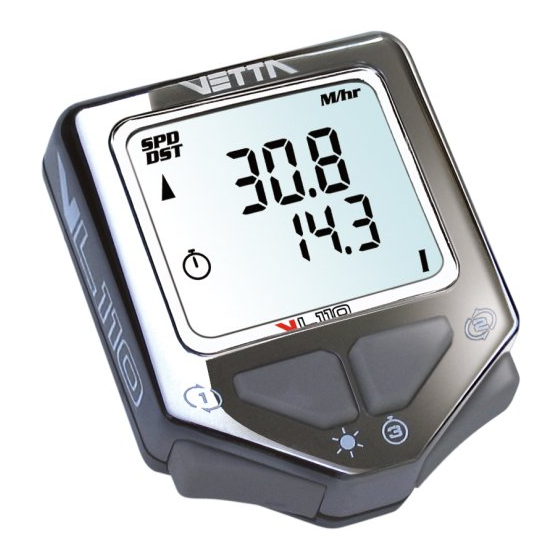
Page 5: Vl110 Illustrations
VL110 ILLUSTRATIONS HEAD UNIT... -
Page 6: Components
COMPONENTS CR 2450 For All Models For VL110 HD For VL110 WL For VL110 T2X Bladed Spoke Magnet (SPD Magnet) Wired Speed Sensor with WL Wireless Speed Transmitter Integrated T2X Torpedo Spacer Mounting Bracket WL Wireless Speed Active Mount Integrated T2X Active Mount... -
Page 7: Button Functions
BUTTON FUNCTIONS SETUP MODE Button Sets digits or units Advances to the next item, screen or setting mode Button Advances digits or toggles through units Hold for fast advance Resets RT to zero for Service Timer Button Button Button Has no function in Initial Setup Button Button Button... - Page 8 OPERATING MODE Button Starts/stops RT/TT timers and Stopwatch Reset RT/TT timers and other ride data to zero Exits NOM Setup and advances to NOM System Check and SPD/DST Mode Button Turn on the NiteLite for 3 seconds Button & (simultaneously for 2 seconds with RT/TT Timers are off) : Hold both in the SPD/DST Mode to enter NOM Setup Button Button...
-
Page 9: Screen Display Sequence: Bi-Level Memory
SCREEN DISPLAY SEQUENCE: BI-LEVEL MEMORY SPD* Upper Screen Mode Service Timer/ Low Battery Icon Upper Display Stopwatch Icon Lower Display Temperature Icon Lower Screen Mode Speed Comparator Symbol Bicycle Icon Remark: ( * ) Available until Upgrade to T2X model... -
Page 10: How To Recognize Your Integrated T2X Torpedo
HOW TO RECOGNIZE YOUR INTEGRATED T2X TORPEDO (T2X MODEL ONLY) 1. For VL110 T2X or Upgrade to T2X models, your computer can ONLY recognize the Integrated T2X Torpedo after it goes through the ID Learning procedure. 2. If your Integrated T2X Torpedo is purchased as a complete set with the VL110 series computer, your computer has been programmed to recognize the Torpedo in the factory. - Page 11 ID LEARNING PROCEDURE Step 1: Install the computer on the Integrated T2X Active Mount. Step 2: After the screen display “id NEEd”, press & hold the Torpedo’s button for 3 seconds.The Light Ring Indicator of the Torpedo will turn on for 2 seconds in red. Step 3: During the process, the computer will display “id LEArn”...
-
Page 12: Setup & Programming
SETUP & PROGRAMMING INITIAL SETUP The computer will automatically go into the Initial Setup Mode after 1. New battery replacement, or 2. All Clear Total Reset In the Initial Setup, riders can program the Basic Settings for the computer, the content of settings are same as NOM Setup for Basic Setting (see page 11, Section of NOM Setup for Basic Setting) Important To change any values or correct any unit errors made during Initial Setup, you must re-enter the NOM Setup by... -
Page 13: Setup: Dual Bike
HOW TO ENTER THE NOM SETUP MODE? 1. Make sure RT/TT timers are off (press in the RT/TT Mode and will disappear) 2. Advance to the SPD/DST Mode by using 3. Press & hold & to enter the NOM Setup Mode. Important Press at any time to exit NOM Setup Mode and advance to System Check. - Page 14 WHEEL SIZE CALCULATION Find your tire size and record the corresponding circumference measurement from the following chart lists. If your wheel size in not on the chart, or if you want a more precise calibration, wheel circumference may be calculated as follows: Step1: Measure the distance from the centre of the front wheel axle the ground in millimetres.
-
Page 15: Setup: Service Timer
SETUP: SERVICE TIMER Step 1: Service Timer Interval (in hour) Service Timer will be disabled when Service Timer Interval is set to “0000” 1. When the lower far right digit begins to fl ash, press to scroll to the desired number. 2. -
Page 16: Setup: Speed Units
SETUP: SPEED UNITS 1. Press to toggle between KM/hr or Mile/hr 2. Press to select and advance to the next Setup Mode. SETUP: TEMPERATURE UNITS 1. Press to toggle between C or 2. Press to select and advance to the next Setup Mode. SETUP: CLOCK 1. -
Page 17: Setup: Odometer
SETUP: ODOMETER 1. When the far right digit begins to fl ash, press scroll to the desired number 2. Press to select this no. and advance to next fl ashing digit 3. Repeat for each digit until the fi nal digit 4. -
Page 18: Setup: Smartlite Interval - From
SETUP: SMARTLITE INTERVAL – FROM 1. Press to scroll from 1:00 PM to 11:00 PM 2. Press to select and advance to the next Setup Mode. SETUP: SMARTLITE INTERVAL – TO 1. Press to scroll from 1:00 AM to 11:00 AM 2. -
Page 19: System Check
SYSTEM CHECK ● After the last setting, the computer will automatically advance to System Check. ● System Check displays all value and unit settings chosen during Setup in sequence. ● Each screen in System Check appears for 5 seconds and blink. ●... -
Page 20: Primary Screen Modes
PRIMARY SCREEN MODES IMPORTANT: For VL110 T2X or Upgrade to T2X models, your computer can ONLY recognize the transmitter— Torpedo after it goes through the ID Learning procedure (see page 8, Section of HOW TO RECOGNIZE YOUR INTEGRATED T2X TORPEDO) -
Page 21: Rt/Tt
UPPER/ LOWER DISPLAYS DEFINITIONS ACTUAL RIDE TIME IN THE TRIP TOTAL ELAPSED TRIP TIME FORM START TO FINISH HOW TO START THE TIMERS? ● If the timers have been reset to “0:00:00”, they will start automatically when the wheel rotates. (see HOW TO RESET THE TIMERS TO “0:00:00”... -
Page 22: Avg/Max
UPPER/ LOWER DISPLAYS DEFINITIONS AVERAGE SPEED (km/hr or mile/hr) MAXIMUM SPEED (km/hr or mile/hr) HOW TO OPERATE? ● Starts automatically when the wheels turn and TT timer is running (see page 19, Section of RT/TT Mode). ● Updated for every 0.1 miles or Km traveled. ●... -
Page 23: Lower Screen Modes
SECONDARY MODE 1. Press & hold to read Average & Maximum Cadence (see page 23, Section of AVG CAD/MAX CAD Secondary Screen Mode) 2.Press to exit. LOWER SCREEN MODES UPPER/ LOWER DISPLAYS DEFINITIONS CURRENT TIME ODOMETER, CUMULATIVE DISTANCE (km or miles) HOW TO CHANGE THE CLOCK? ●... -
Page 24: Spd/Tmp
UPPER/ LOWER DISPLAYS DEFINITIONS CURRENT SPEED CURRENT TEMPERATURE( °C or °F) HOW TO OPERATE? ● The Temperature will be automatically updated once per minute. HOW TO READ MAXIMUM & MINIMUM TEMPERATURE? 1. Press & hold to read MAX TMP/MIN TMP (see page 24, Section of MAX TMP/MIN TMP Secondary Mode) 2. -
Page 25: Secondary Screen Modes
HOW TO START THE STOPWATCH? ● Press to start. HOW TO STOP? ● Press to stop and freeze data for review. HOW TO RESET THE STOPWATCH & INTERMEDIATE DISTANCE TO ZERO? ● Press for 2 seconds. Important IDS does not affect overall Trip Distance or current ride data, but it operates the same as the DST function. -
Page 26: Max Tmp/Min Tmp
HOW TO RESET TO ZERO? ● Press for 2 seconds in any Primary Screen Mode except STP/IDS, with the RT/TT timers turned off. UPPER/ LOWER DISPLAYS DEFINITIONS MAXIMUM TEMPERATURE ( °C or °F) MAX TMP MINIMUM TEMPERATURE ( °C or °F) MIN TMP HOW TO ENTER THE MAX TMP/MIN TMP SECONDARY SCREEN MODE? ●... -
Page 27: Other Features
● Auto Start up & Awake without wasting extra battery run time of the computers. ● All VL110 bicycle computers will exit Sleep Mode automatically when they receive inputs from the buttons or wheel/crank* motion. (* T2X model only) ●... -
Page 28: Smart Lite
DUAL BIKE MEMORY( I II ) ● VL110 can be calibrated for two bicycles. It will store separate Torpedo ID*, Wheel Size, Service Timer, Odometer, as well as different formats selected for Time, Speed and Distance. (* T2X model only) ●... -
Page 29: Speed Comparator
SPEED COMPARATOR (▲▼) ● The Speed Comparator symbols indicate whether current Speed is above or below Current Average Speed. ● A positive (▲) or negative (▼) symbol appears in the upper left apart of the screen in all primary screen modes. ●... - Page 30 UPPER/ LOWER DISPLAYS DEFINITIONS LO HEAD Low Battery of Head Unit LO SENS Low Battery of Torpedo LO ALL Low Battery of Head Unit and Torpedo FOR T2X MODEL: ● Illuminate and stay “on” Wrench icon indicates low battery power in the Head Unit or Torpedo. ●...
-
Page 31: Freeze Frame Memory
FREEZE FRAME MEMORY ● 3 primary screens (SPD/DST, RT/TT, AVG/MAX) will be frozen for review at any point during a race or training ride. HOW TO SAVE? 1. Press & hold in any Primary Screen Mode. 2. The screen will fl ash to indicate it has been frozen. 3. -
Page 32: Reset
RESET RIDE DATA RESET 1. Clear the current ride data (DST, RT, TT, AVG & MAX SPD, AVG & MAX CAD*, MAX & MIN TMP, STP, IDS) to Zero. (*T2X model only) 2. Press for 2 seconds in any Primary Screen Mode except STP/IDS, with the RT/TT timers turned off. STOPWATCH AND INTERMEDIATE DISTANCE RESET 1. -
Page 33: Trouble Shooting
Check to be sure RT and TT are activated. ● Current speed-reading is erratic or does not appear. (VL110 HD) Inspect the wiring for any breaks or kinks. Replace the mounting bracket and sensor as needed. - Page 34 ● Screen readings are erratic and read too high or too low. Symptom of a weak battery. Replace the battery. ● Screen “frozen”, no response to buttons. Symptom of a weak battery. Replace the battery. ● No display whatsoever. Battery is completely dead, or not installed. Replace or install the battery.
-
Page 35: Technical Specifications
Integrated T2X Torpedo: CR123A, 3-Volt battery 12 or 24 hr format, Clock (CLK) hours and minutes displayed. Head Unit: VL110 HD: 30 months Service Timer Limit: 1~1999 hrs. max; +/-1 hr. Battery Run Time VL110 WL: 20 months (1 hour training/ Stopwatch (STP) Limit: 9:59:59 (10 hrs.);... -
Page 36: Warranty Policy
1. Prior to shipping an item back, you must fi rst obtain a Return Authorization Number (s) (RA#). Each item being returned must have an individual RA#. 2. To obtain an RA #, you must either contact the retailer where the product was originally purchased from, or contact VETTA directly at customerservice@vetta.com. - Page 37 ITEMS TO BE INCLUDED IN RETURNS 1. The defective product(s) 2. A letter clearly stating the problem(s) with the returned item(s). 3. Copy of the original sales receipt showing proof of purchase date. 4. The Company is not responsible for loss or additional damages while in transit to ACUMEN INC. 5.
-
Page 38: Customer Service Centers
CUSTOMER SERVICE CENTERS Acumen Inc. 101A Executive Dr., Suite 100, Sterling, VA 20166, USA. Acumen Europe BV Splijtbakweg 117, 1333 HJ, Almere, The Netherlands. E-Mail: customerservice@vetta.com Website: www.vetta.com...
Need help?
Do you have a question about the VL110 and is the answer not in the manual?
Questions and answers