Table of Contents
Advertisement
Quick Links
Download this manual
See also:
Installation Manual
Advertisement
Table of Contents

Related Manuals for Danfoss Air


Summary of Contents for Danfoss Air
- Page 1 MAKING MODERN LIVING POSSIBLE Danfoss Air Installation manual for Danfoss air units and duct systems DANFOSS HEATING...
-
Page 2: Table Of Contents
• a quick guide (located behind wallplate on the and has not been damaged. The ventilation unit wireless remote) consists of: If you have ordered the complete Danfoss Air • a wireless remote control - henceforth referred Solution, a complete packing list will be included to as the Air Dial (4 AAA-batteries included) with the duct system as well, please check that • a communication module - henceforth the... -
Page 3: Installation Of Air Unit And Condensate
Unit installation ✔ 1.0 Installation of air unit Siphon installation - correct Power supply and and condensate line connection of CMM module Insulate condensate (frost proof ) 16mm plywood or mdf (2) Upon delivery, the supply spigots are inverted, to... - Page 4 Unit installation Instructions for wall-mounted air units w & w Place the wall mounting bracket on wall in desired position, 75 mm from the bottom of the bracket to the top of the unit, mark up- and drill holes. Use screws suitable for the wall surface (screws are not included).
- Page 5 Unit installation Ø 19 mm smooth plastic pipe Hose clamp ¾” hose VIEWA102...
-
Page 6: Electrical Installation
If an ethernet connection is already available in the vicinity of the air unit, place the communi- cation module close to this, to allow for future Important: connection to PC. -
Page 7: Wireless Connection
Air Dial. speed. A failed connection will also be visible on the wireless remote. To connect the Air Dial, fit the batteries to the Air Trouble-shooting if wireless connection fails: Dial. The Air Dial will open up in a special mode, that leads the installer through a step-by-step • Connection on the wireless remote was not... -
Page 8: Balancing Of Main Air Flow
In the service menu, press ”set Example basic step” to activate the special commissioning A system is designed for an air flow of 200 m mode (where all outside influences are blocked – (design flow is always given as exhaust air flow). -
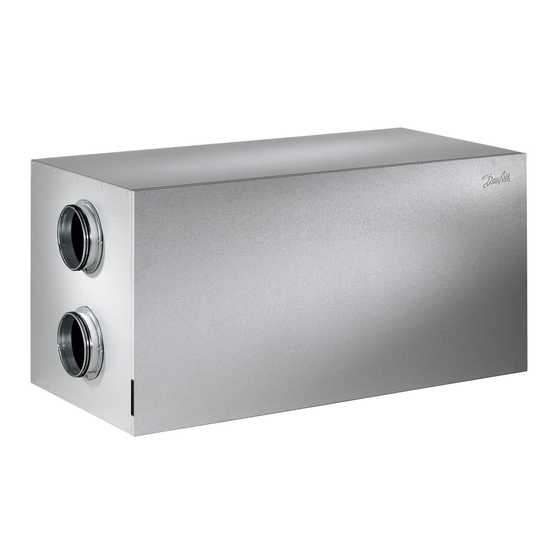
Page 9: Unit Dimensions
Optional supply air spigot located on w underside. To use, remove top supply air spigot by loosing screws, remove lid from the underside spigot, and use this to seal off the normal supply air spigot. Then fit the supply air spigot on underside. VIEWA102... - Page 10 Top view Ø160 Discharge Ø160 Exhaust Ø160 Ø160 Outdoor Supply Front view Isometric view (frontpanel removed) Filter, supply air Filter reset button Filter, exhaust air Diff. pressure exhaust air Diff. pressure supply air Reset filter Flow chart (for balancing) Diff. pressure...
- Page 11 Supply air Discharge air Discharge air Weight of unit: 66 kg 5.0 A-units in detail Front view (without front panel) (front panel removed) Filter, exhaust air Filter reset button Diff. pressure Diff. pressure exhaust air supply air Filter, supply air...
-
Page 12: Location Of Valves
Guidelines for valve locations: Supply Exhaust Try to avoid placing air diffusion valves above Designed to remove moist ”contaminated” air places where people stay for long periods, such and should therefore be positioned as close as as above sofas, beds, dining table, etc. -
Page 13: Installing The Valves
Installing the duct system 3.0 Installing supply and 3.3 Installing the valves pass through insulation, we recommend measu- Fix the bayonet socket that will hold the valve ring the insulation section and installing a duct exhaust valves in the to the ceiling. If it is a gypsum ceiling, we re- section along a suitable length of the bayonet ceiling commend putting a wooden plate on the back... -
Page 14: Installing The Duct System
Installing the duct system 4.0 Installing the duct To get the best out of the system and to achieve Example optimum operational efficiency, you should duct installations… system install the duct system as compactly as the building construction will allow. In practice, this means that you should keep your duct sections as short as possible and use as few bends as possible in order to achieve the lowest possible... -
Page 15: Connecting The Duct System
Installing the duct system 4.0 Installing the duct 4.2 Connecting the duct system The ducts supplied are 3 metres long as stan- Push connectors into the duct up to the stopsick; dard. If you want to connect 2 ducts together, system turning them slightly will make assembly easier. - Page 16 Where there is a pre- insulation without any problems and this will heating surface or a geothermic surface, the save some of the costs of insulation. insulation of the fresh air intake should be at least 100mm. • 50mm of insulation will be adequate for sound • Both supply and exhaust must be covered by...
-
Page 17: Sound Damping
Installing the duct system 4.0 Installing the duct 4.4 Sound damping the system carrried throughout the duct system and out into Sound damping the duct system is a very impor- individual rooms unless there is proper sound system tant element in achieving the general feeling damping. -
Page 18: Adjusting The Valves
Installing the duct system 4.0 Installing the duct 4.6 Adjusting the valves You can adjust the valves as follows: system Supply Start by fully closing the valve (not too tight!) Then open the valve the number of times indi- cated in the diagram. Please observe that the diagram is provided with the assembly drawing of the ducts system. - Page 19 Setting up the system 5.0 Setting up the system Once the system has been fully installed, we recommend having it set up professionally in order to achieve optimum operation. Contact Danfoss Ventilation A/S for information on your nearest approved installer. VIEWA102...
- Page 20 Danfoss A/S Ulvehavevej 61 7100 Vejle Tel. +45 74 88 85 00 Fax +45 74 88 86 03 air@danfoss.com www.danfoss.com www.air.danfoss.com VIEWA102 A1.02 www.danfoss.com...
Need help?
Do you have a question about the Air and is the answer not in the manual?
Questions and answers