Table of Contents
Advertisement
Quick Links
Download this manual
See also:
User Manual
Advertisement
Table of Contents

Related Manuals for ResMed Pixi


Summary of Contents for ResMed Pixi
- Page 1 User Guide English Pixi PEDIATRIC MASK...
- Page 2 Pixi ™ pediatric mask Contents / Contenu / Contenido / Conteúdo...
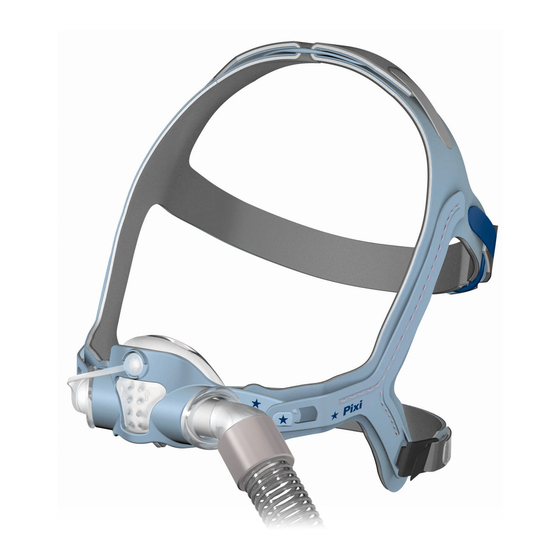
- Page 3 Mask components / Composants du masque / Piezas de la mascarilla / Componentes da máscara...
- Page 4 Mask components / Composants du masque / Piezas de la mascarilla / Componentes da máscara Item / Description / Description / Descripción / Part number / Composant / Descrição Code Pieza / Item produit / Número de pieza / Número da peça Short tube assembly / Ensemble tuyau court / — Conjunto del tubo corto / Conjunto de tubo curto Elbow / Coude / Codo / Cotovelo —...
- Page 5 Item / Description / Description / Descripción / Part number / Composant / Descrição Code Pieza / Item produit / Número de pieza / Número da peça Cushion shoulder / Rebord de la bulle / Hombro — de la almohadilla / Projeção da almofada Pressure port / Port de pression / Puerto de — presión / Porta de pressão Headgear / Harnais / Arnés / Arnês 61034...
-
Page 6: Intended Use
Pixi ™ pediatric mask Thank you for choosing the Pixi Pediatric mask. Please read the entire manual before use. Intended use The Pixi Pediatric mask channels airflow noninvasively to a patient from a continuous positive airway pressure (CPAP) or bilevel device (‘device’). - Page 7 Determine which side of the cushion the air tubing will be located. Ideally this should be the side that is closest to the device. Pixi Hint! If the child has a preference for sleeping on a particular side, this should be considered when determining the location of the device.
- Page 8 Set up...
-
Page 9: Fitting Steps
The fitting illustrations show the sequence for obtaining the best fit and comfort when using the mask. Pixi Hints! • If fitting the mask for the first time, we recommend the child be sitting in an upright position to ensure correct fit. - Page 10 Fitting...
-
Page 11: Adjustment Steps
Adjustment Pixi Hints! • To achieve optimal seal, adjust the headgear straps starting at the bottom strap and working upwards. • If the child experiences nasal dryness or irritation, using a humidifier is recommended. Adjustment steps If necessary, adjust the straps by removing the Velcro and gently ®... - Page 12 Attaching the pressure port The pressure port is used to measure the air pressure at your mask so that the correct pressure is set. This happens during the sleep study at the hospital. The pressure port is also used to deliver oxygen. This can take place in the home or hospital environment.
- Page 13 1–2. Ensure the cushion is not creased or folded or caught inside the sockets of the mask frame. The Pixi cushion is designed to sit mid-bridge. Ensure that the mask does not block the nose or mouth at any time.
-
Page 14: Removal Steps
Removal Removal steps 1–2. Gently hold the mask against the child’s face. Unhook the quick release clip from the lower headgear arm by pulling forward and away from the arm. 3–4. Keep holding the mask and remove the headgear by pulling up and over the head towards the face. -
Page 15: Emergency Removal
Emergency removal In the event of an emergency, remove the mask by placing your finger under the lower headgear strap and firmly pulling it away from the child—this will activate the quick release clip. Do not use this removal method under normal circumstances. - Page 16 Disassembly...
- Page 17 Headgear reassembly Pixi Hints! • You don’t need to disassemble your Pixi headgear to wash it. • The Velcro straps and plastic buckles have been color coded for ™ ease of assembly. Headgear reassembly steps Lay the headgear and plastic buckles out on a flat surface as shown, ensuring the lower headgear arms are facing up.
-
Page 19: Reassembly Steps
Reassembly Reassembly steps Insert each side of the cushion into the sockets of the mask frame. Ensure the cushion is oriented correctly. The arrows on the cushion should be pointing up towards the plug tether. The raised vented area of the cushion should also be sitting up against the mask frame. Pull the arms of the cushion through until the collar of the cushion shoulder is sitting against the mask frame. -
Page 20: Cleaning The Mask
Cleaning the mask The mask and headgear should only be gently handwashed. Daily/After each use: • Disassemble the mask components according to the disassembly instructions. • Thoroughly clean the separated mask components (excluding headgear), by gently rubbing in warm (approximately 86°F/30°C) water using mild soap. -
Page 21: Troubleshooting
Troubleshooting Problem / possible cause Solution Mask is too noisy Vent is blocked or partially blocked. If the vent requires cleaning, use a soft bristle brush. Elbow or plug is incorrectly inserted. Remove the elbow and plug from the mask and then reassemble according to the instructions. - Page 22 WARNING • The technical specifications of the mask are provided for your clinician to check that they are compatible with the CPAP or bilevel device. If used outside specification or if used with incompatible devices, the seal and comfort of the mask may not be effective, optimum therapy may not be achieved, and leak, or variation in the rate of leak, may affect the device function.
-
Page 23: Technical Specifications
Technical specifications The mask contains passive venting to protect against Pressure–flow curve rebreathing. As a result of manufacturing variations, the vent flow rate may vary. Pressure Flow (cm H (L/min) Mask pressure (cm H Dead space Physical dead space is the empty volume of the mask to the end of the swivel. -
Page 24: Limited Warranty
90 days or in the case of disposable masks the maximum use period. This warranty is only available to the initial consumer. It is not transferable. If the product fails under conditions of normal use, ResMed will repair or replace, at its option, the defective product or any of its components. - Page 25 ResMed shall not be responsible for any incidental or consequential damages claimed to have resulted from the sale, installation or use of any ResMed product. Some regions or states do not allow the exclusion or limitation of incidental or consequential damages, so the above limitation may not apply to you.
- Page 26 618162/4 2011-06 Pixi USER AMER ENG 618162...
Need help?
Do you have a question about the Pixi and is the answer not in the manual?
Questions and answers