
Related Manuals for Eaton KA349WE


Summary of Contents for Eaton KA349WE
- Page 1 COOPER POWER Reclosers SERIES Effective October 2015 MN280022EN Supersedes S280-40-10 April 2014 Mercury switch to microswitch retrofit kit KA349WE installation instructions...
- Page 2 CONTENTS OF THIS DOCUMENT SHALL NOT BECOME PART OF OR MODIFY ANY CONTRACT BETWEEN THE PARTIES. In no event will Eaton be responsible to the purchaser or user in contract, in tort (including negligence), strict liability or other-wise for any special, indirect, incidental or consequential damage or loss whatsoever, including but not limited to...
-
Page 3: Table Of Contents
Testing ..................11 Mercury switch to Microswitch retrofit kit kA349we instAllAtion instructions S280-40-10 Month 2015... -
Page 4: Safety Information
FOR LIFE FOR LIFE Eaton meets or exceeds all applicable industry standards relating to product safety in its Cooper Power™ series products. We actively promote safe practices in the use and maintenance of our products through our service literature, instructional training programs, and the continuous efforts of all Eaton employees involved in product design, manufacture, marketing, and service. -
Page 5: Product Information
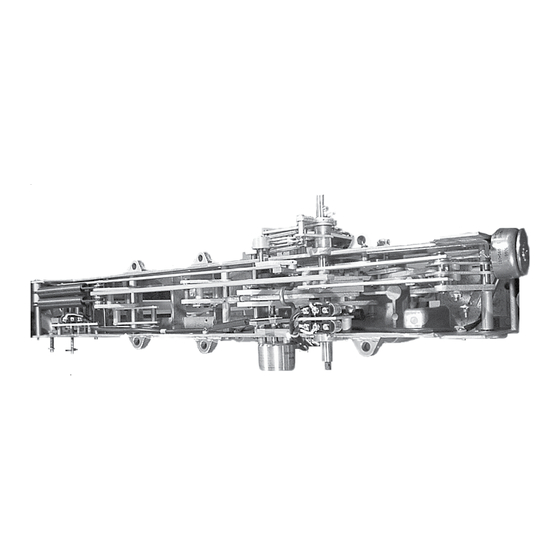
Handling and storage Be careful during handling and storage of equipment to minimize the possibility of damage. Quality standards ISO 9001 Certified Quality Management System MERCURY SWITCH TO MICROSWITCH RETROFIT KIT KA349WE INSTALLATION INSTRUCTIONS MN280022EN October 2015... - Page 6 Grommeted Cable Exit Hole and Terminal Block Main Shaft Switch SW1 Switch SW3 Trip Solenoid Figure 1. A Type WE recloser operating mechanism with new microswitches in place. MERCURY SWITCH TO MICROSWITCH RETROFIT KIT KA349WE INSTALLATION INSTRUCTIONS MN280022EN October 2015...
-
Page 7: Installation
Solenoid end of mechanism Cable exit hole with grommet Retaining pins Figure 4. Terminal block and lower terminal identification. Figure 2. Contact bar retaining rods to be removed. MERCURY SWITCH TO MICROSWITCH RETROFIT KIT KA349WE INSTALLATION INSTRUCTIONS MN280022EN October 2015... -
Page 8: Remove Microswitch Switch Sw1
Detach the two, small lower springs from retaining pin approved mercury disposal guidelines and regulations. marked ‘pin’ in Figure 7 . Remove and retain the two spacers and pin. MERCURY SWITCH TO MICROSWITCH RETROFIT KIT KA349WE INSTALLATION INSTRUCTIONS MN280022EN October 2015... - Page 9 18) on end of handle shaft. approved mercury disposal guidelines and regulations. 10. Scribe new handle shaft assembly (Item 3) to mark orientation of cam and lever to shaft and shaft to frame. MERCURY SWITCH TO MICROSWITCH RETROFIT KIT KA349WE INSTALLATION INSTRUCTIONS MN280022EN October 2015...
-
Page 10: Install Microswitch Sw2
25 (1) 38 (1.5) 67 (2.5) (.5) Figure 1. Correct placement of switch mounting plate. Measurements shown in mm (inch). Measurements otee: are approximate to the nearest mm (.25”). MERCURY SWITCH TO MICROSWITCH RETROFIT KIT KA349WE INSTALLATION INSTRUCTIONS MN280022EN October 2015... - Page 11 Adjust spacers as needed to eliminate attach here any interference. Handle shaft Spacers H bracket Lower two small springs, attach here Figure 16. Reinstall springs and retaining pins. MERCURY SWITCH TO MICROSWITCH RETROFIT KIT KA349WE INSTALLATION INSTRUCTIONS MN280022EN October 2015...
-
Page 12: Install Microswitches Sw1 And Sw 3 And New Switch Cam
Attach two new E rings (Item 16) to main shaft. Reinstall machine screw, spacer, and nut connecting main shaft to closing contactor toggle. Main shaft Large roll pin Figure 20. Items to remove on main shaft. MERCURY SWITCH TO MICROSWITCH RETROFIT KIT KA349WE INSTALLATION INSTRUCTIONS MN280022EN October 2015... - Page 13 Test switches as outlined in the Testing section. Follow procedures in appropriate maintenance manual to tank recloser and return it to service. Figure 24. Microswitches SW1 and SW3 in place. MERCURY SWITCH TO MICROSWITCH RETROFIT KIT KA349WE INSTALLATION INSTRUCTIONS MN280022EN October 2015...
-
Page 14: Kit Ka349We Parts List
Kit KA349WE parts list Figure 27. KA349WE Mercury switch to microswitch kit parts. See Table 2 for individual part identification. Table 2. Kit KA349WE Part Identification Item Part Number Description Kit Qauntity KA20060001 CABLE CLIP 6A00349701 MICROSWITCH ASSEMBLY (SW1 and SW3) -
Page 15: Testing
SW1 (C & D Terminals) SW2 (F & N Terminals) SW3 (A & N Terminals) Open Down Open Open Closed Open Open Closed Closed Closed Closed Closed Open MERCURY SWITCH TO MICROSWITCH RETROFIT KIT KA349WE INSTALLATION INSTRUCTIONS MN280022EN October 2015... - Page 16 United States Eaton.com/cooperpowerseries © 2015 Eaton All Rights Reserved Eaton is a registered trademark. Printed in USA For Eaton's Cooper Power series product Publication No. MN280022EN information call 1-877-277-4636 or visit: All trademarks are property www.eaton.com/cooperpowerseries. KA2048-506 Rev 04 of their respective owners.
Need help?
Do you have a question about the KA349WE and is the answer not in the manual?
Questions and answers