Dimplex XHD23G Service Manual
Hide thumbs
Also See for XHD23G:
- Owner's manual (54 pages) ,
- Service manual (16 pages) ,
- Owner's manual (51 pages)
Table of Contents
Advertisement
IMPORTANT SAFETY INFORMATION: Always read this manual first before attempting to service this firebox.
For your safety, always comply with all warnings and safety instructions contained in this manual to prevent
personal injury or property damage.
Service Manual
Model
XHD23L/XHD23G
XHD26L/XHD26G
XHD28L/XHD28G
Part Number
6909940XXX
6909850XXX
6909970XXX
7401050100R00
Advertisement
Table of Contents

Related Manuals for Dimplex XHD23G


Summary of Contents for Dimplex XHD23G
- Page 1 Service Manual Model XHD23L/XHD23G XHD26L/XHD26G XHD28L/XHD28G Part Number 6909940XXX 6909850XXX 6909970XXX IMPORTANT SAFETY INFORMATION: Always read this manual first before attempting to service this firebox. For your safety, always comply with all warnings and safety instructions contained in this manual to prevent personal injury or property damage.
-
Page 2: Table Of Contents
NOTE: Procedures and techniques that are considered important enough to emphasize. CAUTION: Procedures and techniques which, if not carefully followed, will result in damage to the equipment. WARNING: Procedures and techniques which, if not carefully followed, will expose the user to the risk of fire, serious injury, or death. www.dimplex.com... -
Page 3: Operation
Touch Panel and Remote Controls The manual controls for the Dimplex Electric Fireplace are located on the front panel. When not activated, the icons are not visible. Touch the control panel to the right side of the white line to activate the icons. - Page 4 • Theme t2 - Red Highlights (flame base red/orange) • Theme t3 - Blue Highlights (flame base blue) Color XHD28G, XHD26G or XHD23G (Media Unit) themes: • Theme t0 - Midnight Mode • Theme t1 - Media White • Theme t2 - Media red/orange flickering •...
- Page 5 Icon Function Description Press to change the flame and logs brightness. Display will show b3, b1, b2 respectively. Brightness • High • Low • Medium Press to turn the flame effect On. Press again to turn the flame effect Off. Flame Press multiple times to change the sleep timer by 0.5 hr from 0.5 hr to 8 hr before turning off.
-
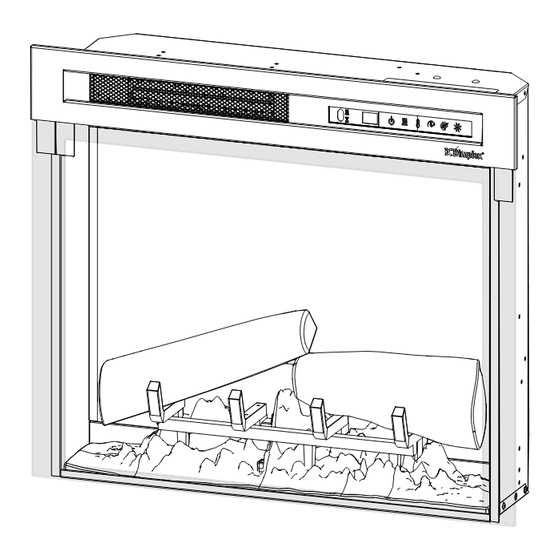
Page 6: Exploded Parts Diagram
Thermistor ......3001560900RP 14. Media Tray XHD23G ....0442320100RP Flicker Motor. -
Page 7: Wiring Diagram
Wiring Diagram On log models only Logset or Media Bed LEDs... -
Page 8: Accessing Top Components
NOTE: When reinstalling the base panel, align the 2 middle screw holes on each side of the logset/media tray with the corresponding holes on the base panel to ensure that the logset or media tray are properly af- fixed. (Figure 4) www.dimplex.com... -
Page 9: Power Cord Replacement
Main Control Board Replacement 4. Carefully lay the fireplace on its back. 5. Remove the bottom panel and set it aside. Tools Required: Phillips head screwdriver Pliers NOTE: On the XHD28G, the media bed lights are attached to this bottom panel. You can disconnect WARNING: If the firebox was operating prior to these lights to have better access to the components in servicing, allow at least 10 minutes for the heating... -
Page 10: Heater Assembly Replacement
2. Locate and disconnect the connection from the yellow wire from the new flicker motor with the yellow touchpad to the main control board. wire cut from the old flicker motor. 3. Remove screws on either side of the touchpad to release it. (Figure 3) www.dimplex.com... -
Page 11: Flicker Rod Replacement
Flame LED Strip Replacement 8. Secure the wire connector by crimping the 3M symbol with pliers. Pull on both wires to ensure a strong Tools Required: Phillips head screwdriver connection. WARNING: If the firebox was operating prior to 9. Repeat the process for the 4 remaining wires, ensuring servicing, allow at least 10 minutes for the heating that all wires are paired by colour in each connector. -
Page 12: Media Tray/Media Led Replacement
Rubber grommet Thermistor other. Flicker rod 3. Connect the new cable, and orient the log set along the LED holder Retaining bracket base of the fireplace. Flicker motor 4. Reassemble the firebox. www.dimplex.com... -
Page 13: Troubleshooting Guide
Troubleshooting Guide PROBLEM CAUSE SOLUTION General Additional appliances may exceed the current rating of the circuit breaker Improper circuit current rating or fuse. Plug unit into another outlet Circuit breaker trips or fuse blows or install unit on a dedicated 15 amp when unit is turned on circuit. - Page 14 Replace the flicker rod if necessary. Defective flicker motor Replace flicker motor DATE 1-888-346-7539 | www.dimplex.com In keeping with our policy of continuous product improvement, we reserve the right to make changes without notice. © 2019 Glen Dimplex Americas...
Need help?
Do you have a question about the XHD23G and is the answer not in the manual?
Questions and answers