Table of Contents
Advertisement
Quick Links
Advertisement
Table of Contents

Related Manuals for Kyoritsu Electrical Instruments Works KEW4105DL


Summary of Contents for Kyoritsu Electrical Instruments Works KEW4105DL
- Page 1 Instruction Manual Digital Earth Resistance Tester KEW4105DL...
-
Page 2: Table Of Contents
Contents 1. Safety warnings ・・・・・・・・・・・・・・・・・・・・・・・・・・・・・・・・・・・・・・・・・・・・1 2. Features ・・・・・・・・・・・・・・・・・・・・・・・・・・・・・・・・・・・・・・・・・・・・・・・・・・・5 3. Specifications ・・・・・・・・・・・・・・・・・・・・・・・・・・・・・・・・・・・・・・・・・・・・・・6 4. Name of parts ・・・・・・・・・・・・・・・・・・・・・・・・・・・・・・・・・・・・・・・・・・・・・・9 5. Accessories ・・・・・・・・・・・・・・・・・・・・・・・・・・・・・・・・・・・・・・・・・・・・・・ 12 6. Getting started ・・・・・・・・・・・・・・・・・・・・・・・・・・・・・・・・・・・・・・・・・・・ 14 7. Earth resistance measurement ・・・・・・・・・・・・・・・・・・・・・・・・・・・・・ 15 7-1. Measurement principle ・ ・・・・・・・・・・・・・・・・・・・・・・・・・・・・・・ 15 7-2. P recision measurement (with test leads for precision measurement) ・・・・・・・・・・・・・・・・・・・・・・・・・・・・・・・・・・・・・・ 15 7-3. S implified measurement (with test leads for simplified measurement) ・・・・・・・・・・・・・・・・・・・・・・・・・・・・・・・・・・・・・・ 19 8. Comparator function ・・・・・・・・・・・・・・・・・・・・・・・・・・・・・・・・・・・・・・ 22 8-1. Comparator function ・・・・・・・・・・・・・・・・・・・・・・・・・・・・・・・・ 22 8-2. How to enable/ disable comparator function ・・・・・・・・・・ 23 9. Switching indications of aux. earth resistance warning ・・・・・・・ 24 10. Backlight ・・・・・・・・・・・・・・・・・・・・・・・・・・・・・・・・・・・・・・・・・・・・・・・ 24 11. Battery replacement ・ ・・・・・・・・・・・・・・・・・・・・・・・・・・・・・・・・・・・・・ 25 12. Cleaning ... -
Page 3: Safety Warnings ・・・・・・・・・・・・・・・・・・・・・・・・・・・・・・・・・・・・・・・・・・・・1
1.Safety warnings This instrument has been designed, manufactured and tested according to IEC 61010: Safety requirements for Electronic measuring apparatus, and delivered in the best condition after passing quality control tests. This instruction manual contains warnings and safety rules which have to be observed by the user to ensure safe operation of the instrument and to maintain it in safe ... - Page 4 # DANGER ● N ever make measurements on circuits in which earth potentials higher than the following values exist. * 3 00 V or higher in CAT II, 150 V or higher in CAT III and 100 V or higher in CAT IV environment. ● K eep your hand and fingers behind the protective finger guard during a measurement. ● D o not attempt to make measurements in the presence of flammable ...
- Page 5 # CAUTION ● A lways make sure to set the range selector switch to the appropriate position before making a measurement. ● P ower off the instrument after use. Remove batteries if the instrument is to be stored and will not be in use for a long period.
- Page 6 Measurement Category To ensure safe operation of measuring instruments, IEC 61010 establishes safety standards for various electrical environments, categorized as O to CAT IV, and called measurement categories. Higher-numbered categories correspond to electrical environments with greater momentary energy, so a measuring instrument designed for CAT III environments can endure greater momentary energy than one designed for CAT II. O : C ircuits which are not directly connected to the mains power supply. ...
- Page 7 2.Features KEW4105DL is an earth resistance tester for testing power distribution lines, in-house wiring system, electrical appliances etc. It also has an earth voltage range to measure earth voltage. ● Designed to meet the following safety standards. IEC 61010-1, IEC 61010-2-030 CAT II 300 V, CAT III 150 V, CAT IV 100 V, Pollution degree 3 IEC 61010-031, IEC 61557-1, -5 ● D ust and water-proof construction in conformity with IEC 60529 (IP67) This instrument is water-proof, so it is washable. ● B acklight to facilitate working at dimly illuminated location or at ...
- Page 8 3.Specifications ● Measuring range and accuracy (23ºC±5ºC, RH 75% or less) Earth voltage measurement Measuring range Display range Accuracy 0 to 300 V AC 0.0 to 314.9 V (45 - 65Hz) ±1%rdg±4dgt ±0 to ±300 V DC 0.0 to ±314.9 V Measuring method: Average sensing, True RMS value display * A C/ DC auto-detection for an input of 2 V or higher. The LCD shows AC or DC mark according to the input polarity. Earth resistance measurement Measuring Range Display range Accuracy* range 20Ω 0.00 to 20.99Ω ±1.5%rdg±0.08Ω Range 200Ω 0.00 to 2000Ω...
- Page 9 ● Applicable ● IEC 61010-1 standards C AT II 300 V CAT III 150 V CAT IV 100 V Pollution degree 3 ●IEC 61010-2-030 ●IEC 61010-031 ●IEC 61557-1, -5 ●IEC 60529 IP67 ●IEC 61326-1, -2-2 MODEL7127B…CAT III 300 V CAT IV 150V * W hen test leads are connected to and used with the instrument, the lower category either of them belongs to is applied. ● Location for use Altitude 2000m or less, in-door/ out-door use ● Display Liquid crystal display with backlight ● Operating temp. -10ºC to 50ºC, 80% or less (no condensation) & humidity ● Storage temp. -20ºC to 60ºC, 75% or less (no condensation) & humidity ● Withstand voltage 2210 V AC (50/60Hz) / 5 sec Between electrical circuit and enclosure ● Insulation 50 MΩ or more/ 1000 V DC resistance Between electrical circuit and enclosure ● Auto power off Turns ...
- Page 10 ● O perating uncertainty in earth resistance measurements (IEC61557-5) * Formula: B = ±(|A|+ 1.15 x √E + E + E + E ) Intrinsic uncertainty Variation due to changing the Battery voltage (till the battery indicator becomes empty ) Variation due to changing the temperature (-10ºC to 50ºC) Variation due to series interference voltage 16·2/3 Hz, 50 Hz, 60 Hz: 25 V DC: 10 V 400 Hz: 5 V Variation due to resistance of the auxiliary earth electrode 20Ω range: 0 ‒ 10 kΩ 200Ω range: 0 ‒ 50 kΩ 2000Ω range: 0 ‒ 100 kΩ * The measuring range to keep operating uncertainty of ± 30%: 20Ω range : 5.00 Ω ‒ 20.00 Ω...
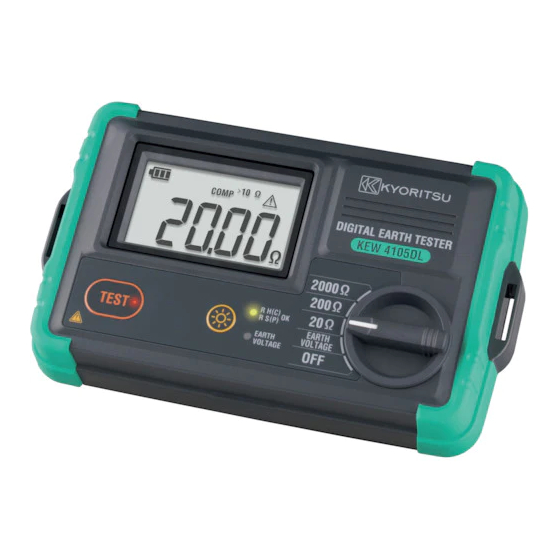
- Page 11 4.Name of parts (1) Front panel ① ② ④ ⑥ ⑤ ③ Fig. 4-1 Name Description ① LCD LCD with backlight ② Test button Starts/ stops a measurement. ③ Backlight button Turns on/ off the backlight. Selects a range for earth resistance or ④ Range selector switch earth voltage measurement. G r e e n L E D li g h t s u p i n e a r t h LED ...
- Page 12 (2) Terminal part ① ② ③ Fig. 4-2 Terminal Designated function ① For an earth electrode ② S(P) For an aux. earth (potential) electrode ③ H(C) For an aux. earth (current) electrode (3) LCD Fig. 4-3 ● Symbols common to all functions Battery level indicator Segments for numerical display Indicates Over-range status ‒ the measured value is exceeding the display range. Resistance: >20.99 (20Ω range) >209.9 (200Ω range) >2099 (2000Ω range) Voltage : > 314.9V( <-314.9V is displayed for negative DC input) ̶ 10 ̶...
- Page 13 ● Symbols for earth measurement Measurement unit Warning - Aux. earth resistance is too high. (See P. 18.) Data hold is active. Comparator function is active. While the comparator function is active, these signs indicate that the present input is more than the pre-set threshold values. >10 Ω (20Ω range) >100Ω (200Ω range) >500Ω(2000Ω range) While the comparator function is active, this sign indicates that the present input is more ...
-
Page 14: Accessories
5.Accessories (1) Test leads for precision measurement MODEL7266 (Red: 20m, Yellow: 10m, Green: 5m) Fig. 5-1 (2) Test leads for simplified measurement MODEL7127B 2pcs (red & black) Protective finger guard* 2pcs (black) Fig. 5-2 Protective finger guard* P rotective finger guard is a part providing protection against electrical shock and ensuring the minimum required air and creepage distances. (3) Auxiliary earth spike MODEL8041 Fig. 5-3 (4) Cable reel (supplied depending on the purchased model) Yellow cable (10m) Red cable (20m) Fig. 5-4 Cable reel + Red cable (20m) MODEL7267 Cable reel + Yellow cable (10m) MODEL7268... - Page 15 (5) Shoulder strap MODEL9121 (6) Six AA alkaline batteries (LR6) (7) Instruction manual (8) Hard case MODEL9191 (supplied depending on the purchased model) Each item can be stored as shown below. Test leads for simplified measurement Test leads for precision measurement Auxiliary earth spikes Fig. 5-5 Main unit (9) Soft case MODEL9190 (supplied depending on the purchased model) Each item can be stored as shown below. Test leads for simplified measurement and for Main unit...
-
Page 16: Getting Started
(2) Test leads for precision measurement MODEL7241A (Red, Yellow, Green: 1.5m) Fig. 5-9 6.Getting started Battery voltage check (1) P lease refer to 11. Battery replacement in this manual and insert batteries in KEW4105DL. (2) T urn and set the range selector switch to any position other than OFF to power on the instrument. (3) B attery level indicator appears at the upper left on the LCD. Battery voltage is extremely low if mark is displayed. ... -
Page 17: Earth Resistance Measurement
7.Earth resistance measurement With the earth resistance measurement function of this instrument, earth resistance of power distribution lines, in-house wiring system and electrical appliances can be measured. # DANGER ● B e extremely careful when measuring earth resistance; high voltage, 50 V max is generated across H(C) ‒ E terminals. ● W hen measuring earth voltage, do not apply 300 V or higher voltage between S(P) ‒ E and between H(C) ‒ E terminals. - Page 18 Fig. 7-2 Green Yellow Yellow Green Earthed electrode Auxiliary Fig. 7-3 under test earth spikes Insert the plug of test leads firmly into each terminal. If they are not inserted firmly, the loose connection may cause inaccurate readings. Note: Make sure to stick the auxiliary earth spikes in the moist part of the soil. Give enough water where the spikes have to be stuck into the dry, stony or sandy part of the earth so that it may become moist. In case of concrete, lay the auxiliary earth spike down and water it, or put a wet cloth etc. on the spike when making measurement. Confirm that the LED for aux. earth resistance lights up before pressing ...
- Page 19 Confirm that the displayed voltage value is 25V or less. When the display reads more than 25V, the warning LED as shown below lights up. (The warning LED lights up at; more than 10V for DC earth voltage and more than 5 V for earth voltage of 400 Hz.) Fig. 7-5 Red LED lights up. Excessive errors in earth resistance measurement may be caused in the condition that warning LED for high earth voltage is lighting up. To avoid this, make measurement after reducing the voltage by turning ...
- Page 20 (4) Auxiliary earth resistance I f the auxiliary earth resistance is within the allowable range and doesn t affect measurement, the green LED shown below lights up. The table below shows the upper limit of auxiliary earth resistance. Green LED lights up. Fig. 7-7 Upper limit of auxiliary earth resistance Measurement range Aux. earth resistance 20Ω 10 kΩ 200Ω 50 kΩ 2000Ω 100 kΩ If the auxiliary resistance of auxiliary spike H(C) or S(P) is too high to make measurement, the display reads RH̲H or RS̲H . Recheck the ...
-
Page 21: S Implified Measurement
# CAUTION ● I f measurement is made with the test leads twisted or in touch with each other, the reading of the instrument may be affected by induction. For accurate measurement, test leads should be arranged so as not to be contacted with each other. ● I f earth resistance of auxiliary earth spikes is too large, it may result in inaccurate measurement. Make sure to stick the auxiliary earth spikes H(C) and S(P) into the moist part of the earth carefully, and ensure sufficient connections between the respective connections. 7-3. S im plifie d m easu rem e nt (with test lea ds fo r simplified measurement) Use this method when the auxiliary earth spike cannot be stuck. In this method, an existing earth electrode with a low earth resistance, ... - Page 22 [How to attach] Firmly insert and connect the adapter you want to use to the end of the cord (with banana plugs at both ends). Alligator clip Banana plugs, both ends Flat test bar Fig. 7-11 Insert the plug of test leads firmly into each terminal. If they are not inserted firmly, the loose connection may cause inaccurate readings. # DANGER ● T o avoid getting electrical shocks, ensure that test leads are disconnected from the instrument when replacing the metal tip or adapter for test leads. (2) Wiring Make connection as shown in the following figure. Indicated Secondary Primary...
-
Page 23: Measurement
(3) Earth voltage check ● S elect the Earth voltage function and check the voltage value displayed on the LCD. The displayed earth voltage is the voltage between S(P) and E terminals. C onfirm that the displayed voltage value is 25 V or less. When the display reads more than 25 V, the warning LED as shown below lights up. (The warning LED lights up at; more than 10 V for DC earth voltage and more than 5 V for earth voltage of 400 Hz.) Display example Fig.7-13... -
Page 24: Comparator Function
When the measured result exceeds the display range (over-range), the LCD shows: >20.99Ω (20Ω range) >209.9Ω(200Ω range) >2099Ω (2000Ω range). (5) Simplified measurement value T wo-pole method is used for simplified measurement. In this method, earth resistance value re of earth electrode connected to terminal H(C) ‒ see Fig. 7-12 - is added to true earth resistance value Rx and shown as an indicated value Re. Re (indicated value) = Rx + re ... -
Page 25: How To Enable/ Disable Comparator Function
Display example (200Ω range) Blinks Measured value is lower than In case the measured value the reference value exceeds the reference value Fig. 8-1 8-2. How to enable/ disable comparator function * The comparator function has been disabled by default. 1. Set the range selector switch to OFF position. 2. Power on the instrument while holding down the backlight button. 3. A ll segments in the LCD light up, and then COMP mark blinks twice to indicate the comparator function is enabled. To disable the function, perform above steps 1. and 2. while the function is enabled. The COMP mark blinks twice and the function ... -
Page 26: Switching Indications Of Aux. Earth Resistance Warning
9. Switching indications of aux. earth resistance warning Warning indications for aux. earth resistance can be switched between (1) and (2) as shown in the table below; default setting is (1). Conditions Resistance at H(C) terminal is high. Resistance at S(P) terminal is high. ● How to switch the indications: (1) T urn the range selector switch from OFF to EARTH VOLTAGE while pressing down the TEST and backlight button. Then the ... -
Page 27: Battery Replacement
11. Battery replacement Replace the batteries as soon as the mark appears. # DANGER ● D o not open the battery compartment cover if the instrument is wet. ● N ever attempt to replace batteries during a measurement. In order to avoid getting electrical shock, ensure that the instrument is powered off and test leads are disconnected from the instrument before replacing batteries. ● T he battery compartment cover must be closed and screwed before ... -
Page 28: Cleaning
# CAUTION Remove all batteries if the instrument is to be stored and will not be in use for a long period. In this case, when attaching the battery compartment cover, keep the right screw of the cover slightly loose. Right screw Fig. 11-2 This instrument has water-proof feature and has high sealing property, therefore, air pressure adjustment is necessary. Air pressure between inside and outside of the instrument can be balanced by loosening the right screw of the battery compartment cover. ... -
Page 29: Notes On Housing Case
# CAUTION ● The watertight feature may be degraded after prolonged use. T his feature works on fresh water and tap water only and is guaranteed as long as the following conditions are met. - Temperature of fresh water or tap water is 15 ‒ 35℃. - Ambient temperature is 15 ‒ 35℃. - D ifference in temperatures of water and instrument enclosure is within 5℃ ● Replace the waterproof packing if it is degraded. ● C heck the packing for deformation, cracks when washing the instrument and firmly secure the battery compartment cover when ... -
Page 30: How To Fit Strap Belt
14. How to fit strap belt The instrument is equipped with a strap belt to suspend from the neck to allow both hands to be used freely for easy and safe operation. Fig. 14-1 15. Cable reels 15-1. Operating instruction Connection ② ① Fig. 15-1 Fig. 15-2 Connect the cable to the instrument. -
Page 31: Cable Replacement
Storage F irst, house the alligator clip onto the cable reel as follows. Then hold the grip of the cable reel with your left hand and slack the cable downward. Rotate the handle with your right hand for rewinding. Alligator clip Fig. 15-4 Fig. 15-5 Fig. 15-6 Plug cap can be housed in the center of the cable reel. 15-2. Cable replacement How to remove the cable Hook To replace the cable with a new one, first, pull out the cable fully. - Page 32 DISTRIBUTOR PO BOX 29187, Dubai-UAE Tel: +971- 43206053 Fax: +971- 43206785 Email: info@synergix-int.com Web: www.synergix-int.com Kyoritsu reserves the rights to change specifications or designs described in this manual without notice and without obligations. 02-17 92-2259A...
Need help?
Do you have a question about the KEW4105DL and is the answer not in the manual?
Questions and answers