Skandika Fitness Studio Vibration Plate 700 Assembly Instructions And User Manual
Hide thumbs
Also See for Studio Vibration Plate 700:
- Assembly instructions and user manual (48 pages)
Table of Contents
Advertisement
Available languages
Available languages
Quick Links
Advertisement
Chapters
Table of Contents

Related Manuals for Skandika Fitness Studio Vibration Plate 700


Summary of Contents for Skandika Fitness Studio Vibration Plate 700
- Page 2 VORWORT Bevor Sie beginnen Vielen Dank, dass Sie sich für eines unserer Produkte entschieden haben. Die Qualität jedes einzelnen Produkts wird bestmöglich geprüft und doch können gelegentliche Fehler nicht komplett ausgeschlos- sen werden. Sollten Sie feststellen, dass dieses Produkt in irgendeiner Art fehlerhaft ist oder dass ein Teil fehlt, nehmen Sie bitte Kontakt mit dem Händler auf.
-
Page 3: Table Of Contents
INHALTSVERZEICHNIS Inhaltsverzeichnis Produktübersicht .................................. 4 Bedienung .................................... 5 Aufbau ....................................8 Trainingsanweisungen ................................ 10 Gleichgewichtsübungen ..............................11 Übungsabbildungen................................12 Hinweise und Pfl ege ................................18 Batterie-Entsorgung................................18 Hinweise zum Umweltschutz .............................. 19 Technische Daten ................................19 Explosionszeichnung ................................20 Teileliste ....................................21 Garantiebedingungen / Service ............................ -
Page 4: Produktübersicht
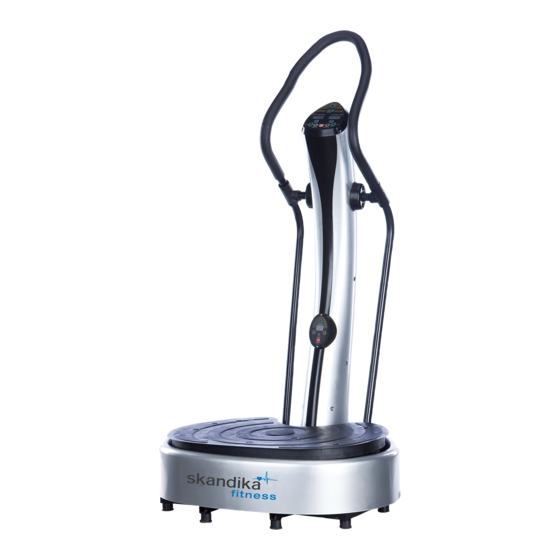
PRODUKTÜBERSICHT Willkommen bei der Studio Vibration Plate 700! Die Vibration Plate 700 besteht aus einer Standfläche mit Anti-Rutschbeschichtung und einem Hand- lauf, sowie zwei Bedienpanels zur einfachen Bedienung aus jeder Übungshaltung heraus. Die Standfüße sorgen für einen sicheren Stand. Eine geeignete Bodenschutzmatte (z.B. die SKANDI- KA Unterlegmatte) sollte zum Schutz des Untergrundes verwendet werden. -
Page 5: Bedienung
BEDIENUNG Die Bedienpanels Oberes Unteres Bedienpanel Bedienpanel Funktionen des oberen Bedienpanels Mit dieser Taste wechseln Sie zwischen der Zeit- und der Vibrationsfrequenz-Anzei- ge während der Gerätebenutzung. In der „Modus“-Anzeige wird der gerade genutzte Betriebsmodus (manuell oder au- tomatisch) angezeigt. Zeit (Countdown) bzw. Vibrationsfrequenz der horizontalen Vibration werden hier abwechselnd angezeigt. - Page 6 BEDIENUNG Mit dieser Taste können Sie die Trainingszeit einstellen. Die Zeit wird als Vorgabe eingestellt und läuft dann als Countdown bis null. Bei null stoppt das Gerät automa- tisch. Die Standard-Vorgabe sind 10 Minuten. Nach Auswahl des manuellen Modus drücken Sie diese Taste und dann H+ oder H-, um die Laufzeit der horizontalen Vibration einzustellen und L+ oder L-, um die Laufzeit der vertikalen Vibration einzu- stellen.
- Page 7 BEDIENUNG Die Vorgaben der Automatikprogramme Horizontale Vibration: 30 34 38 42 46 50 54 58 54 50 46 42 38 34 30 26 22 18 14 10 6 2 6 10 14 18 22 26 Vertikale Vibrationsfrequenz: 30 26 22 18 14 10 6 2 6 10 14 18 22 26 30 34 38 42 46 50 54 58 54 50 46 42 38 34 Zeitintervall: 5 Sekunden Horizontale Vibration: 5 10 15 20 25 30 35 40 45 50 55 60 55 50 45 40 35 30 25 20 15 10 5...
-
Page 8: Aufbau
AUFBAU Schritt 1 Entnehmen Sie die Hauptstrebe (1) und die Basis (2) dem Karton. Verbinden Sie die beiden Kabel (Ober- und Unterteil des Steuerkabels) miteinan- der. Schritt 2 Stecken Sie die Hauptstrebe (1) in die Ba- sis (2) und verschrauben Sie diese Verbindung mit den Schrauben M8x20 (4) wie dargestellt. - Page 9 AUFBAU Schritt 4 Der untere Handlauf (8) wird mit den Schrauben M6x15 (3) und M6x45 (6) wie abgebildet ange- bracht. Schritt 5 Damit ist das Gerät fertig aufgebaut. Achten Sie darauf, dass alle Schraubverbindungen fest sitzen und kontrollieren Sie die Verbindungen auch spä- ter in regelmäßigen Abständen.
-
Page 10: Trainingsanweisungen
TRAINING Trainingsanweisungen 1. Es ist empfehlenswert, vor Beginn des Trainings 1 Glas Wasser zu trinken. Je Tag sollten generell ca. 3 Liter Wasser zur Aufrechterhaltung einer guten Gesundheit getrunken werden. 2. Stecken Sie das Netzkabel in den Netzanschluss des Geräts. 3. -
Page 11: Gleichgewichtsübungen
GLEICHGEWICHTSÜBUNGEN Gleichgewichtsübungen 1. Fußgelenk, Kniegelenk, Hüfte in eine gerade Beinachse bringen. So bekommen Sie Stabilität. 2. Ein Bein abwinkeln, Arme ausbreiten und versuchen das Gleichgewicht zu halten. 3. Sollten Sie sich unsicher fühlen, stellen Sie das Gerät vor eine Wand, damit Sie sich notfalls an der Wand abstützen können, wenn Sie das Gleichgewicht verlieren. -
Page 12: Übungsabbildungen
TRAININGSÜBUNGEN Die folgenden Übungsabbildungen wurden mittels Computer auf einem generischen Gerätemodell erstellt. Ihr Gerät kann andere Ausstattungsmerkmale aufweise (z. B. keine Bänder oder keine Griffe). In diesem Fall sind Teile der abgebildeten Übungen nicht möglich. A. Kräftigungsübungen werden mit geringem Übungstempo ausgeführt. A 1 Stehen auf dem Gerät Stellen Sie sich mit zur Hüfte parallel ausgerichteten Füßen auf die Vibrationsplatte. - Page 13 TRAININGSÜBUNGEN A 6 Triceps Dips Den Körper vom Gerät abgewandt, ergreifen Sie die Ecke der Vibrationsoberfläche und drücken sich leicht nach oben. Die Arme werden dabei leicht durchgedrückt, die Hüfte dabei leicht nach unten gesenkt und die Schulterblätter zusammengedrückt. Sie sollten die Span- nung in den Oberarmen und den Schultern spüren.
- Page 14 TRAININGSÜBUNGEN A 11 Unterer Bauch Stützen Sie sich auf Ihre Ellbogen und ergreifen Sie die vordere Kante der Plattenoberflä- che. Rücken gerade halten. Drücken Sie Ihren Po langsam nach oben als wollten Sie das Gerät zu Ihren Füßen ziehen – Sie sollten die Spannung in der Bauchregion spüren. Als Abwechslung können Sie diese Übung auch aus dem Kniestand heraus absolvieren.
- Page 15 TRAININGSÜBUNGEN B. Dehnungsübungen werden mit geringem Übungstempo ausgeführt. B 1 Oberschenkelstrecker Legen Sie ein Schienbein wie abgebildet auf die Vibrationsplatte auf, das andere Bein steht auf dem Boden. Oberkörper und Rücken gerade halten, Bauchdecke anspannen. Nun das Becken nach vorn drücken und dadurch die Oberschenkelmuskulatur dehnen. Variieren Sie diese Übung durch Vorziehen des hinteren Beines.
- Page 16 TRAININGSÜBUNGEN C. Massageübungen werden mit mittlerem Übungstempo ausgeführt. C 1 Wadenmassage Legen Sie sich vor das Gerät mit beiden Waden auf der Platte. Die Zehen zeigen an die Decke. Entspannen Sie einfach und genießen Sie die Vibrationsmassage. C 2 Oberarmmassage Legen Sie ein Handtuch oder eine Unterlegmatte auf die Vibrationsplattform.
- Page 17 TRAININGSÜBUNGEN D. Entspannungsübungen werden mit mittlerem Übungstempo ausgeführt. D 1 Schulter- und Nackenentspannung Knien Sie vor dem Gerät mit ausgestreckten Armen. Rücken und Nacken gerade halten. Ziehen Sie Ihren Oberkörper nach hinten, während die Arme auf der Plattform verbleiben. Diese Übung trägt zur Entspannung Ihres Nacken- und Schulterbereiches bei. Als Variation können Sie Ihre Hände mitsamt den Ellbogen auf die Plattform legen oder Ihre Hände in Richtung Gerätemitte drehen, wobei die Ellbogen nach außen zeigen.
-
Page 18: Hinweise Und Pflege
HINWEISE UND PFLEGE Hinweise Während der Benutzung des Gerätes • Sollten Sie sich durch die Benutzung des Gerätes unwohl fühlen oder sonstige Auffälligkeiten auf- treten, beenden Sie sofort das Training und kontaktieren Sie einen Arzt. • Benutzen Sie keine Gewalt. Es besteht das Risiko von Verletzungen und Fehlfunktionen können auftreten. -
Page 19: Hinweise Zum Umweltschutz
HINWEISE / TECHNSICHE DATEN Hinweise zum Umweltschutz Dieses Produkt darf am Ende seiner Lebensdauer nicht über den normalen Haushaltsabfall entsorgt werden, sondern muss an einem Sammelpunkt für das Recycling von elektrischen und elektronischen Geräten abgegeben werden. Das Symbol auf dem Produkt, der Ge- brauchsanleitung oder der Verpackung weist darauf hin. -
Page 20: Explosionszeichnung
EXPLOSIONSZEICHNUNG Bei mechanischen Schwierigkeiten jeglicher Art nutzen Sie bitte nachfolgende Explosionszeichnung. Hier sind alle Teile mit einer spezifischen Nummer gekennzeichnet. Bitte nennen Sie uns diese Nummer,um das Teil gegebenenfalls im Laufe der Garantiezeit kostenlos zu ersetzen. Auch die Versand- kosten werden von Skandika getragen. Nutzen Sie zur exakten Bestimmung der Teile, falls notwen- dig, bitte das kostenlose Benutzerhandbuch im pdf-Format auf www.skandika.com. -
Page 21: Teileliste
TEILELISTE Teil Nr. Bezeichnung Menge Teil Nr. Bezeichnung Menge Trittfläche Motorhalterung Zylindrische Schraube Isolierung für Motorhalterung Unterlegscheibe Unterlegscheibe Fußplatte Sicherheits-Unterlegscheibe Winkel Zylindrische Schraube Schalter Mutter Buchse Sicherheits-Unterlegscheibe Metallclip Unterlegscheibe Befestigungsstücke Führung Verstärkungsstreben Verbindungsachse Basisgehäuse Halterung für Verbindungsachse Gummführung Federklammer für Verbindungsachse Lagereinsatz Verbindungsstück Kugellager... - Page 22 TEILELISTE Teil Nr. Bezeichnung Menge Schraube Schaumstoffrohr Schaumstoffrohr Bedienpanel-Aufkleber Schraube BMI Sensor Chip Oberes Bedienpanel Display PCB Schraube Hauptstrebe Schraube Abdeckung Schraube Unterlegscheibe Schraube Kunststoffabdeckung Schaumstoffrolle Führungsstange Schraube Unterlegscheibe Abdeckung (ABS) Unteres Rohr für Handlauf Schraube Stange Unterlegscheibe Schaumstoffrohr Unteres Bedienpanel Schraube Aufkleber für unteres Bedienpanel Schraube...
-
Page 23: Garantiebedingungen / Service
GARANTIEBEDINGUNGEN / SERVICE Für unsere Geräte leisten wir Garantie gemäß nachstehenden Bedingungen: 1. Wir beheben kostenlos nach Maßgabe der folgenden Bedingungen (Nummern 2-5) Schäden oder Män- gel am Gerät, die nachweislich auf einen Fabrikationsfehler beruhen, wenn Sie uns unverzüglich nach Feststellung und innerhalb von 24 Monaten nach Lieferung an den Endabnehmer gemeldet werden. - Page 24 WELCOME Before you begin Thank you for choosing one of our products. Although the quality of our products is checked on a re- gularly base, we cannot eliminate each possible mistake completely. If you shoud find any product is incomplete or defective, please contact your dealer. Please follow the safety hints and instruction given in this manual in order to use the device correctly and effectively.
- Page 25 CONTENTS Contents Product overview ................................26 Use ..................................... 27 Set-up ....................................30 Exercise instructions................................32 Balance exercises ................................33 Exercise images ................................. 34 Hints and care ..................................40 Battery disposal .................................. 40 Environmental protection ..............................41 Technical specifi cations ..............................41 Explosion drawing ................................
-
Page 26: Product Overview
PRODUCT OVERVIEW Welcome to Studio Vibration Plate 700! The Vibration Plate 700 consists of a anti-slip standing area and a handrail, as well as two computer panels for easy usage independently from the exercise position. The feet help to accomplish a solid stand of the device. We recommend to use a suitable floor protec- tion mat (e.g. -
Page 27: Use
The computer panels Upper Lower Computer panel Computer panel Functions of the upper computer panel Press this button to switch the time or speed display during the machine is in use. Mode window: Display the current mode of machine (manual or automatic). Time, Oscillation speed display window: Displays the time countdown or oscillation speed. - Page 28 Set the exercise time of the machine. Adjust the time to a preset value of your deci- sion. When the exercise time reaches the set value, the machine will automatically stop working. Setting method: The default time is 10 minutes. After selecting the manual mode, press this button before the machine starts to work, then press button “H+”...
- Page 29 The presets of the automatic programmes Oscillation: 30 34 38 42 46 50 54 58 54 50 46 42 38 34 30 26 22 18 14 10 6 2 6 10 14 18 22 26 Vibration: 30 26 22 18 14 10 6 2 6 10 14 18 22 26 30 34 38 42 46 50 54 58 54 50 46 42 38 34 Time interval: 5 seconds Oscillation: 5 10 15 20 25 30 35 40 45 50 55 60 55 50 45 40 35 30 25 20 15 10 5...
-
Page 30: Set-Up
SET-UP Step 1 Take out the main support tube (1) and main base (2) from carton. Connect the upper and lower signal cable ends. Step 2 Put the support tube (1) into the base (2). Lock them with screws M8x20 (4) and install the feet cushion. - Page 31 SET-UP Step 4 The lower handrail (8) will be fixed as shown with the screws M6x15 (3) and M6x45 (6). Step 5 The device is set-up completely. Pay attention, that all screw connections are fixed tightly and check the connections for proper seating later on a regu- lar base.
-
Page 32: Exercise Instructions
TRAINING Exercise instructions 1. We recommend to drink 1 glass of mineral water before exercise. You should drink at least 3 liters of mineral water each day to maintain a good health. 2. Connect the mains cable to the device. 3. -
Page 33: Balance Exercises
BALANCE EXERCISES Balance exercises 1. Foot joint, knee joint and hips should build a straight axle in order to attain stability. 2. Bend one leg, stretch your arms and try to maintain balance. 3. If you should feel insecure, place the device in front of a wall so that you can use the wall as a support in case you should lose the balance. -
Page 34: Exercise Images
EXERCISE IMAGES These illustrations are shown on a generic machine. Your machine may not have the bands or the handles as shown. If your machine has side handles, you may not be able to position yourself as shown. A. Strength exercises are done at low speeds. A 1 Standing Position your feet parallel to your hip on the Vibration Plate. - Page 35 EXERCISE IMAGES A 6 Triceps Dip With body facing away from the Vibration Plate, firmly grip the edge of the platform and push upwards. Bend the arms slightly and lower the hips toward the plate, squeezing the shoulder blades together. You should feel the tension in your upper arms and shoulders. For increa- sed vibration, repeat the exercise with your legs extended.
- Page 36 EXERCISE IMAGES A 11 Lower Abdominals Brace yourself on your elbows and hold onto the front edge of the Vibration Plate. Now, with a straight back, pull your buttocks up slowly as if you wanted to pull the plate toward your feet.
- Page 37 EXERCISE IMAGES B. Stretch exercises are done at low speeds. B 1 Quadriceps Stretch Place one shin on the Vibration Plate ensuring the other leg is on the floor. Keeping the up- per body and back straight, tense your stomach. By pushing your pelvis forward you will be stretching your quadriceps.
- Page 38 EXERCISE IMAGES C. Massage exercises are done at medium speeds. C 1 Calf Massage Lie in front of the Vibration Plate with both calves on the vibration platform, toes pointing toward the ceiling. Simply relax and enjoy an invigorating calf massage. C 2 Upper Arm Massage Place a towel or mat on the vibration platform.
- Page 39 EXERCISE IMAGES D. Relaxation exercises are done at medium speeds. D 1 Shoulder and Neck Relaxation Kneel down in front of the Vibration Plate with your arms outstretched. Keep your back and neck straight. Now pull your upper body back while resting your arms on the vibration plat- form.
-
Page 40: Hints And Care
HINTS AND CARE Hints During the use of the device • If you should feel unwell during the use of the device or any other abnormalities should occur, im- mediately stop exercise and contact your physician. • Never use force. There is a risk of injuries and malfunctions. •... -
Page 41: Environmental Protection
HINTS / TECHNICAL SPECIFICATIONS Environmental protection At the end of its life cycle, this product must not be disposed of with household waste but must be taken to a collection unit for the recycling of electric and electronic equipment. The symbol on the product, the instructions for use or the packaging express mention of this. -
Page 42: Explosion Drawing
EXPLOSION DRAWING In case of mechanical problems use this explosion dra- wing. All parts are marked with a specific part number in it. Tell us this number in order to replace the respective part (within warrany time this service may be free of charge). If necessary, you may additionally use the free user ma- nual in pdf-format, available on www.skandika.com. -
Page 43: Parts List
PARTS LIST Part no. Description Q‘ty Part no. Description Q‘ty Foot skin Motor Seat Inner Hexagon Cylindrical Screw Insulation Pad of Motor Seat Washer Washer Footplate Spring washer Ornament of straps Inner Hexagon Cylindrical Screw Switch Hexagon Nipples Socket Spring washer Metal clip for fixing ornament of straps Flat Washer Hexagon Nipples... - Page 44 PARTS LIST Part no. Description Q‘ty Inner Hexagon Cylindrical Screw Upper Handrail Protection Foam Upper Handrail Protection Foam Main control Panel sticker Phill Disk Head Self-tapping Screw BMI Sensor Chip Main control Panel Display PCB Phill Disk Head Self-tapping Screw Column Phill Disk Head Self-tapping Screw Handrial bcnk Plastic Cover...
-
Page 45: Warranty / Service
WARRANTY TERMS / SERVICE For our devices we provide a warranty as defined below. 1. In accordance with the following conditions (numbers 2-5) we repair defect or damage to the device free of charge, if the cause is a manufacturing defect. Therefore, these defects / damages need to be reported to us without delay after appearance and within the warranty period of 24 months after delivery to the end user. - Page 46 NOTIZEN / NOTES ________________________________________________________________________________ ________________________________________________________________________________ ________________________________________________________________________________ ________________________________________________________________________________ ________________________________________________________________________________ ________________________________________________________________________________ ________________________________________________________________________________ ________________________________________________________________________________ ________________________________________________________________________________ ________________________________________________________________________________ ________________________________________________________________________________ ________________________________________________________________________________ ________________________________________________________________________________ ________________________________________________________________________________ ________________________________________________________________________________ ________________________________________________________________________________ ________________________________________________________________________________ ________________________________________________________________________________ ________________________________________________________________________________ ________________________________________________________________________________ ________________________________________________________________________________...
- Page 47 NOTIZEN / NOTES ________________________________________________________________________________ ________________________________________________________________________________ ________________________________________________________________________________ ________________________________________________________________________________ ________________________________________________________________________________ ________________________________________________________________________________ ________________________________________________________________________________ ________________________________________________________________________________ ________________________________________________________________________________ ________________________________________________________________________________ ________________________________________________________________________________ ________________________________________________________________________________ ________________________________________________________________________________ ________________________________________________________________________________ ________________________________________________________________________________ ________________________________________________________________________________ ________________________________________________________________________________ ________________________________________________________________________________ ________________________________________________________________________________ ________________________________________________________________________________ ________________________________________________________________________________...
- Page 48 20171005...
Need help?
Do you have a question about the Studio Vibration Plate 700 and is the answer not in the manual?
Questions and answers