
Related Manuals for kincrome KP15001


Summary of Contents for kincrome KP15001
- Page 1 GAS SOLDERING IRON KIT GAS SOLDERING IRON KIT 3 IN 1 PIEZO BLOW BLOW MOULD INCLUDES CASE DOUBLES AUTO TORCH WORK FUNCTION IGNITION STATION ACCESSORIES KP15001 ED1 JULY 2016...
-
Page 2: Specifications
10. Flame Adjustment Knob 20. Solder In Dispenser 21. Switch Safety Enclosure (Not Shown) 15 16 17 Specifications Model No: ..................KP15001 Fuel Type: ..................Butane/Butane-Propane Mixture Gas Fuel Storage: ................20ml Operating Time (Setting #2-3): ............60min Flame Length (From Torch Tip): .............50mm Flame Temperature: ...............Up to 1300°C (2372°F) -
Page 3: General Safety Warnings
GAS SOLDERING IRON KIT GENERAL SAFETY WARNINGS Read and follow operating instructions and warnings and familiarize yourself with the gas soldering iron before lighting or using. Review instructions and warnings periodically to maintain awareness. WARNING This tool must be placed on its folding stand when not in use. Do not leave the appliance unattended when it is switched ON. -
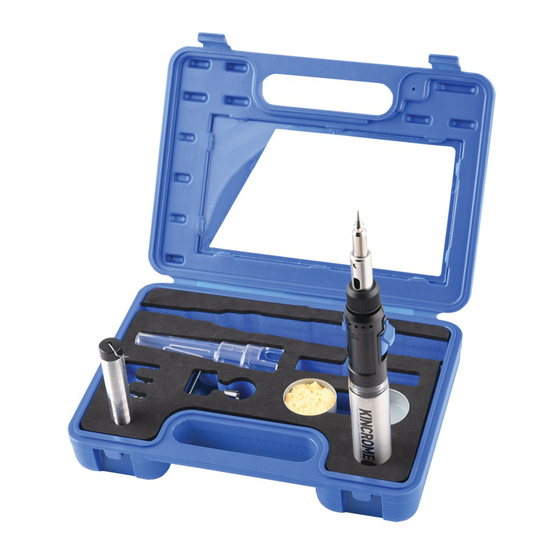
Page 4: Case Layout
Invert the refueling canister (not supplied), then insert the butane canister tip into the FILL VALVE (9). Adaptors may be needed, depending on refueling canister type (not supplied). Push the butane canister and KP15001 together and allow gas to flow into the GAS LEVEL WINDOW/ TORCH TANK (8). The KP15001 should take approximately 5 to10 seconds to fill. -
Page 5: Lighting And Operation
GAS SOLDERING IRON KIT Understanding The Supplied Accessories The KP15001 Kincrome Gas Soldering Iron Kit is supplied with a number of accessories. DEFLECTOR (14) is commonly used in heat shrink applications (Fig 1). • To assemble the DEFLECTOR (14) to the gas soldering iron, first remove either the SOLDERING TIP (1), CHISEL TIP (15), ANVIL TIP (16) or NEEDLE TIP (17) from the soldering iron by rotating the tip anti-clockwise. - Page 6 (Fig 5) The KP15001 is setup for use as a soldering iron and can be used immediately. Loosen LOCK NUT (5) and adjust the EXHAUST PORT (2) so that hot air escapes in a safe direction so it does NOT burn the user or damage work surface.
-
Page 7: Cleaning And Maintenance
Do not expose/store KP15001 to temperatures in excess of 45°C. Store KP15001 in well ventilated areas. SPARE PARTS For a full list of available spare parts for this item visit the Kincrome website kincrome com.au or alternatively contact Kincrome Customer Service. ALSO AVAILABLE PLASTIC WELDING KIT The KP15002 Plastic Welding Kit can help avoid the need to pay for costly repairs on: Automotive, Marine, Motorcycle products such as Bumpers, Headlight fixings, Moldings, Farings etc. -
Page 8: Caring For The Environment
GAS SOLDERING IRON KIT CARING FOR THE ENVIRONMENT When a tool is no longer usable it should not be disposed of with household waste, but in an environmentally friendly way. Please recycle where facilities exist. Check with your local council authority for recycling advice. Recycling packaging reduces the need for landfill and raw materials. - Page 9 (12 months) commences on the date that the product is purchased. If this product has materials or workmanship defects (other than defects caused by abnormal or non warranted use) you can, at your cost, send the product to place of purchase, an authorised Kincrome service agent or one of Kincromes addresses for repair or replacement.
- Page 10 www.kincrome.com.au...
Need help?
Do you have a question about the KP15001 and is the answer not in the manual?
Questions and answers