Table of Contents
Advertisement
Quick Links
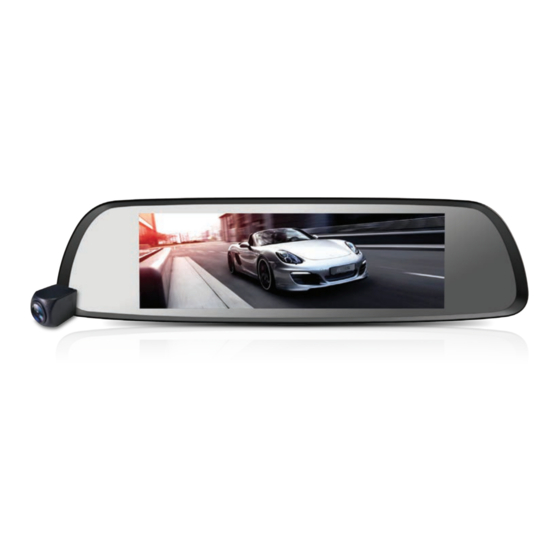
DVR1905K
6.86" Touchscreen Rearview Mirror Kit with DVR
DUAL FRONT & REAR RECORDING
SPECIFICATIONS
GENERAL
- Vertical Viewing Angle Adjustable via Touchscreen
- Built-In Lane Departure Warning System
- Bulit-In Microphone / Speaker
- Operating Temperature: -10°C to +60°C
- Built-In Battery: 500mAh
- Working Voltage: DC +5V
- Working Current: 2A Max
- Power: 10W Max
MONITOR
- 6.86" Touchscreen LCD Screen
- Highly Reflective Mirror Finish
- Anti-Glare Glass
- Front or Rear View
- Adjustable Rubber Straps
- 12/24V via Cig Lead
INSTRUCTION MANUAL
2
YEAR WARRANTY
FRONT CAMERA
- Full HD: 1920 x 1080P 30FPS
- Swivel Adjustable
- 6 Layer Full Glass Lens
- 148° Wide View Angle
REAR CAMERA
- HD: 1280 x 720P 25FPS
- 120° Wide View Angle
- Runs off Mirror Power
- 12V Reverse Trigger
- 8m Camera to Mirror Lead
DVR
- G-Sensor
- Parking Monitor / G-Sensor / Loop Recording
- Supports up to 64GB SD Card Class 10 (not included)
INCLUDES:
Touchscreen Rearview Miirror, Rear Camera,
12/24V Cig Lead Car USB Charger,
Adjustable Rubber Straps, Installation Hardware
1
Advertisement
Table of Contents

Related Manuals for Axis DVR1905K


Summary of Contents for Axis DVR1905K
- Page 1 INSTRUCTION MANUAL DVR1905K 6.86” Touchscreen Rearview Mirror Kit with DVR DUAL FRONT & REAR RECORDING YEAR WARRANTY SPECIFICATIONS FRONT CAMERA - Full HD: 1920 x 1080P 30FPS GENERAL - Swivel Adjustable - Vertical Viewing Angle Adjustable via Touchscreen - 6 Layer Full Glass Lens - Built-In Lane Departure Warning System - 148°...
-
Page 2: Power Key
Thank you for choosing the DVR1905K FHD Rearview Mirror Two-way Dash Cam, this dash cam adopts the high-performance MSTAR/AIT8336 Chipset, supporting 1080P Full HD video. Please read this manual carefully before use and keep it for future reference. We hope that this product will meet your needs and serve you for a long time. - Page 3 2. INSTALLATION GUIDE Please refer to the diagram below for Installation. 1. Turn the car engine off. 2. Insert a Class10 TF card (8GB-64GB) into the SD card slot of the Mirror Dash CAM. 3. Use the straps to fix the Mirror Dash CAM onto the car rearview mirror in a proper position. 4.
- Page 4 Enter into menu setting and choose “Date/Time”. Short press “up button”/ “ down button” to move the cursor to set date&time options. Short press “OK” to confirm and move the cursor to the next item. [ATTENTION]: Before using the DVR1905K, please set the correct date and time.
- Page 5 7. Video Replay Feature Enter into Video replay mode and choose from the S icons on the left: Front Normal/Rear Normal/Front Lock/Rear Lock Files for videos, and Image Files for pictures. Press the right side preview window to display the video. The shortcut buttons can operate: Lock or unlock/Play or Pause/Previous or Next/Fast Forward or Rewind/Delete.
- Page 6 4. TOUCH SCREEN CONTROL - QUICK GUIDE Menu Description Set the record video resolution to 1080P or 720P Page1 Video Resolution Default set as “1080P” (For front Camera only, rear camera is fixed on 720P). Set the length of each loop video recording to 1min, Page1 Loop Recording...
- Page 7 Set G-Sensor level to High, Middle, Low and Off. High means more sensitive, Low means less sensitive. This G-Sensor function activates Page2 G-Sensor Level during accidents or collisions to lock the recording video files for future use. Loop recording will not erase these locked files.
-
Page 8: Troubleshooting
Set volume of built-in speaker Page3 Volume to High, Middle, Low, or Off. Default set as “Middle” Set Flicker Frequency to 50Hz Page4 Flicker or 60Hz. Default set as “60Hz” Touch "Setting Date/Time" to display the Date/Time settings. Touch Up/Down to adjust and Page4 Date/Time OK to save and exit. - Page 9 5. TROUBLESHOOTING Not Recording/System Malfunction - Format the SD Card in the settings. - Replace the SD Card. Not Holding Charge - Connect to a charger or computer to charge for a few hours.
- Page 10 NOTES...
- Page 11 NOTES...
-
Page 12: Consumer Warranty
Please complete details below in the event of warranty service being required. Purchaser's Name: _________ _ Purchaser's Address: ________ _______ _ DVR1905K Model Number: ________ Serial Number: __ _ Dealer Name: _ _ _ _ _ _ _ _ _ Date of Purchase:...
Need help?
Do you have a question about the DVR1905K and is the answer not in the manual?
Questions and answers