Table of Contents
Advertisement
Quick Links
EN
EEP A5-10-02
EEP A5-10-03
EEP A5-10-04
• Installation and commissioning must only be carried out by a
qualified tradesman.
• Read installation and operating instructions before installation
and operation.
• Hand installation and operating instructions over to the final user.
• Read separate instructions of connected systems.
Valves, controls + systems
"R-Tronic RT B" (ENOCEAN)
Installation and operating instructions
EEP A5-10-06
EEP A5-10-06 +RPS
Advertisement
Table of Contents

Related Manuals for oventrop ENOCEAN R-Tronic RT B


Summary of Contents for oventrop ENOCEAN R-Tronic RT B
- Page 1 Valves, controls + systems “R-Tronic RT B” (ENOCEAN) Installation and operating instructions EEP A5-10-02 EEP A5-10-06 EEP A5-10-03 EEP A5-10-06 +RPS EEP A5-10-04 • Installation and commissioning must only be carried out by a qualified tradesman. • Read installation and operating instructions before installation and operation. • Hand installation and operating instructions over to the final user. • Read separate instructions of connected systems.
-
Page 2: Table Of Contents
Content “R-Tronic RT B” (ENOCEAN) “R-Tronic RT B” (ENOCEAN) Extent of supply and accessories ............3 General information ................4 2.1 Manufacturer and contact ..............4 2.2 Storage ....................4 2.3 General conditions of sales and delivery ..........4 2.4 Note regarding declaration of conformity ..........4 2.5 Copyright and protective rights.............4 Safety ....................5 3.1 Correct use ....................5 3.2 Residual risks and fundamental dangers ..........5 Technical description ................6 4.1 Summary “R-Tronic RT B” (ENOCEAN) ..........6 4.2... -
Page 3: Extent Of Supply And Accessories
Extent of supply and accessories “R-Tronic RT B” (ENOCEAN) Extent of supply and accessories Thank you for purchasing this product. Please check the delivery for completeness. It consists of the following components: Item no.: 1150780 “R-Tronic RT B” (ENOCEAN) Installation and 2 x battery Wall bracket operating instructions Optional accessories for 230 V power supply: Flush-mounted power pack with wall Mains adaptor with table stand bracket (item no.: 1150692) (item no.: 1150694) 3/24... -
Page 4: General Information
General information “R-Tronic RT B” (ENOCEAN) General information Manufacturer and contact Phone: +49 29 62 82-0 Oventrop GmbH & Co. KG Fax: +49 29 62 82-450 Paul-Oventrop-Straße 1 E-mail: mail@oventrop.de D-59939 Olsberg, Germany Storage • Temperature: -10°C up to +65°C • Dry (max. RH 70%); free from dust • Keep packaging material and • Do not expose to aggressive small components away from fluids or heat sources children General conditions of sales and delivery Oventrops general conditions of sales and delivery valid at the time of supply are applicable. Note regarding declaration of conformity The company OVENTROP GmbH & Co. KG hereby declares that the wireless... -
Page 5: Safety
Safety “R-Tronic RT B” (ENOCEAN) Safety Correct use The wireless thermostat “R-Tronic RT B” (ENOCEAN) serves the transmission of actual and nominal temperatures in rooms to a gateway for the control of building automation applications. As the wireless thermostat supports different EnOcean profiles “EEP” for the European market, it can be connected to the gateways of different manufacturers - such as the “wibutler”. The thermostat not only serves the transmission of temperature values but it can also be used for the activation of additional functions, such as the speed control of a fan or the transmission of information on whether the room is occupied or not. Furthermore, the wireless thermostat can be used for the control of freely definable “special functions” (RPS telegram). These functions, such as the control of light (on/off) and blinds (up and down) are not stored in the controller and have to be configured in the connected gateway. -
Page 6: Technical Description
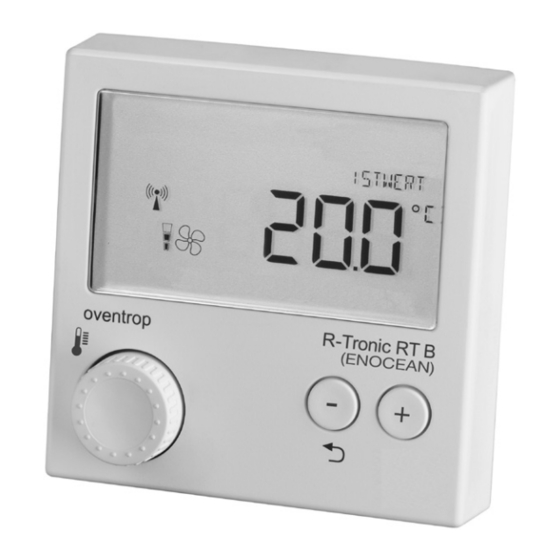
Technical description “R-Tronic RT B” (ENOCEAN) Technical description 4.1 Summary “R-Tronic RT B” (ENOCEAN) “Room occupied” active “Special function” active Text line for notes Menu-button Key for increasing a value Return key/key for reducing a value Key lock active Battery status “Teach in” telegram Current supply (fully charged, sent to gateway via external low, empty) power pack Warning symbol Fan speed (1-3) Fan control for notes and active error messages Menu- Turning = Pressing = Function selection button Confi rmation of (via display) -
Page 7: Technical Data
Technical description “R-Tronic RT B” (ENOCEAN) Technical data Radio frequency 868.3 MHz Radio range within the building Depending on materials and interference sources Transmission interval Winter mode 10 min.; Summer mode 30 min. Operation mode Type 1 (EN 60730-1) Protection IP20 (EN 60529) Protective system III – Protective low voltage Ambient temperature +5 °C up to +50 °C Battery type AA 1.5 V Mignon LR6, Energy supply alkaline (no rechargeable batteries); optional mains operation Battery life span about 2 years (battery capacity > 2,600 mAh) Display Measuring range T (°C) 0 °C up to +50 °C Accuracy at +25 °C ± 1 K Casing ABS (ASA), traffic white similar to RAL 9016 Casing dimensions... -
Page 8: Installation
Installation “R-Tronic RT B” (ENOCEAN) Installation General installation advice The wireless thermostat “R-Tronic RT B” (ENOCEAN) should be installed at a location where a good circulation of air is guaranteed. If possible, the wireless thermostat should be mounted onto an inner wall or a pillar at a height of 140 cm to 170 cm. Please make sure that the wireless thermostat is not affected by other heat sources (such as sunlight or heating devices next to it) in order to guarantee a high measuring accuracy. The wireless thermostat cannot only be mounted onto a wall, but can also be placed on a table stand is available as optional accessory. The table stand should be set up freestanding, for instance on tables, sideboards or similar and should not be covered. -
Page 9: Wall Attachment Of Fixing Plate "R-Tronic Rt B" (Enocean) (Battery Operation)
Installation “R-Tronic RT B” (ENOCEAN) 5.2 Wall attachment of fixing plate “R-Tronic RT B” (ENOCEAN) (battery operation) Power is supplied by batteries by default. A flush-mounted power pack and a mains adaptor with table stand are available as accessories. 1. Insert two AA 1.5 V Mignon batteries into the battery case. The position of the batteries is specified by the markings +/-. 2. Screw the supplied fixing plate for the wireless thermostat horizontally onto the wall. NOTE A necessary battery replacement is indicated by a message on the display. 3. Insert the wireless thermostat into the fixing plate from the top. “R-Tronic RT B” (ENOCEAN) Fixing plate The “R-Tronic” is ready for the “teach in” process (see paragraph 6.2) 9/24... -
Page 10: Wall Attachment Of Fixing Plate And Flush-Mounted Power Pack
Installation “R-Tronic RT B” (ENOCEAN) 5.3 Wall attachment of fixing plate and flush-mounted power pack (accessory) WARNING Risk of electric shock! As the flush-mounted power pack has to be connected to the power supply of the building, there is a risk of electric shock. The flush-mounted power pack must only be installed by a qualified electrician. CAUTION Risk of fire due to overcharging of the batteries! There is a risk of overcharging of the batteries if the “R-Tronic” is equipped with batteries and is connected to the 230 V network via the flush-mounted power pack. -
Page 11: Use With Mains Adaptor And Table Stand (Accessory)
Installation “R-Tronic RT B” (ENOCEAN) 5.4 Use with mains adaptor and table stand (accessory) CAUTION Risk of fire due to overcharging of the batteries! There is a risk of overcharging of the batteries if the “R-Tronic” is equipped with batteries and is connected to the 230 V network via the mains adaptor with table stand. The wireless thermostat must never be equipped with batteries when using the mains adaptor with table stand. 1. Plug the mains adaptor which is connected to the table stand into an earthed socket (100-240 V ~/50-60 Hz). 2. Insert the “R-Tronic” into the table stand from the top. “R-Tronic RT B” (ENOCEAN) Remove batteries! Table stand Mains adaptor The “R-Tronic” is now ready for the “teach in” process (see paragraph 6.2). NOTE The “R-Tronic” is removed by pulling it vertically upward out of the table stands. 11/24... -
Page 12: Function And Commissioning
Function and commissioning “R-Tronic RT B” (ENOCEAN) Function and commissioning Summary of the supported Enocean Equipment profiles (EEP) The wireless thermostat supports a total of five EEP profiles, which, when combined with a gateway, serve the control of different and sometimes even several functions. It must be observed that only one profile can be activated at the thermostat during commissioning. The display controlled user navigation (see next page) shows the respective activation process for the individual EPP profiles. Function EEP profile A5-10-02 A5-10-03 A5-10-04... - Page 13 Function and commissioning “R-Tronic RT B” (ENOCEAN) Activation of EEP profi les Actual temperature / Nominal temperature (always) active ENGLISH ENGLISH FRANCAIS Press menu-button Turn menu-button DEUTSCH >> confi rm selection >> change selection SPECIAL FUNCTION NO SPECIAL FUNCTION YES A5-10-06 + RPS ROOM OCCUPIED ROOM OCCUPIED A5-10-03 A5-10-06 NOTE ROOM OCCUPIED ROOM OCCUPIED The active EEP profi le can be found in...
- Page 14 Function and commissioning “R-Tronic RT B” (ENOCEAN) Display of the actual temperature/ Setting of the nominal temperature (supported by all profi les: A5-10-02, A5-10-03, A5-10-04, A5-10-06, A5-10-06 + RPS) Cyclical measurement of the room temperature (ACTUAL value): Setting of the new required temperature (nominal value): Press once quickly for storing Turn the menu-button to the right to increase the temperature. Turn the menu-button to the left to reduce the temperature. Store by pressing the menu-button.
- Page 15 Function and commissioning “R-Tronic RT B” (ENOCEAN) Symbols and display text with active fan speed (A5-10-02, A5-10-04) “FAN SPEED” (fan active, manual fan operation via “R-Tronic”) NOTE When set to AUTO (see below), fan control is carried out externally via the gateway. “FAN OFF” is displayed after having pressed the key (–) several times. Return key/(-) key for reducing a value (+) key for increasing a value AUTO: Fan speed symbol disappears 15/24...
- Page 16 Function and commissioning “R-Tronic RT B” (ENOCEAN) Function “Room occupied” (A5-10-02, A5-10-06, A5-10-06 + RPS) If the EEP profi les A5-10-02, A5-10-06 or A5-10-06 + RPS were activated during commissioning, the function “Room occupied” will be available at the “R-Tronic RT B” (ENOCEAN). This function can be activated when the room is occupied and be deactivated when leaving the room. Switching between PRESENT (HOME) and ABSENT: Press once quickly Special functions (A5-10-06 + RPS) If the EEP profi le A5-10-06 + RPS was activated during commissioning, freely defi nable “Special functions” (SF) can be controlled via the plus and minus keys of the wireless thermostat. Please observe that these functions, such as the control of light (on/off) and blinds (up and down) have to be confi gured in the connected gateway. Function key “Plus” Function key “Minus”...
-
Page 17: Adaptation To A Gateway
Function and commissioning “R-Tronic RT B” (ENOCEAN) 6.2 Adaptation to a gateway After activation of the EEP profi le, there does not yet exist an automatic communication between the wireless thermostat and the gateway. The communication will only be established after having sent a telegram via the “R-Tronic”. Once the telegram has been received by the gateway, the wireless thermostat will be “teached in”. The EEP profi le activated at the “R-Tronic” must be supported by the gateway, i.e. -
Page 18: Activation And Deactivation Of The Key Lock
Function and commissioning “R-Tronic RT B” (ENOCEAN) 4. Press the menu-button to complete the “teach in” process. X The message TELEGRAM SENT and a radio symbol will be displayed. It has to be checked via the user interface of the gateway whether the “teach in” process was successful. The displayed radio symbol does not automatically indicate a successful radio connection. 6.2.1 Activation and deactivation of the key lock Once the “teach in” process has been completed, the key lock will be activated automatically and the... -
Page 19: Subsequent Modification Of The Eep Profile
Function and commissioning “R-Tronic RT B” (ENOCEAN) 6.3 Subsequent modifi cation of the EEP profi le If the EEP profi le shall be modifi ed subsequently or a wrong EEP profi le has been activated, the factory settings of the thermostat have to be restored. A different respectively the correct profi le can then be activated in the course of the new installation (see paragraph 6.1 on page 12). The factory settings of the “R-Tronic RT B” (ENOCEAN) are restored as follows: 1. Switch to the setup menu by pressing the menu-button until BACKLIGHT will appear on the display. 2. Turn the menu-button all the way to the right until FACTORY SETTINGS will be displayed. - Page 20 Function and commissioning “R-Tronic RT B” (ENOCEAN) 4. Keep the “Plus” key pressed for some seconds. X The thermostat is reset to the factory settings and can be reconfi gured. 20/24...
-
Page 21: Summary Of The Setup Level
Function and commissioning “R-Tronic RT B” (ENOCEAN) Summary of the setup level Some basic functions can be defi ned and information on the operating status of the “R-Tronic RT B” (ENOCEAN) can be queried on the setup level. To switch to the setup menu, keep the menu-button pressed until BACKLIGHT will appear on the display (1). Opening of the setup menu: Keep pressed for 3 seconds When turning the menu-button (2) to the right, the following menu points will be displayed one after another: • BACKLIGHT (YES/NO): Activation and deactivation of the display lighting (switched off by default to increase battery life) • Installation (“TEACH IN”): see paragraph 6.2 • Transmission interval: 10 or 30 minutes • Languages: German, English, French • Offset temperature: -3.0° C up to +3.0° C (compensation of physical infl uences impairing the measurement accuracy) • Diagnosis: ID (unique identifi cation of the wireless thermostat); display of error messages: see 6.4.1... -
Page 22: Summary Of The Error Messages
Function and commissioning “R-Tronic RT B” (ENOCEAN) 6.4.1 Summary of the error messages BATTERY EMPTY REPLACE BATTERIES POWER SUPPLY DEFECT Power supply for “R-Tronic” temporarily insufficient. RADIO MODULE DEFECT INIT ERROR Initialisation error occurred. MEMORY DEFECT Error in the electronic memory. T-SENSOR DEFECT Temperature sensor defective 22/24... -
Page 23: Setting Options For The Final User
Setting options for the final user “R-Tronic RT B” (ENOCEAN) Setting options for the final user The final user of the wireless thermostat has the following setting options which were already described in chapter 6: 1. Modification and saving of the nominal temperature (warmer, colder) This function is available in all EEP profiles. 2. Setting of the fan speed respectively the ventilation intensity 3. Activation and deactivation of the function “Room occupied” (present/ absent) 4. Control of “special functions” (e.g. light, blinds) Activation of the correct EEP profile is paramount for the functions 2 to 4. This is the task of the qualified tradesman configuring the Smart Home System in the object into which the wireless thermostat(s) is (are) integrated. Access to the setup level and a subsequent modification of the EEP profiles by the final user should be prevented by locking the keypad (symbol “padlock”). The final user may use the a.m. functions even if the key lock is active. Disposal Disposal of this product with the standard waste is inadmissible. Electronic waste is dangerous and must only be disposed of by specialist companies The local municipal authorities give information on... - Page 24 For an overview of our global OVENTROP GmbH & Co. KG presence visit www.oventrop.de. Paul-Oventrop-Straße 1 D-59939 Olsberg, Germany Phone +49 29 62 82-0 Subject to technical modifications without notice. Fax +49 29 62 82-450 E-mail mail@oventrop.de Internet www.oventrop.com 115078080 08/2017...
Need help?
Do you have a question about the ENOCEAN R-Tronic RT B and is the answer not in the manual?
Questions and answers