Table of Contents
Advertisement
Available languages
Available languages
Quick Links
Advertisement
Table of Contents

Subscribe to Our Youtube Channel
Related Manuals for Ksenia ergo


Summary of Contents for Ksenia ergo
- Page 1 MANUALE DI INSTALLAZIONE E PROGRAMMAZIONE QUICK INSTALLATION AND PROGRAMMING GUIDE GUIDE DE PROGRAMMATION ET D’INSTALLATION RAPIDE TASTIERA LCD CAPSENSE - MULTIFUNCTION LCD KEYPAD - CLAVIER LCD MULTIFONCTION KSI2100000.300 www.kseniasecurity.com...
-
Page 2: Table Of Contents
Accessoires Optionnelle ......................26 INSTALLATION ........................... 26 Incorporation (Dans Le Boîtier Din 503) ou Directement sur le Mur ........27 Installation avec Pièce de Montage pour Surface Plate ..........27 Notes Installation ........................27 Description des Fonctions du Clavier ................... 31 ergo... -
Page 3: Introduzione
INTRODUZIONE ergo è un’innovativa tastiera con display a cristalli liquidi dal design sobrio e pulito e dal profilo estremamente sottile (incassata a parete sporge meno di 13 mm) che colloca- ta in un qualsiasi ambiente ne esalta prestigio e modernità. -
Page 4: Dati Tecnici
RFID/NFC per l’inserimento e disinserimento dei sistemi antintrusione realizzati con i dispositivi della serie lares ACCESSORI OPZIONALI KIT cavetto 1,5 m. per programmazione GSM/GPRS - p/n KSI7500000.000 Supporto da parete - p/n KSI2100001.300 KIT tastiera ergo - p/n KSI2100002.300 ergo... -
Page 5: Installazione
(x.x.xxx), a partire dal 10° carattere il Serial Number del dispositivo (6 caratteri numerici). Quanto detto è vero se ergo viene acceso per la prima volta, senza essere collegato sul KS-BUS o se collegato ad un dispositivo diverso da quello a cui in precedenza era stato connesso. - Page 6 FIGURA 2 - SUPPORTO DA TAVOLO Supporto da tavolo (parte 1) Retro del fondo tastiera Supporto da tavolo (parte 2) Perno Al fine di mantenere la conformità con le normative elencate a pag. 11 questa modalità di installazione non può essere utilizzata. ergo...
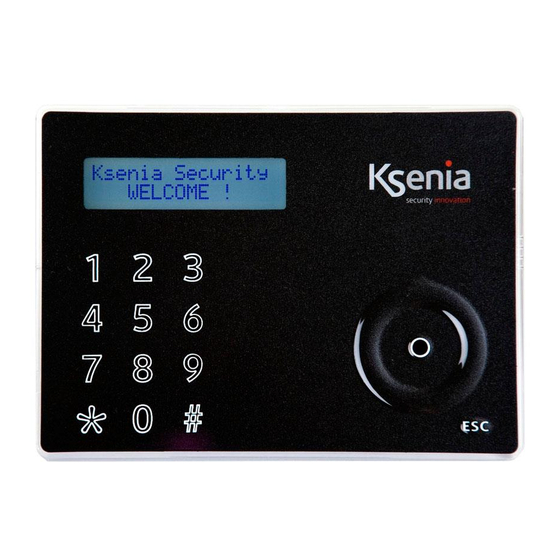
- Page 7 FIGURA 4 - COPERTURA TRASPARENTE E MASCHERINA Tastierino alfanumerico con i tasti da 1 a 9, * Tasto ESC Tasto ENTER Scroll che prevede anche: 4.1. Freccia a Sx 4.2. Freccia in Basso 4.3. Freccia a Dx 4.4. Freccia in Alto Display RFID/NFC Area ergo...
- Page 8 Infine un gioco - Inserisci il tuo PIN, naviga nei menù con lo scroll circolare, scegli un menù, ad esempio quello che consente di inserire un numero in rubrica ed inserisci un numero telefonico, premendo i tasti. Dopo alcuni minuti capirai di aver già preso confidenza con la tastiera ergo! PIN INSTALLATORE: 123456 PIN UTENTE: 147258...
-
Page 9: Descrizione Funzioni Tastiera
Durante lo stato di blocco della tastiera per l’attivazione della funzione pulizia, sul display di ergo verranno visualizzate le seguenti informazioni: • Prima riga: “Blocco tastiera” • Seconda riga: “.” in avanzamento che scandiscono la durata del “Blocco tastiera”;... - Page 10 Il Display permette le visualizzazioni di tutte le informazioni e dei dati gestibili tramite ergo, esso è composto da 16 caratteri per 2 righe (non è grafico), però è possibile visualizzare stringhe più lunghe (fino a 32 caratteri) grazie alle funzioni di shift manuale e automatico che sono state implementate nel suo FW.
- Page 11 Esso in realtà non è un tasto ma la zona delimitata dalla circonferenza (presente sul lato destro di ergo) in cui è presente una piccola depressione. Agendo in questa zona, in senso orario (per andare avanti) o antiorario (per andare all’indietro) si può: •...
- Page 12 Ksenia Security Srl declina ogni responsabilità nel caso in cui le apparecchiature vengano manomesse da personale non autorizzato. Il contenuto di questo manuale può essere soggetto a modifiche, senza preavviso, e non rappresenta un impegno da parte della KSENIA SECURITY. ergo...
- Page 13 Sono previste sanzioni molto elevate nel caso di irregolarità nel rispetto del Decreto Leg.vo 151/05. * Per maggiori informazioni si prega di contattare l’autorità locale competente. ergo...
-
Page 14: Introduction
In the case of ergo the front is completely smooth and all desired functions can be implemented by simply touching upon the surface in the areas shown by the graphic (letters, symbols, circular-scroll mouse) in a very simple and rational manner. -
Page 15: Technical Data
KIT ergo keypad - p/n KSI2100002.300 INSTALLATION The keypad ergo can be installed directly on a wall or put in an DIN 503 box set in the wall or leant on a plain surface by means of the proper sustainer. -
Page 16: Built-In Installation (With Din 503 Box) Or Directly On The Wall
(x.xx.xxx), as from the 10° character the device serial-number (six numeirc characters). This if ergo is switched on for the first time, if not connected to KSI-BUS, or if connected to a device other than the previous one. - Page 17 FIGURE 2 - TABLE SUSTAINER Table sustainer (part 1) Back of the keypad base Table sustainer (part 2) Hinge In order to maintain the conformity to the norms listed on page 21, this installation option can’t be used. ergo...
- Page 18 FIGURE 4 - TRANSPARENT COVER AND LEXAN Alphanumeric keypad with 1 a 9, * and # keys ESC key ENTER key Scroll, also including: 4.1. Left arrow 4.2. Down arrow 4.3. Right arrow 4.4. Up arrow Display RFID/NFC Area ergo...
- Page 19 (for example the one which allows to insert a phone number in the phone- book and insert it by digiting on the keypad). After few minutes only you’ll be surprised about your confidence with the ergo Keypad! DEFAULT INSTALLER’S PIN: 123456 DEFAULT USER’S PIN: 147258...
-
Page 20: Keypad Function Description
• First line: “Keypad block” • Second line: forewarding “.” which marks the keypad block lasting. It means that, as the “.” gets to the last line character, the cleaning function ends and ergo recovers its regular functionally. ergo... - Page 21 <Information> DISPLAY The Display shows all the information and the datas ergo can manage. It consist of 2 lines with 16 characters each (it is not graphic), but it can display longer strings (up to 32 characters) thanks to the manual and automatic shift functions available on his FW.
- Page 22 SCROLL Actually, “Scroll” is not a key but the zone borded by a circle (on the right side of ergo) typified by a little depression. The action on this zone clockwise (to move forward) or anticlockwise (to move backwards) permits to: •...
- Page 23 Installation of these systems must be carried out strictly in accordance with the instructions described in this manual, and in compliance with the local laws and bylaws in force. ergo series have been designed and made with the highest standards of quality and performance adopted by Ksenia Security.
- Page 24 Correct disposal of this product guarantees it undergoes the necessary treatment, recovery and recycling. This prevents any potential negative effects on both the environment and public health which may arise through the inappropriate handling of waste. * Please contact your local authority for further details. ergo...
-
Page 25: Introduction
(qu’elles soient autonomes ou pas) peuvent être exécutées directement à partir du clavier ergo. Donc, ergo est en mesure de programmer tout le système ou seulement de modifier des données spécifiques à n’importe quel moment dans la vie du système, telles que, par exemple, numéros de téléphone, adresses e-mail, SMS, etc. -
Page 26: Données Techniques
Pièce de montage pour surface plate - p/n KSI2100001.300 KIT ergo clavier - p/n KSI2100002.300 INSTALLATION Le clavier ergo peut être installé directement sur un mur ou encastré dans un boîtier DIN 503 installé sur le mur ou sur un bureau au moyen des pièces fournies. ergo... -
Page 27: Incorporation (Dans Le Boîtier Din 503) Ou Directement Sur Le Mur
(x.xx.xxx), à partir du 10e caractère : le numéro de série du système (six caractères numériques). C’est l’affichage qui apparaît quand ergo est allumé pour la première fois, s’il n’est pas connecté à un KS-BUS, ou s’il est connecté à un autre système. - Page 28 IMAGE 2 - PIÈCE DE MONTAGE POUR L’INSTALLATION SUR SURFACE PLANE Pièce de montage (élément 1) Dos de la base du clavier Pièce de montage (élément 2) Charnière Afin de maintenir la conformité avec les normes indiquées à la p. 31, cette installation ne peut pas être utilisé. ergo...
- Page 29 Clavier alphanumérique avec chiffres de 1 à 9, touches * et # Touche ESC Touche ENTER Bouton de défilement, comportant aussi: 4.1. Flèche gauche 4.2. Flèche vers le bas 4.3. Flèche droite 4.4. Flèche vers le haut Ecran LCD Zone lecteur de proximité/NFC ergo...
- Page 30 Après quelques minutes, vous comprendrez que vous avez déjà se familiariser avec le clavier ergo! USINE PIN INSTALLATEUR: 123456 NOMS D’UTILISATEURS PIN: 147258 (actif seulement après avoir affecté...
-
Page 31: Description Des Fonctions Du Clavier
• Deuxième ligne : l’avancement de l’affichage : “.”, ce qui indique la durée du blocage du clavier. Cela veut diire que, quand “.” arrive au dernier caractère de la ligne, la fonction de nettoyage s’éteint, et ergo retrouve son fonctionnement normal. ergo... - Page 32 : les données suivantes, le menu ou les données elles-mêmes. Si vous appuyez sur la touche “Enter” quand ergo est en mode veille, les données d’installation seront affichées (nom, numéro ou adresse e-mail) si elles ont été...
- Page 33 En fait, “le bouton de défilement” n’est pas une touche mais une zone limitée par un cercle (sur le côté droit d’ergo) caractérisée par un petit enfoncement. Les actions effectuées sur cette zone dans le sens des aiguilles d’une montre (pour avancer) ou dans le sens inverse (pour reculer) permettent de: •...
- Page 34 L’installation de ces systèmes doit s’effectuer strictement conformément aux instructions expliquées dans ce manuel, et en accord avec la législation locale et la réglementation en vigeur. ergo series a été conçu et fabriqué selon les normes de qualité et de performance les plus exigeantes adoptées par Ksenia Security.
- Page 35 La mise au rebut de ce produit garantit qu’il subit le traitement nécessaire, la récupération et le recyclage. Cela permet d’éviter les éventuels effets négatifs sur l’environnement et la santé publique qui peuvent résulter de la manipulation inappropriée des déchets. * Veuillez contacter les autorités locales pour plus de détails ergo...
- Page 36 RISPETTO DELL’AMBIENTE ergo è stata progettata e realizzata con le seguenti caratteristiche per ridurne l’impatto ambientale: Plastiche senza PVC Laminati senza Alogeno per circuiti stampati senza piombo Basso assorbimento Imballo realizzato per la maggior parte con fibre riciclate e materiali provenienti da fonti...
Need help?
Do you have a question about the ergo and is the answer not in the manual?
Questions and answers