Table of Contents
Advertisement
Quick Links
Advertisement
Table of Contents

Related Manuals for UFactory uArm Swift


Summary of Contents for UFactory uArm Swift
-
Page 2: Table Of Contents
Contents Safety Instructions ......................... 3 Product Overview ........................4 1. Reference Frame ......................4 2. Buttons & Indicator Lights ................... 5 3. Extension Description ....................5 End-Effectors Installation ....................... 6 1.Suction Cup (Default) ....................6 2. Swift Gripper ....................... 8 3. -
Page 3: Safety Instructions
Safety Instructions 1. Please don’t put your hands between the arms when uArm is moving. 2. Please use the official power supply for safety reasons. Please clear a space for uArm, in case of knocking down anything. -
Page 4: Product Overview
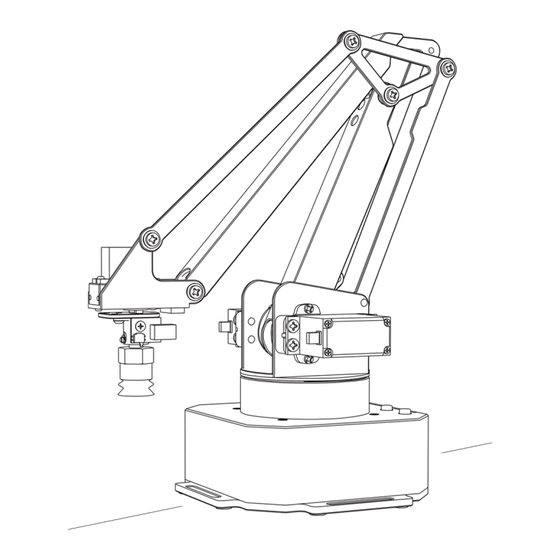
Product Overview 1. Reference Frame... -
Page 5: Buttons & Indicator Lights
2. Buttons & Indicator Lights 3. Extension Description... -
Page 6: End-Effectors Installation
End-Effectors Installation 1. Suction Cup (Default) Preparation: Suction cup, M3 screws and hex bar wrench Step 1: Fix the suction cup to the front mounting block Step 2: Wiring the limited switch and silicon tube... - Page 7 Note: Before unplugging the wire, press the locker of connector and then unplug it.
-
Page 8: Swift Gripper
2. Swift Gripper Step 1: Fix the gripper to the front mounting block... - Page 9 Step 2: Plug the wire of gripper Note: Because there is no need to use the silicon tube for suction cup, we could use the velcro to fix the tube with the upper arm.v...
-
Page 10: Swift Universal Holder
3. Swift Universal Holder Step1: Fix the universal holder to the front mounting block Step2: Install the pen to the holder. -
Page 11: Offline Learning Mode
Offline Learning Mode Use buttons on the base to “teach” uArm by hand. TEACH: 1. Start learning mode. Press the once, and the status indicator turns green. 2. Teach the robot manually. Press the once to turn on the end-effector, again to turn off. (If is down end-effector is gripper, or it is pump. -
Page 12: Software: Uarm Studio (Win/Mac)
Software: uArm Studio (Win/Mac) 1.Download uArm Studio from: http://www.ufactory.cc/#/en/support/ 2.Device Connection 1)Plug in the power cable. 2)Press down the power button. 3)Connect uArm to your computer via USB. Status of device connection is displayed on home page. More info is displayed in “Setting”. -
Page 13: Teach & Play: Learning Mode
3.Teach & Play: Learning Mode What is Teach & Play? Teach uArm by hand, and then replay the recording anytime. How? 1) Make a recording • Click the “New Recording” button to start “teaching”, OR, • Use the buttons on the base (usage of the buttons is the same as that under “Offline Learning Mode”). Save your recording... -
Page 14: Blockly: Visual Programming
3) Replay the recording in different speed and times What makes “Teach & Play” different from “Offline Learning Mode”? No time limit while “teaching” with uArm Studio. You may save, export your recordings and import recordings made by others. You may apply your recording in Blockly (visual programming interface, which is explained up next). 4.Blockly: Visual Programming What is Blockly? Blockly in uArm Studio is a visual programming interface specially designed for controlling uArm. - Page 15 Control uArm’s basic movements Change events (i.e. how you trigger commands) Apply recorded movements Dig deeper into programming (functions, variables, etc.)
-
Page 16: Gesture Control: Leap Motion
2. Place Leap Motion Controller in the way that you are facing the Green light. 3. Ensure the Leap Motion software is on. Green light on: Connected 4. Start your real-time control with hand motion: uArm Community UFACTORY Official Forum uArm User Facebook Group uArm Technical Support... -
Page 17: For Developers
For Developers 1.Library uArm Swift - Arduino Library 2.Communication Protocol 1) Introduction: • uArm gCode is an important part of the uArm software. • Based on the standard gCode protocol, we add a new protocol head in front of the gCode so that it can be more easily to use and debug. - Page 18 GCodeCommand Description Feedback 1. #n is used for the debug, if you don’t want to use it please remove it directly. (For Example: G2202 N0 V90\n) 2. ‘\n’ is the symbol of line feed. Moving Command (parameters are in underline) Move to XYZ(mm), F is 1000 G0 X...
- Page 19 false, 1 true) Convert coordinates to angle of OK B \n (Bjoint 0,Ljoint M2220 X joints 1,R joints 2, 0~180) Convert angle of joints to M2221 B OK X coordinates Check if it can M2222 X OK V \n (1 reachable,0 reach,P1polar,P0Cartesian unreachable) coordinates...
- Page 20 P2241 N1\n OK V295\n (return the data of ADC) Get the status of analog IO Ticking (Tip Sensor of Suction Cup) feedback Ready Timed feedback , ”M2120” Report the button event. N: 0 = Menu button, 1 = Play @4 N button V: 1 = Click, 2 = Long Press @5 V...
Need help?
Do you have a question about the uArm Swift and is the answer not in the manual?
Questions and answers