Advertisement
Quick Links
Advertisement

Subscribe to Our Youtube Channel
Related Manuals for Garlando Toorx MSX-90


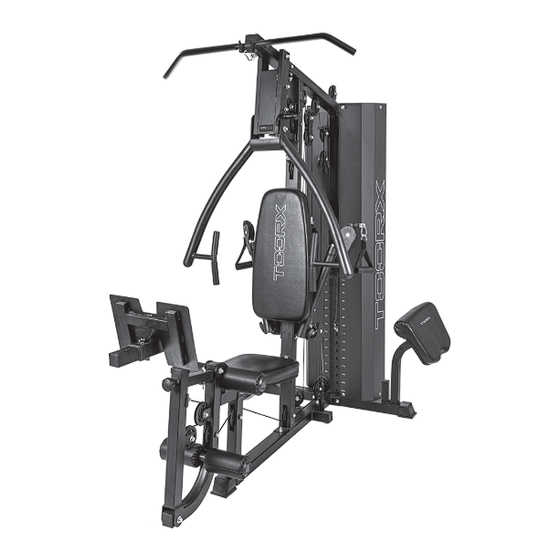
Summary of Contents for Garlando Toorx MSX-90
- Page 1 INSTRUCTION m u l t i f u n c t i o n a l p o w e r...
-
Page 2: Components - Parts
Components - Parts Please check you have all parts listed below Note: Some of the smaller components may be pre-fitted to larger components. Please check carefully before contacting us regarding any missing components. -
Page 6: Components - Fixings
Components - Fixings Please check you have all parts listed below Note: The quantities below are the correct amount to complete the assembly. In some cases more hardware may be supplied than are required. Some of the fixings are pre-fitted to the larger components. Please check carefully before contacting us regarding any missing fixings. - Page 7 Assembly Instructions Step 1 Insert 2 pcs guide rods(14#) into the holes of the Rear Stabilizer(1#) separately and tighten them with 2 pcs M10*20 Allen Bolt(34#) and 2pcs φ10 washers(50#). Note:(76#)&(87#) &(79#) &(82#) were pre-fixed in the fa ctory already.
- Page 8 Assembly Instructions Step 2 Attach the main base frame(2#) to the rear stabilizer (1#) , Carefully align the holes and secure them with 2pcs M10*90 carriage bolt(47#),2pcs bracket (28#),2pcs φ10 washers(50#) and 2pcs M10 Aircraft nuts(53#) . Note:(76#)&(77#) &(87#) were pre-fixed in the factory already.
- Page 9 Assembly Instructions Step 3 A ttach the front vertical frame (3#) onto the main base frame(2#), carefully align the holes and them together with 2pcs M10*70 carriage bolt(48#),1 pc bracket(29#),2pcs φ10 washers(50#) tighten and 2pcs M10 Aircraft nuts(53#) .
- Page 10 Assembly Instructions Step 4 Slide the 2pcs rubber bumper (59#) along the guide rods (14#) separately from the top to the bottom. Place 15pcs weight plate(100#) along the guide rods(14#) from the top to the bottom and Insert the Selector Rod(17#) into the center hole of the weight plates(#100).And then put the weight stem (101#) with the same way,Select the desired weight with the lock pin(65#) when exercising.
- Page 11 Assembly Instructions Step 5 A. Attach the end of the Upper Frame(4#) onto the Guide Rod(14#), Align the holes and secure them with 2pcs M10*20 allen bolt(34#),2pcs φ10 washers(50#) . B. Attach upper Frame(4#) onto the front vertical Frame(3#) and secure them with 2pcs M10*70 carriage bolt(48#),1 pc bracket(#29),2pcs φ10 washers(50#) and 2pcs M10 Aircraft nuts(53#) .
- Page 12 Assembly Instructions Step 6 A. Attach the seat pad support frame (7#) to the front vertical frame(3#),Secure them together with 2pcs M10*70 carriage bolt(48#),1pc bracket(29#) ,2pcs φ10 washers(50#) and 2pcs M10 lock nuts(53#) . B. Attach the front short support (8#)onto the main base frame(2#),Secure them together with 1pcs M10*90 carriage bolt(47#),1pcs φ10 washers(50#) and 1pcs M10 lock nuts(53#) ,Attach the front short support (8#)with the seat pad support frame(7#) together,Secure them with 1pcs M10*70 carriage bolt(48#),1pcs φ10 washers(50#) and 1pcs M10 lock nuts(53#)
- Page 13 Assembly Instructions Step 7 A. Attach the front press base frame(5#) to the upper frame (4#) and secure them together with 1pcs axle(45#),2pcs φ10 washers (49#) and 2pcs M10 Aircraft nuts(53#) . B. Attach butterfly frame(6#) to the front press base (5#) and secure them together with 1pc Axle (46#),2pcs φ10 washers(49#) and 2pcs M10 Aircraft nuts(53#) .
- Page 14 Assembly Instructions Step 8 A.Attach the bracket frame(12#) to the vertical frame (3#) and secure them together with 2pcs M12*95 mm hex bolt (44#),4pcs φ12 washer(52#) and 2p cs M12 Aircraft nuts(54#) . B.Attach the Left frame(20#) & right frame(21#)to th e bracket (12#) separately,,and fix them with 2pcs M24*1.5 aircraft circle bolt(69#),then tighten with a r ound nut hook wrench as the above diagram shows.(Factory provide the wrench).
- Page 15 Assembly Instructions...
- Page 16 Step 9 A.Attach the leg developer holder (9#) to the seat pad support frame(7#) and secure them with 1pc axle (43#),2pcs washer (#49) ,2pcs M10 aircraft nut(53#). B.Attach leg press support(10#) onto the leg develop holder(9#) and secure them together with 1pc axle (43#),2pcs washer (#49) ,2pcs M10 aircraft nut(53#).Insert the L shape pin(#63) to keep it safe when not use.
- Page 17 Assembly Instructions...
- Page 18 Step 10 A .Attach the upper cable (96#)through the opening of the upper frame, Make sure the ball • stopper should be underneath the upper fame.Place 1pc pulley (92#) under the cable, and secure the pulley with 1pc Allen bolt M10*85 (41#),2pcs bushing(39#) and M10 Aircraft nut (53#). B.
- Page 19 Assembly Instructions...
- Page 20 Step 11 pectoral cable(99#) through the open and place the 1 pulley below A.Draw the • the cable, Secure the pulley with (37#), M10*50 Allen bolt 2pcs ϕ10 washer (50#) and 1 pc M10 Aircraft nut (53#). B.Draw the pectoral cable through the tube and place the 2 pulley onto the cable.Secure •...
- Page 21 Assembly Instructions...
- Page 23 Step 13 • A. Attach the low cable (97#) through the bracket and place the 1 pulley onto t cable , Secure the pulley with the 1pc M10*45 Allen bolt (36#),2pcs ϕ10 washer (50#) and 1 pc M10 Aircraft nut (53#). •...
- Page 24 Assembly Instructions Step 14 A. Attach the arm curl pad (#106)onto arm curl pad support (#13) and secure it with 2PC M8×18mm Allen bolt (32#), 2PCϕ8 washer(#51) . B. Attach the backrest pad (#105)onto backrest pad support (#15) with 4PC M8×18mm Allen bolt (32#), 4PCϕ8 washer(#51) .
- Page 25 Assembly Instructions Step 15 Attach the 2pcs weight stack cover(25#) onto the rear stabilizer, secure the weight stack cover with 4pc M10*16 allen bolt (33#) ,4pcsφ10 washer(50#).(Two or many persons needed to finish this step assembly). Use 2 pcs bracket (112#) to connect the two weight stack cover with the 4pcs M10*16 Allen bolt (33#) and 4pcs ϕ10 washer(50#).
- Page 26 Assembly Instructions Step 16 Important: Study and follow the diagram carefully. A Attach the pull bar(24#) to the the pull bar cable (97#)with 1pcs 10-Joint Chain(67#) and 2pcs gourd hook(68#). B.Attach the lat bar(23#) to the upper cable(96#) with 1pcs 15-Joint Chain(66#) and 2pc gourd hook(#68).
-
Page 27: Parts List
Parts List Part # Description QTY Part # Description Rear stabilizer ϕ16*198*M10 Axle Main base frame M10*90 Carriage bolt Front vertical frame M10*70 Carriage bolt Upper frame ϕ25*10.5*1.5 washer front press base frame ϕ10 washer Butterfly frame ϕ8 washer Seat pad support frame ϕ12 washer Front support M10 Flat washer... - Page 28 Part # Description QTY Part # Description ϕ31*25.7*8 bushing ϕ97 Pulley ϕ90*10*26 Pulley ϕ24.5*31*500 handle grip ϕ24*31*120 handle grip Upper cable 3960mm Lower cable 5200mm Shoulder pull cable1880mm Pectoral cable 4830mm weight plate/15lbs 10lbs weight stem Abdominal strap Foam roller group ϕ8*70 handle grip Backrest pad Arm curl pad...
- Page 29 GARLANDO SPA Via Regione Piemonte, 32 - Zona Industriale D1 15068 - Pozzolo Formigaro (AL) - Italy www.toorx.it - info@toorx.it...
Need help?
Do you have a question about the Toorx MSX-90 and is the answer not in the manual?
Questions and answers