Table of Contents
Advertisement
Quick Links
Advertisement
Table of Contents

Related Manuals for Teufel Ultima 800 DiY Edition


Summary of Contents for Teufel Ultima 800 DiY Edition
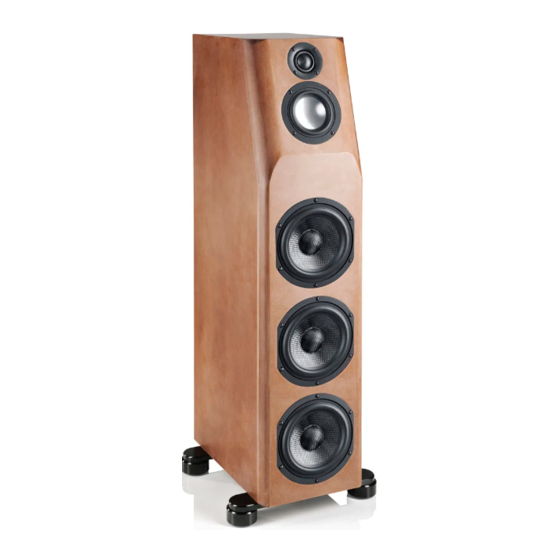
- Page 1 Technical description and assembly instructions Ultima 800 DiY Edition...
-
Page 2: Table Of Contents
Contents General notes and information ........ 3 Assembly ..............6 Notice ..............3 Basic information ..........6 Original packaging ..........3 Required tools ............6 Complaints ............3 Finish ..............6 Contact ...............3 Assembly steps ..........6 Proper use ............3 Setup and connection ..........13 For your safety ............4 Location tips ............13 Signal terms ............4 Connecting the cables ........14... -
Page 3: General Notes And Information
For questions, suggestions or any other issues please prior notice and in no way constitutes any liability on contact our customer service department: the part of Lautsprecher Teufel GmbH. Lautsprecher Teufel GmbH No part of these instructions may be reproduced in Gewerbehof Buelowbogen ·... -
Page 4: For Your Safety
For your safety Signal terms CAUTION You will encounter the following signal terms in these Incorrect location may result in damage. operating instructions: • Never use the unit unmounted in vehicles, in WARNING unstable locations, on wobbly stands or furniture, on under dimensioned brackets etc. -
Page 5: Preparation
Due to differing customer requirements, Ultima 800 DiY speakers are shipped without con- nector cables. You can find suitable cables in our web shop (www.teufel.de). • Check that all items have been delivered and that nothing is damaged. If anything is missing or dam- aged, please contact our service department (see page 3). -
Page 6: Assembly
Assembly Basic information Required tools The Ultima 800 DiY is a perfectly aligned speaker Phillips screwdriver PH2 concept. Even the smallest details are instrumental in producing the perfectly aligned overall concept of Size 4, 6, 8 Allen key this reference speaker. For this reason, please keep in mind that any modifications to the housing, the Hot-glue gun crossovers or drivers may negatively affect the sound... - Page 7 2. Mounting the feet Size 4 Allen key size 4 and 6 2x base plates 4x spikes 4x fastening screws 4x threaded bolts 2.1 Screw the 4 threaded bolts onto the 2 base Size 6 plates with the Allen key (size 4). Then screw the spikes onto these threaded bolts.
- Page 8 4. Mounting the cable distributor Cross-slot PH2 Cable distributor with 3 connector cables for the upper passive low-range speakers Cable distributor with 4 connector cables for the bottom passive low-range speakers 2 wood screws 4.1 Use one wood screw to mount each circuit board for the two cable distributors on the right inside wall (viewed from the back).
- Page 9 6. Wiring the connector terminal Connector terminal Bass Alignment Cross-slot PH2 12 wood screws 6.1 Two connector cables for the two crossovers are paired and end in one cable lug each. Stick the – cable lug of the red marked cable pair on the con- nector terminal of the red pole terminal (+) and the other one on the connector terminal of the black pole terminal (-) on the inside of the connector...
- Page 10 7. Sealing the holes and inserting damping wool Hot-glue gun Damping wool 3 mats CAUTION Let the hot glue cool off sufficiently before you touch it or insert the damping wool. 7.1 Make sure that all cables are protruding suffi- ciently.
- Page 11 8. Connecting and installing the speakers 1 tweeter e 1 mid-range speaker f 2 active low-range speak- ers g Identifiable by the thinner drive magnets. 4 passive low-range speakers h Identifiable by the thicker drive magnets. Cross-slot PH2 44 wood screws 8.1 Now connect the speakers one by one.
- Page 12 9. Mounting the speaker covers 9.1 Front side • Magnets hold the front speaker cloth grilles onto the front of the speaker; as a result, they can be attached and removed with ease anytime. NOTE Do not reach into the very sensitive diaphragms when attaching and removing the cloth grilles.
-
Page 13: Setup And Connection
Setup and connection Location tips CAUTION Set up the speakers so that there is no risk of them being knocked over unintentionally and the cables don`t represent a tripping hazard. Otherwise, there is a risk of injury. • Select a stable, level base. •... -
Page 14: Connecting The Cables
Connecting the cables Bass Aligment 1. Turn your amplifier off. 2. Lay the speaker cable from your amplifier to each of the speakers. Use a high-quality double wire speaker cable with marked strands for this. The cross-section should amount to at least 2.5 mm and no more than 10 mm 3. -
Page 15: Protecting The Environment
Bass alignment With your Ultima 800 DiY speakers, you can adjust the bass performance in order to adapt the sound to the unique room situation or the individual sound performance of the amplifier used. 3 pairs of terminals are provided for this purpose, which can be connected vertically with a bridge. -
Page 16: Technical Data
Council of the European Community 2004/108/EC and 2006/95/EC. Technical changes reserved! For questions, suggestions or other issues please contact our customer service department: Lautsprecher Teufel GmbH Tel.: 00800 200 300 40 (toll-free) No liability is accepted for the accu- racy of this information. Technical...
Need help?
Do you have a question about the Ultima 800 DiY Edition and is the answer not in the manual?
Questions and answers