Wilo Yonos MAXO Installation And Operating Instructions Manual
Hide thumbs
Also See for Yonos MAXO:
- User manual ,
- Installation and operating instructions manual (192 pages) ,
- Installation and operating instructions manual (160 pages)

Related Manuals for Wilo Yonos MAXO


Summary of Contents for Wilo Yonos MAXO
- Page 1 Pioneering for You Yonos MAXO/-D en Installation and operating instructions 2 175 507-Ed.01 / 2016-08-Wilo...
- Page 2 www.wilo.com/yonos-maxo/om...
-
Page 3: Table Of Contents
Table of contents Warning signals ............12 Spare parts ............13 Guidance information ......... 4 Disposal .............. 13 About these instructions ..........4 Original instructions ............ 4 Safety information ............4 Description of the pump ........4 Overview ............... 4 Short description ............4 Type key ................ -
Page 4: Guidance Information
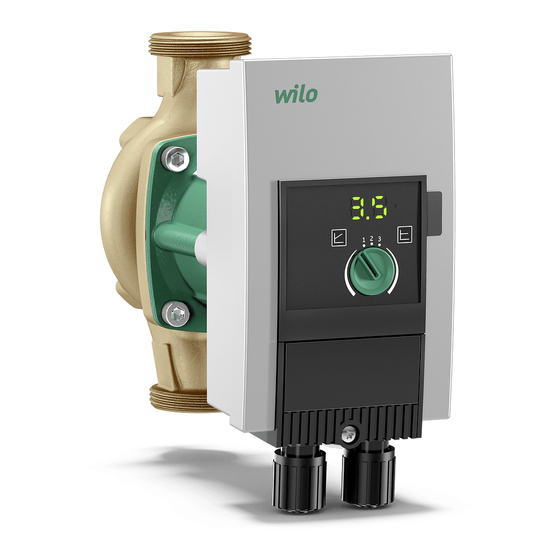
Plug DN 40 0.5 bar 1.2 bar 1.8 bar Short description DN 50 The high-efficiency pump Wilo-Yonos MAXO in the sin- gle or double pump version with flange or threaded pipe DN 65 0.7 bar 1.5 bar 2.3 bar union is a glandless pump with permanent magnet rotor DN 80 and integrated differential pressure control. -
Page 5: Safety
The delivery rate of the pump is compromised by the Keep highly flammable materials away. admixture of glycol due to the changed viscosity. This is ◾ to be considered during pump adjustment. Use other fluids only after approval from Wilo. Transportation and storage Scope of delivery Permitted temperatures ◾... -
Page 6: Transport
Installation Transport Permissible installation Fig. 4: Permissible installation Outdoor installation When installing outdoor also observe: ◾ Install pump in a pump chamber. Fig. 3: Transport ◾ Utilise cover as protection against environmental influ- ◾ Only carry motor or pump housing. ences (e.g. rain). ◾ If necessary use hoisting gear with sufficient bearing ◾... -
Page 7: Installation
Installation Installation Close the shut-off devices in front of and behind the pump. 5.7.1 Flange-end pump installation Screws and tightening torques Flange-end pump DN 32 DN 40 DN 50 PN 6 Screw diameter Strength class ≥ 4.6 Tightening torque 40 Nm Screw length ≥ 55 mm ≥ 60 mm Flange-end pump DN 65 DN 80 DN 100... -
Page 8: Insulate
Installation Open the shut-off devices in front of and behind the Screw together the pump with the union nuts. In doing pump. so hold it exclusively against the flat faces on the pump housing. Check impermeability. 5.7.2 Install threaded pipe union pump WARNING The pipes can be hot. -
Page 9: Connect
Connect Connect ◾ 1~ 230 V ◾ 3~ 400 V with neutral conductor Personnel requisition ◾ 3~ 400 V without neutral conductor (upstream power The electrical connection may only be performed by a transformer) qualified electrician. ◾ 3~ 230 V Requirements Double pumps ATTENTION Only operate as main and standby pump with automatic fault-actuated switchover: Wrong connection of the pump leads to damage to the... - Page 10 Connect Prepare pipes as per the instructions in the illustration. Remove the elastic fastener from the cable ducts using a small screwdriver. Guide the pipes through the cable ducts to the connec- tion sockets. Fig. 16: Plug disassembly Unscrew the screw from the plug. Disassemble the plug.
-
Page 11: Put Into Operation
Put into operation Put into operation Venting Charge the system appropriately and ventilate. ▶ The pump is self-ventilating. Flush ATTENTION While using liquids with admixtures property damage can occur due to the accumulation of chemicals. ◾ Flush out the pump before pouring in, refilling or replac- ing fluid. -
Page 12: Table Of Contents 8.5 Warning Signals
Troubleshoot Adjust operating mode and pump output Fault signals A signal is displayed. ◾ Factory setting The pumps are delivered in control mode Δp-v. The re- Failure LED lights up. ◾ quired delivery head is preset according to pump type at ◾... -
Page 13: Spare Parts
Disposal ATTENTION Improper disposal leads to environmental damage. ◾ Do not dispose of the pump in household waste. ◾ Recycle the pump. ◾ If in doubt, contact local authorities and specialist waste management companies. Further recycling information at www.wilo-recycling.com. - Page 14 (Die Seriennummer ist auf dem Typenschild des Produktes nach Punkten b) & c) von §1.7.4.2 und §1.7.3 des Anhanges I der Maschinenrichtlinie angegeben. / The serial number is marked Yonos MAXO on the product site plate according to points b) & c) of §1.7.4.2 and §1.7.3 of the annex I of Yonos MAXO-D the Machinery directive.
- Page 15 EC DEARBHÚ COMHLÍONTA WILO SE vakuuttaa, että tässä vakuutuksessa kuvatut tuotteet ovat WILO SE ndearbhaíonn an cur síos ar na táirgí atá i ráiteas seo, siad i seuraavien eurooppalaisten direktiivien määräysten sekä niihin gcomhréir leis na forálacha atá sna treoracha seo a leanas na hEorpa agus sovellettavien kansallisten lakiasetusten mukaisia: leis na dlíthe náisiúnta is infheidhme orthu:...
- Page 16 (SV) - Svenska ES-IZJAVA O SKLADNOSTI EG-FÖRSÄKRAN OM ÖVERENSSTÄMMELSE WILO SE izjavlja, da so izdelki, navedeni v tej izjavi, v skladu z določili WILO SE intygar att materialet som beskrivs i följande intyg naslednjih evropskih direktiv in z nacionalnimi zakonodajami, ki jih överensstämmer med bestämmelserna i följande europeiska direktiv och...
- Page 18 WILO SE Nortkirchenstraße 100 D-44263 Dortmund Germany T +49(0)231 4102-0 F +49(0)231 4102-7363 wilo@wilo.com Pioneering for You www.wilo.com...
Need help?
Do you have a question about the Yonos MAXO and is the answer not in the manual?
Questions and answers