Table of Contents
Advertisement
Advertisement
Table of Contents

Related Manuals for Bristan OP TS1503 EL C


Summary of Contents for Bristan OP TS1503 EL C
- Page 1 Installation Instructions and User Guide Opac Lever Thermostatic Shower Valve Models covered: OP TS1503 EL C, OP TS1503 CL C, OP TS1503 ISOL C, OP TS1503 SCL C Please keep this booklet for future Reference. Installer, when you have read these instructions please ensure you leave them with the user.
-
Page 2: Table Of Contents
Contents Thank you for choosing Bristan, the UK’s leading taps and showers expert. We have designed this product with your enjoyment in mind. To ensure that it works to its full potential, it needs to be fitted correctly. These fitting instructions have been created to give you all of the information you need and, if you need any further help, please do not hesitate to give us a call on 0844 701 6273. -
Page 3: Important Safety Information
Important Safety Information • Please read these instructions thoroughly and retain for future use. • All products manufactured and supplied by Bristan are safe provided they are installed, used correctly and receive regular maintenance in accordance with these instructions. •... -
Page 4: General Information
General Information This product has been tested to the TMV2 scheme which complies with the BS EN 1287:1999 (LP) and BS EN 1111:1999 (HP) thermostatic mixing valve standards and TMV3 scheme for use in Healthcare and commercial situations and performs to the requirements of NHS specification D08. -
Page 5: Product Features
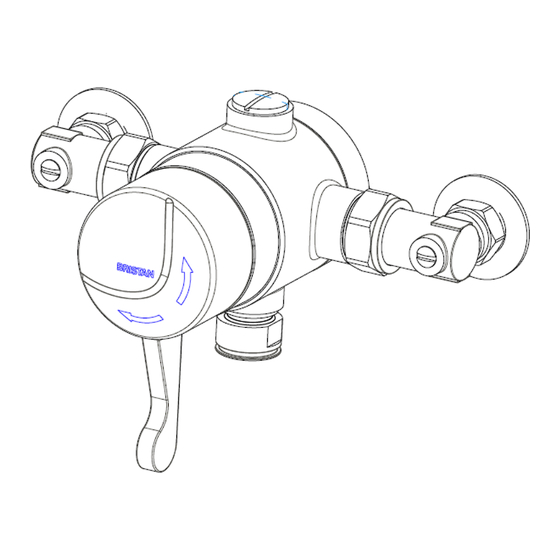
Product Features 1. On/Off and Temperature Control Turn the control anti-clockwise to turn the shower on and increase the temperature. Turn the control clockwise to decrease the temperature and to turn the shower off. 2. Shower Outlet Connects the shower hose to the shower valve. -
Page 6: Specifications
Specifications Inlet Connections: 15mm compression connections. OP TS1503 EL C – 148-158mm adjustable centres. OP TS1503 CL C – 130mm fixed centres. OP TS1503 ISOL C – 175mm fixed centres. OP TS1503 SCL C – 125-132mm adjustable centres. Outlet Connections: Top or bottom G ½" BSP male 15mm compression adaptor Operating Pressure Range: Min: 0.1 bar –... -
Page 7: Dimensions
Dimensions (mm’s) OP TS1503 EL C (Surface Mounted) 33.5 148 - 158 Need help? Give us a call on 0844 701 6273 and speak to one of our trained advisors. - Page 8 Dimensions (mm’s) OP TS1503 CL C (Concealed Model) 64 – 74 Centres Suitable for wall cavity depths of between 64-74mm. Need help? Give us a call on 0844 701 6273 and speak to one of our trained advisors.
- Page 9 Dimensions (mm’s) OP TS1503 ISOL C 33.5 Need help? Give us a call on 0844 701 6273 and speak to one of our trained advisors.
-
Page 10: Dimensions
Dimensions (mm’s) OP TS1503 SCL C 125-132 centres Need help? Give us a call on 0844 701 6273 and speak to one of our trained advisors. -
Page 11: Installation Requirements
Installation Requirements These fittings need to be installed in Size of tap or Vertical distance accordance with the following Installation combination fitting. of outlet above Requirements and Notes (IRN) to ensure spill-over level. they meet the requirements of the Water Supply (Water Fittings) Regulations 1999 1. - Page 12 Installation Requirements Conditions of use for Type 2 (Thermostatic mixer) valves High Pressure Low Pressure Maximum Static Pressure (Bar) Flow Pressure, Hot & Cold (Bar) 0.5 to 5 0.1 to 1.0 Hot Supply Temperature (ºC) 55 to 65 55 to 65 Cold Supply Temperature (ºC) Equal to or less than 25 Equal to or less than 25...
-
Page 13: Installation Requirements
Installation Requirements Conditions of use for Type 3 (Thermostatic mixer) valves In order to give compliance with N.H.S. specification DO8 the table below lists the conditions for normal use. These valves will perform adequately outside these parameters, however they cannot be guaranteed by the scheme to operate as Type 3 valves. -
Page 14: Flow Regulators
Flow Regulators Fit to Elbows Cold Supply Hot Supply Comments Cold 0.1 to 1.0bar 0.1-1.0 bar Max ratio of Hot (1 to 10 MTR (1-10 MTR Nothing Nothing – Cold pressure HEAD) HEAD) 1:5 / 5:1 This 1.0 to 5.0 bar 1.0 -5.0 bar Green 7 Litre Yellow 5 Litre... - Page 15 Flow Regulators The table on page 12 shows the flow regulator requirements and valve adjustments for various hot / cold supplies. # Flow regulators are fitted and will be required to be removed when installed in low pressure (gravity fed) applications below 1.0 bar. To remove: unscrew the retaining ring and remove regulator and washer.
-
Page 16: Installation
Installation OP TS1503 EL C, OP TS1503 ISOL C Before Installation Important: Water supplies to the mixer Flush through the pipework to ensure must be with hot on the left and cold on removal of debris. Turn off the mains the right when views from the front. - Page 17 Installation cont. OP TS1503 EL C, OP TS1503 ISOL C continued 3. Attach shower valve Place the shrouds over the water supply Re-attach the shower valve to the backplate by tightening the grub screw. pipes. Insert the 15mm hot and cold water supply pipes into the inlet connections and tighten the nuts.
- Page 18 Installation cont. OP TS1503 CL C (Concealed) Before Installation Important: Water supplies to the mixer Flush through the pipework to ensure must be with hot on the left and cold on removal of debris. Turn off the mains the right when views from the front. water supply and close any isolating valves.
- Page 19 Installation cont. OP TS1503 CL C (Concealed) continued. 3. Finish wall surface Remove the control handle and place the plastering shroud over the shower valve. Finish the wall surface up to the edge of the plastering shroud. Once the tiling is complete remove / cut the plastering shroud away from the shower valve.
- Page 20 Installation cont. OP TS1503 SCL C Before Installation Important: Water supplies to the mixer Flush through the pipework to ensure must be with hot on the left and cold on removal of debris. Turn off the mains the right when views from the front. water supply and close any isolating valves.
- Page 21 Installation cont. OP TS1503 SCL C continued 3. Attach shower valve to backplate cover Insert the 15mm hot and cold water supply pipes into the inlet connections and tighten the nuts. Ensure the olives and filter are in place. 4. Fit the cover shroud Slide the cover shroud over the shower valve and push onto the backplate cover until it clips into place.
-
Page 22: Operation & Temperature Setting
Operation & Temperature Setting On/Off and Temperature Control Turn the control (1) anti-clockwise to OP TS1503 ISOL C shown below turn on and increase the temperature. Turn the control (1) clockwise to decrease the temperature and turn off. The maximum temperature is factory set to 43ºC however this can be adjusted to suit different site conditions (see below to re-set maximum... -
Page 23: Commissioning
Commissioning wait for five seconds, if the water is still Commissioning notes for flowing check that the temperature is Thermostatic Mixing Valves below 46ºC. The first step in commissioning a thermostatic mixing valve is to check If there is no significant change to the set the following: temperature (+/-2ºC or less change from the original settings) and the fail-safe shut... -
Page 24: In Service Testing
In Service Testing Purpose c) Any isolating valves are fully open. The purpose of in service tests is to regularly monitor and record the With an acceptable mixed water performance of the thermostatic mixing temperature, complete the following valve. procedure: Deterioration in performance can indicate a) Record the temperature of the hot and the need for service work on the valve and /... - Page 25 In Service Testing cont. Annex F of D 08 (informative) Frequency of in-service tests c) If small changes (e.g. 1 to 2 K) in mixed water temperatures are recorded in General both of these periods, necessitating adjustment of the mixed water In the absence of any other instruction or temperature, then the next in-service guidance on the means of determining the...
-
Page 26: Maintenance
Tighten the nuts and backplate grub screw. leave behind. Order through your Bristan stockist (order code: ECLOTH). 4. Turn on the mains water supply and open any isolation valves and let the water flow to Servicing Filters flush the shower valve. -
Page 27: Maintenance
Note: For a full ‘how to’ video of how tightened the water supply is turned to service the shower valve please back on. visit www.bristan.com/howto. 5. Push the concealing plate back 3. Replace the piston and thermostat onto the shower valve and twist... -
Page 28: Troubleshooting
Troubleshooting Symptom Cause Remedy Maximum water Maximum water temperature Reset maximum water temperature too set incorrectly. temperature. Refer to ‘Maximum hot or cold Temperature Setting’ in Commissioning section (page 23) and ‘Adjusting the Temperature’ in Operation & Temperature setting section (page 22) Outlet water Inlet filter is partially blocked. - Page 29 Troubleshooting Symptom Cause Remedy No flow when Inlet filter is partially blocked. Check insert filters for any shower is turned blockages and clean as necessary. Blocked or damaged check Remove check valve and clean / valve. replace if necessary. Air block in either / both Flush through supply pipework.
-
Page 30: Guarantee
Guarantee Bristan offers solid guarantees to provide *Labour provided by an approved Bristan engineer. Guarantee only applies to products you with complete peace of mind. with a manufacturing fault. A deferred payment will be necessary in order to secure Taps and Mixers any visits by our engineers which will be 5 year parts and 1 year labour*. -
Page 31: Service Policy
Our service staff are fully qualified to advise on correct installation procedures and will be able to diagnose whether the fault will require a replacement part or a visit from a Bristan engineer. If required, a service call will be booked and either yourself or an appointed representative (who should be a person of 18 years or over) must be present during the visit. - Page 32 Part Number: 800446 Issue: FI Opac Lever Range D3 Bristan Group Ltd. Birch Coppice Business Park Dordon Tamworth Staffordshire B78 1SG Web: www.bristan.com Email: enquire@bristan.com A Masco Company...
Need help?
Do you have a question about the OP TS1503 EL C and is the answer not in the manual?
Questions and answers