Table of Contents
Advertisement
Quick Links
Advertisement
Table of Contents

Subscribe to Our Youtube Channel
Related Manuals for MB QUART MBQ-SUBSYS-1


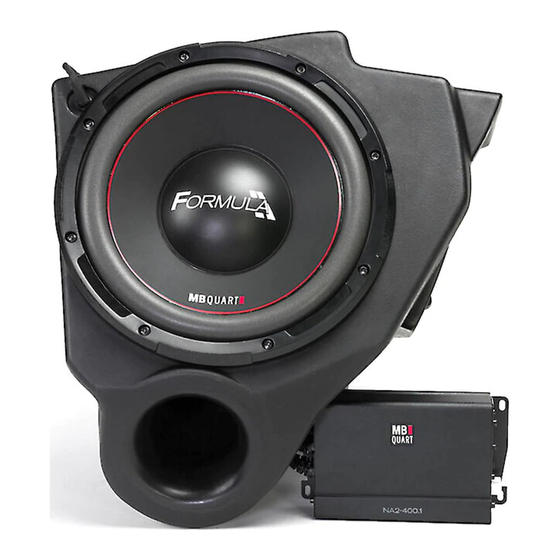
Summary of Contents for MB QUART MBQ-SUBSYS-1
- Page 1 MBQ-SUBSYS-1 400 WATT SUBWOOFER RZR Tuned Audio Package Installation Manual For additional technical information, go to the “SUPPORT” tab at MBQUART.com There you will find helpful, FAQ, TEQ Tips and you can contact Technical Support via email. ©2018 Maxxsonics USA...
-
Page 2: Support Tab
INTRODUCTION MB QUART SUBWOOFER, RZR TUNED AUDIO SYSTEM Thanks for choosing MB QUART. This RZR Tuned subwoofer system has been meticulously engineered to install into your vehicle. We have made the process so simple you will be in and out of the installation in no time. -
Page 3: Warranty
WARRANTY Your audio system is covered by a 1 year warranty from the date of invoice. It is important that you keep your sales receipt. Furthermore, it is crucial that you record and store a record of the serial numbers for each of the components that are included in your system. In the rare instance that a warranty claim is needed both proof of purchase and serial numbers are required. -
Page 4: Time & Tools
You will need about 1.5 HOURS to complete this installation depending on who is “helping.” The following are a list of tools you will need for any of the MB Quart UTV/RZR Tuned Audio packages. Depending on which system you are installing, you may or may not need all of them. -
Page 5: Chapter 1 - Preparation For Installation
CHAPTER 1 – PREPARATION FOR INSTALLATION Before you start dismantling your machine, we suggest you prepare all your components, enclosures. These steps will follow the CHAPTERS of the Installation Videos when completed. Additionally, it will make life less stressful to have everything ready when you are ready to put each component into the machine. -
Page 6: Chapter 2 - Prep Subwoofer Enclosure & Mount
PREPARATION CHAPTER 2 - PREP SUBWOOFER ENCLOSURE & MOUNT If your subwoofer is not preinstalled in the enclosure, you will need to prepare the unit by installing the clips that will hold the door from your OEM glove box. Next you will wire the subwoofers two voice coils and screw the subwoofer to the enclosure. STEP 1 –... - Page 7 PREPARATION Use the provided nuts to secure the hinge brackets from the inside of the subwoofer. Do not over tighten. (FIG 2-2) The clip with the closed hole mounts on the driver side with the screws on the inside where the glove box door will cover the screws.
-
Page 8: Chapter 3 - Subwoofer Install Into Enclosure
PREPARATION CHAPTER 3 – SUBWOOFER INSTALL INTO ENCLOSURE STEP 1 – INSTALL THE SUBWOOFER Set your subwoofer enclosure on a flat surface as shown in FIG 4-1. Put the subwoofer enclosure on its back and extend the harness from inside the enclosure as shown in FIG 4-1. - Page 9 PREPARATION If your subwoofer was not preinstalled, you will wire the woofer with the dual voice coils to 2 ohms (indicated with the Ω symbol) as pictured in FIG 3-2. We have prepared the internal harness so you cannot make a mistake. Wiring the subwoofer for 2 ohms (2Ω) will allow the subwoofer to develop maxximum power from the amplifier by perfectly balancing the impedance with the amplifiers power output.
- Page 10 DUAL WIRE ON ONE CONNECTOR (FIG 3-3) SINGLE WIRE OPPOSITE CONNECTOR (FIG 3-4) For additional technical information, go to the “SUPPORT” tab at MBQUART.com There you will find helpful, FAQ, TEQ Tips and you can contact Technical Support via email. ©2018 Maxxsonics USA...
- Page 11 PREPARATION STEP 2 – SECURE THE SUBWOOFER TO THE ENCLOSURE Due to the shape of the enclosure it can be very difficult to balance the subwoofer enclosure and screw in the speaker for one person shown in FIG 3-6. Consider having a friend hold the enclosure steady while you mount the subwoofer using HAND TOOLS with the screws provided.
-
Page 12: Chapter 4 - Remove & Reinstall The Glove Box Door
PREPARATION CHAPTER 4 – REMOVE & REINSTALL THE GLOVE BOX DOOR With a small amount of pressure you can bend up on the center portion of your OEM glove box door and remove it from the brackets. In a reverse movement you can now reinstall this door onto your new subwoofer glove box to give your subwoofer a stealth appearance as shown in FIG 4-1. -
Page 13: Chapter 5 - Vehicle Disassembly
VEHICLE DISMANTLE CHAPTER 5 - VEHICLE DISASSEMBLY STEP 1 – REMOVE HOOD Start with removing the hood. This is where you will access the bus bar (FIG 5-1). Confirm that your machine has the busbar installed by the dealer or by you. If your busbar harness has not been installed, see Chapter 1 of this manual for clarification (FIG 5-1) For additional technical information, go to the “SUPPORT”... - Page 14 VEHICLE DISMANTLE STEP 2 - REMOVE TOP OF DASH Remove the top of the dash shown in FIG 5-2 by removing the screws. (FIG 5-2) STEP 3 – REMOVE THE GRAB BAR Remove the grab bar shown in FIG 6-3 by removing the retaining clip and pin and firmly pulling the grip toward the rear of the vehicle.
- Page 15 VEHICLE DISMANTLE STEP 4 – PULLING FRONT DASH Remove 4 Torx screws from the front of the dash REMOVE TORX For additional technical information, go to the “SUPPORT” tab at MBQUART.com There you will find helpful, FAQ, TEQ Tips and you can contact Technical Support via email. ©2018 Maxxsonics USA...
- Page 16 VEHICLE DISMANTLE STEP 5 Using a large panel popper to release X clips from the front dash assembly PANEL POPPER TO POP THE DASH SLOWLY ACCOUNT FOR ALL DASH CLIPS For additional technical information, go to the “SUPPORT” tab at MBQUART.com There you will find helpful, FAQ, TEQ Tips and you can contact Technical Support via email.
- Page 17 VEHICLE DISMANTLE STEP 6 – REMOVING THE GLOVE BOX Remove 2 - 10mm bolts on the top of the subwoofer where it is fastened to the internal framework. See holes in FIG 5-9. The glove box will easily slide out. We will use a different mounting method for the new subwoofer.
-
Page 18: Chapter 6 - Mount The Subwoofer Enclosure
CHAPTER 6 – MOUNT THE SUBWOOFER ENCLOSURE With the glove box door in position and the subwoofer installed in the enclosure, you are ready to mount the subwoofer back into the glove box location. Sitting on the floor of the RZR, hold the subwoofer enclosure up to the grab bar pipe. GRAB BAR PIPE STEEL PLATES &... - Page 19 Tighten a few threads at a time on each bolt to allow the subwoofer to rise up against the pull bar frame evenly. This will allow the subwoofer to seat properly against the frame of the vehicle. As the subwoofer comes up against the bar, before it is finally secure, make sure that the speaker wire is not behind the enclosure.
- Page 20 See CHAPTER 7 – TEST & TUNE for additional information on final system adjustments and best-settings. TUNED PACKAGE TWO CHANNEL AMPLIFIER MONO AMPLIFIER MBQ-SUBSYS-1 Bass Boost to 0dB NA2-400.1 AMPLIFIER SEE CHART TO ADJUST For additional technical information, go to the “SUPPORT” tab at MBQUART.com There you will find helpful, FAQ, TEQ Tips and you can contact Technical Support via email.
-
Page 21: Chapter 7 - Test & Tune
CHAPTER 7 - TEST & TUNE Nearly done, but it is smart to confirm that everything is working before you put the machine back together. With the amplifier and subwoofer wired and connected to the system, you are ready to power up the system. STEP 1 –... -
Page 22: Chapter 8 - Vehicle Reassembly
STEP 2 – Here is a check list so you know you did not forget something. With the power “ON” use the list here to check the system for all of the following. Make sure you are using the controls on the source unit to confirm Left is Left and Right is Right. There will be no change from Front to Rear as all speakers are on the same 2 channel amplifiers. -
Page 23: Chapter 10 - Show Your Friends
CHAPTER 10 - SHOW YOUR FRIENDS Congrats on a great install and an awesome RZR audio upgrade. Get on the trails, show your friends and show us too. We’re all over social media, just like you. We use: @MBQ UART USIC EFINED #RZRL... - Page 24 For additional technical information, go to the “SUPPORT” tab at MBQUART.com There you will find helpful, FAQ, TEQ Tips and you can contact Technical Support via email. ©2018 Maxxsonics USA...
Need help?
Do you have a question about the MBQ-SUBSYS-1 and is the answer not in the manual?
Questions and answers