Table of Contents
Advertisement
Advertisement
Table of Contents
Troubleshooting

Related Manuals for Minuteman RoboScrub 20


Summary of Contents for Minuteman RoboScrub 20
- Page 1 RoboScrub 20 Operations Manual...
-
Page 2: Introduction
Brain Corp or Brain Corp-approved trainers in a controlled, restricted environment approved by Brain Corp. Additional training materials may be provided as to the intended use of the RoboScrub 20, and it should only be used in accordance with such training. Use the machine in approved environments in accordance with the Autonomy Services Agreement (ASA) and the Autonomous Navigation Software End User License Agreement (EULA). -
Page 3: Technical Specifications
988767UM REV A Content Subject to Change •... -
Page 4: Table Of Contents
ROBOSCRUB 20 OVERVIEW ........ - Page 5 ROBOSCRUB 20 STORAGE ........
- Page 6 PARK AND STORE RoboScrub 20 ........
- Page 7 988767UM REV A Content Subject to Change •...
-
Page 8: Important Safety Instructions
Do not use on public paths or roads. • The RoboScrub 20 should only be used to scrub flat, hard surfaces with little to no inclines (up to 2% incline when operating in manual mode; 0% incline when operating in robotic mode). -
Page 9: Operational Safety
RoboScrub 20. • Do not leave the RoboScrub 20 unattended without first turning the ignition key off and removing the key. When the RoboScrub 20 is operating in robotic mode, remove the ignition key to prevent unauthorized use. -
Page 10: Maintenance And Service Safety
Drain all tanks and hoses prior to storing the RoboScrub 20. • Prevent unauthorized use of the RoboScrub 20 by storing with the ignition key removed. • Do not charge batteries when open flames or sparks are present. Do not smoke. -
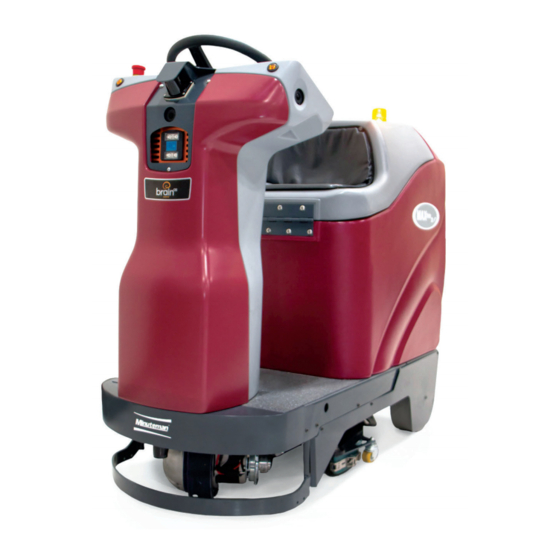
Page 11: Roboscrub 20 Overview
1. Sensors: Side 2D Cameras 8. Scrub Deck 2. Sensors: Front 2D Camera 9. Squeegee 3. Sensors: Front 3D Camera 10. Accelerator Pedal 4. Sensors: Side 3D Cameras 11. Solution/Recovery Tank 5. Sensors: Lower LIDAR 12. Operator Seat/Recovery Tank Lid 6. - Page 12 14. Recovery Tank Drain Hose 15. Vacuum Motor Muffl er 16. Solution Fill Port 17. Warning Light 18. Rear Emergency Stop 19. Start/Pause Button 20. Solution Tank Site Gauge/Drain Hose 21. Battery Compartment 22. Rear Tires 988767UM REV A • Content Subject to Change...
- Page 13 23. Ignition Key Switch 24. User Interface (UI) Touch Screen 25. Steering Wheel 26. Front Emergency Stop 27. Horn Button 28. Recovery Tank High Indicator 29. Solution Tank Low Indicator 30. Solution Flow Control 31. One-Touch Button 32. Vacuum Button 33.
-
Page 14: Components Overview
WARNING LIGHT The warning light fl ashes when the RoboScrub 20 is operating in robotic mode. This serves as an indicator to passersby that the RoboScrub 20 is currently in operation. 988767UM REV A • Content Subject to Change... -
Page 15: Emergency Stop
START/PAUSE The RoboScrub 20 is equipped with a blue start/pause button on the back that is used to begin running a saved route in robotic mode, or to pause an in-process robotic route. -
Page 16: Recovery Tank Drain Hose
The operator seat is equipped with two sensors: a pressure switch under the seat cushion to prevent joyriding during robotic operation, and two contact switches located on the back of the seat and the body of the RoboScrub 20. It also serves as the recovery tank lid. -
Page 17: Accelerator Pedal
RoboScrub 20. SENSORS The RoboScrub 20 is equipped with LIDAR, 3D and 2D cameras, all of which allow machine visions for the robotic software. All sensors and cameras constantly surveille the robot’s surroundings for both stationary and moving obstacles. -
Page 18: Control Console Overview
CONTROL CONSOLE OVERVIEW The Minuteman® RoboScrub 20, powered by BrainOS, was designed with total operator ease of use in mind. All controls and components have been designed as a total system to effi ciently clean dirty fl oors. The control console consists of the User Interface (UI) Touch Screen, also referred to as the UI or touch screen, and a number of manual controls. -
Page 19: Ignition Key Switch
Just below the steering wheel is the ignition key switch. The ignition key switch turns the RoboScrub 20 on and off. Turn the key to the right (clockwise) to turn on the RoboScrub 20. Turn the key to the left (counter- clockwise) to turn it off. -
Page 20: Direction Buttons (Forward/Backward)
DIRECTION BUTTONS (FORWARD/BACKWARD) The direction buttons control whether the RoboScrub 20 drives forward or backward when the accelerator pedal is pressed. The upward arrow instructs the RoboScrub 20 to drive forward. The downward arrow instructs it to drive backward. When driving backward, the squeegee will automatically raise to prevent damage. -
Page 21: Roboscrub 20 Setup
13. Sit on the operator seat, insert the ignition key and the RoboScrub 20. turn to the right (clockwise) to start the RoboScrub 5. The RoboScrub 20 is battery-operated and designed to operate on 24 volts DC; (2) 12 volt 14. Make sure the squeegee and scrub deck are raised. -
Page 22: Scrub Brush/Pad Options
SCRUB BRUSH/PAD OPTIONS The following scrub brush or pad options are available with the Minuteman® RoboScrub 20, powered by BrainOS: 988767UM REV A • Content Subject to Change... -
Page 23: Install Scrub Brush/Pad
If there is a brush currently attached, perform the following steps to unload the scrub brush/pad: 1. Turn the ignition key to the left (counter-clockwise) to turn the RoboScrub 20 off, if necessary. 2. Turn the ignition key to the left (counter-clockwise) past the off position and hold. -
Page 24: Squeegee Assembly
SQUEEGEE ASSEMBLY The Minuteman® RoboScrub 20, powered by BrainOS, is equipped with a squeegee assembly that houses the squeegee blade. Familiarize yourself with all aspects of the squeegee assembly: 1. Outside Blade Fastening Latch 5. Inside Blade Fastening Latch 2. Caster Wheel 6. -
Page 25: Install And Adjust Squeegee
INSTALL AND ADJUST SQUEEGEE The Minuteman® RoboScrub 20, powered by BrainOS, is typically shipped with the squeegee assembly attached. INSTALL/REPLACE SQUEEGEE BLADE If necessary, perform the following steps to install or replace a squeegee blade into the squeegee assembly: 1. Remove the squeegee assembly by pulling off the vacuum suction hose from the squeegee’s vacuum connector. -
Page 26: Before Use
PRE-OPERATION CHECKS The RoboScrub 20 is capable of both manual and robotic operation, thanks to BrainOS technology. A subscription to Brain Corp’s Autonomy Services is required to use the RoboScrub 20’s robotic functions. Robotic mode means that the RoboScrub 20 performs fl oor cleaning without direct, real-time operator control, which allows janitorial staff to focus on other tasks. -
Page 27: Manual Operation
MANUAL OPERATION Before turning on the RoboScrub 20, make sure it is fully charged and free of damage. Perform the following steps to use the Minuteman® RoboScrub 20 manually: 1. Fill the solution tank via the solution fi ll port located on the top left corner of the back of the RoboScrub 20. -
Page 28: Robotic Operation
ROBOTIC MODE OPERATION The RoboScrub 20 is equipped with BrainOS technology that offers a robotic mode feature. Robotic mode provides the ability for the machine to perform floor cleaning by following one of the saved navigation routes without direct, real-time operator control. The machine can only operate in robotic mode in areas where cleaning routes have been taught and saved. -
Page 29: Region
REGION The UI (User Interface) touchscreen can be set to display in a variety of languages. English is the default language. Perform the following steps to set the UI touchscreen to display in a different language: 1. Insert the ignition key and turn to the right (clockwise) to turn on the machine. Wait for the UI touchscreen to initialize. 2. -
Page 30: Roc: Robot Operations Center
ROC: ROBOT OPERATIONS CENTER BrainOS software provides access to Brain Corp’s Robot Operations Center, also known as the ROC. The ROC is a cloud- based robot operations center, managed by Brain Corp technicians, that enhances the machine’s abilities by providing monitoring and analytics. -
Page 31: Teach A Robotic Route
TEACH A ROBOTIC ROUTE The RoboScrub 20 must be taught one or more cleaning navigation routes before it can run robotically. Perform the following steps to teach a new route: 1. Sit in the operator seat, insert the ignition key... - Page 32 6. Select one of the available routes. The UI 8. Press the accelerator pedal and drive the touchscreen states Ready. I will learn as you drive . machine through the entire cleaning route to be saved. As soon as driving begins, the UI touchscreen states Learning ...
- Page 33 9. Once driving stops, the UI touchscreen 11. The UI touchscreen displays Saving ... states Learning Paused. Drive to resume. When the route is successfully saved, the with options to SAVE or CANCEL. Select UI touchscreen briefl y displays Success! SAVE to save the new route.
- Page 34 Avoid U-turns. The RoboScrub 20 requires a width of at least 8½ feet to perform a U-turn. Avoid making U-turns as much as possible. • Avoid tight spaces. The RoboScrub 20 requires a width of at least 3½ feet when driving a straight line and 4½ feet to make turns around a corner or when turning into an aisle. •...
-
Page 35: Run A Robotic Route
If necessary, adjust the solution fl ow setting for today’s cleaning needs. 8. Step off the RoboScrub 20, and either remove the operator seat cushion or tuck the top half under the bottom half to display the yellow STAY CLEAR 4. - Page 36 9. Press the Start/Pause button on the back of the 12. If any scrubbing functions need adjustment, machine to start the robotic route. The yellow press the Start/Pause button on the back warning light fl ashes and the horn sounds of the machine to pause the robotic route.
- Page 37 FOR SAFETY • The steering wheel may rapidly and unexpectedly move while operating in robotic mode, which could cause physical injuries. Do not sit on the operator seat, hold the steering wheel, or put your hand or arm through the holes of the steering wheel while the machine is operating in robotic mode.
-
Page 38: Alerts During Operation
• Sweep the fl oor. • Pair your phone to the ROC to receive text messages whenever the RoboScrub 20 encounters an alert and/or when the robotic route is complete. • Run routes when the area is most free of people and other obstructions. - Page 39 The following table provides a list of possible alerts with steps to resolve. ALERT CAUSE RESOLUTION 1. Follow the blue arrow and drive to the red path. ROBOT IS OFF PATH Machine is off robotic 2. When correct, the path will turn white. 3.
- Page 40 ALERT CAUSE RESOLUTION 1. Inspect squeegee for damage or debris. Adjust or replace as needed. Squeegee is obstructed, 206 SQUEEGEE ERROR damaged, or missing 2. If there are no issues, press the BLUE button in the back to resume. 3. If the issue persists, contact customer service. 1.
-
Page 41: Emergency Stop
The RoboScrub 20 is equipped with two Emergency Stop (aka E-Stop) buttons, one to the right of the steering wheel and one on the rear of the machine. If there is an emergency and the RoboScrub 20 must be immediately stopped, press one of these red Emergency Stop buttons. -
Page 42: Delete A Route
DELETE A ROUTE Perform the following steps to delete an existing route: 1. Insert the ignition key and turn to the right (clockwise) 5. Select the desired Home Marker to view existing to turn on the machine. routes available for deletion. 2. - Page 43 Select DELETE ROUTE to permanently delete the 9. All existing routes for the Home Marker are selected route from the machine. displayed. The deleted route no longer appears on the screen. NOTE: SELECT BACK TO RETURN TO THE LIST OF EXISTING ROUTES.
-
Page 44: After Use
Rinse the solution tank with clean water to prevent chemical buildup and clogging of water lines. Remove the solution fi ll fi lter from the solution fi ll port on the rear, top left side of the RoboScrub 20 and rinse with clean water. -
Page 45: Clean In-Line Solution Filter
The solution solenoid, which shuts off solution fl ow, is protected from debris by the in-line fi lter assembly located on the under-carriage of the RoboScrub 20 on the left-hand side, just under the solution tank. It is important to check and clean the screened washer inside the assembly regularly to ensure proper solution fl... -
Page 46: Park And Power Down
When not in use, the RoboScrub 20 should be stored in a designated parking station. Turning off and securing the RoboScrub 20 is vital. Turn the ignition key to the left (counter-clockwise) to turn off the RoboScrub 20. Remove the key to prevent unauthorized use. -
Page 47: Battery Charging
BATTERY CHARGING The RoboScrub 20’s battery is designed to last up to 3 — 3.5 hours on the lowest solution fl ow control setting when using the recommended AGM batteries. Charge the batteries when the RoboScrub 20 is not in operation. -
Page 48: Brake Release
BRAKE RELEASE PROCEDURE The RoboScrub 20 is stopped via an electromagnetic brake, located on the front drive wheel assembly. When the accelerator pedal is pressed the electromagnetic brake releases, which allows the RoboScrub 20 to move forward or backward. When pressure is removed from the accelerator pedal, the electromagnetic brake presses against the front drive wheel to stop the RoboScrub 20. -
Page 49: Maintenance & Safety
5. Rinse the solution tank with clean water to prevent chemical buildup and clogging of water lines. 6. Remove the solution fi ll fi lter from the solution fi ll port on the rear, top left side of the RoboScrub 20 and rinse with clean water. -
Page 50: Clean Scrub Brush/Pad
4. Reinstall. PARK AND STORE RoboScrub 20 Park the RoboScrub 20 in a designated parking station, turn it off, and remove the ignition key to prevent unauthorized use. Make sure the designated parking station meets the following criteria: 1. Indoors. -
Page 51: Charge Batteries
CHARGE BATTERIES Charge the batteries when the RoboScrub 20 is not in operation by performing these steps: 1. Place the RoboScrub 20 in a well-ventilated area. 2. Turn off the RoboScrub 20. 3. Remove the battery compartment cover. 4. Unwind the power supply cord and insert into a properly grounded receptacle. -
Page 52: Weekly Maintenance
WEEKLY MAINTENANCE Perform the following maintenance tasks on a weekly basis: 1. Check the scrub deck skirt and clean as needed. 2. Check the solution fi ll fi lter and clean as needed. 3. Check the squeegee blade for signs of wear. a. -
Page 53: Periodic Maintenance
PERIODIC MAINTENANCE Inspect all mechanical functions of the RoboScrub 20 prior to each use, and perform the following tasks as needed: 1. Check all tank cover seals for damage. 2. Drain and clean the recovery tank, if necessary. 3. Check vacuum hose for debris or blockage. Flush the vacuum hose to remove buildup, as necessary. -
Page 54: Troubleshooting & Support
AND ASKS FOR HELP. IS THERE A MINIMUM SPACE NEEDED TO OPERATE OR TURN AROUND? Think of “3½ - 4½ - 8½”. When your RoboScrub 20 is on a straight path, it can go through spaces as narrow as 3½... -
Page 55: Troubleshooting Tips
Recovery hose to squeegee or recovery Reconnect or replace recovery hose tank disconnected or damaged Worn brushes Rotate or replace brushes Wrong brush or cleaning chemical Consult Minuteman Debris caught on scrub brushes Remove debris POOR SCRUBBING PERFORMANCE Moving machine too fast... - Page 56 TROUBLESHOOTING TIPS (continued) PROBLEM CAUSE RESOLUTION Battery Disconnected Check All Battery Cable Connections Emergency Shut-Off Reset Activated NO POWER TO MACHINE Battery Terminals Corroded Clean Connections Faulty Main Connector Replace Connector Faulty Key Switch Replace Switch Broken brush motor switch Replace switch Damaged brush block or drive hub Replace...
-
Page 57: Where To Get Maintenance And Support
WHERE TO GET MAINTENANCE AND SUPPORT If the touch screen displays the following error, reboot the RoboScrub 20. If the problem persists, please contact customer service. CUSTOMER SUPPORT (800) 323 - 9420 techsupport@minutemanintl.com 988767UM REV A Content Subject to Change •... -
Page 58: Warranty
Minuteman International, Inc. warrants to the original purchaser/user that the product is free from defects in workmanship and materials under normal use. Minuteman will, at its option, repair or replace without charge, parts that fail under normal use and service when operated and maintained in accordance with the applicable operation and instruction manuals. - Page 59 Model Parts Labor Poly Travel** 12yrs 90 days Stand-alone Battery One year Chargers: Replacement Parts: Ninety days Batteries: 0-3 months full replacement, 4-12 months pro-rate Polypropylene 12yr warranty, no additional labor Plastic Tanks: 988767UM REV A Content Subject to Change •...
- Page 60 14N845 U.S. Route 20 Pingree Grove, Illinois 60140 USA (800) 323-9420 www.minutemanintl.com A Member of the Hako Group MINUTEMAN® ROBOSCRUB 20, POWERED BY BRAINOS · 988767UM REV A CONTENT SUBJECT TO CHANGE...
Need help?
Do you have a question about the RoboScrub 20 and is the answer not in the manual?
Questions and answers