Table of Contents
Advertisement
Quick Links
ISO Registered Company
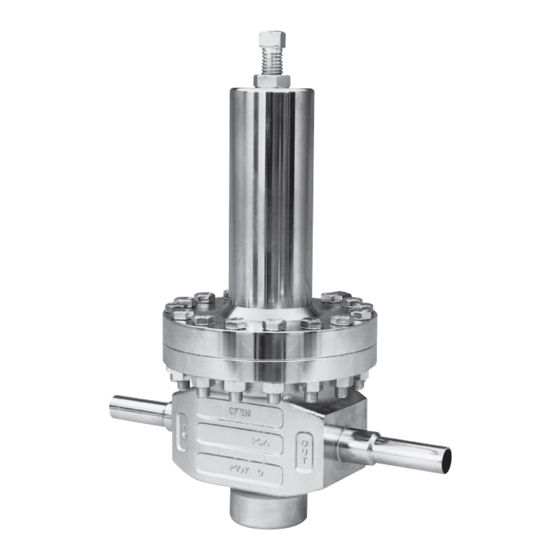
CA1 and SA1 - ULTRA HIGH PURITY, SPRING LOADED
I. DESCRIPTION AND SCOPE
Models CA1/SA1 are pressure reducing regulators used to control downstream (outlet or P2) pressure. Sizes are
3/4" (DN20), 1" (DN25), 1-1/2" (DN40), and 2" (DN50). With proper trim uti li za tion, the unit is suitable for liquid or
gaseous service. (NOTE: This product was formerly identified as a Model C1 or S1; a Model CA1/SA1 and C1/S1
are one and the same product.)
II. REFERENCES
Refer to Technical Bulletin CA1/SA1-TB for tech ni-
cal specifications of a Model CA1/SA1 reg u la tor.
Installation of adequate overpressure pro tec tion
is recommended to pro tect the reg u la tor and all
downstream equip ment from dam age in the event
of reg u la tor failure.
III. INSTALLATION
1. Install per direction of flow arrow indicated on
body, or "IN" and "OUT" markings.
2. Regulator may be rotated around pipe axis 360
degrees. For ease of maintenance, the rec om-
mend ed orientation is with the spring chamber
(4) upwards.
3. Provide space below, above, and around reg u la tor
for removal of parts during maintenance.
4. Install block valves and pressure gauges to pro-
vide means for adjustment, operation, bypass, or
removal of the regulator. A UHP filter is rec om-
mend ed before inlet to remove typical pipe line
debris from entering valve and damaging internal
"soft goods", primarily the dynamic seal and valve
seat.
INSTALLATION, OPERATION & MAINTENANCE MANUAL (IOM)
MODEL CA1/SA1
PRESSURE REDUCING REGULATORS
CAUTION
SECTION I
SECTION II
CCW – Counter Clockwise
CW
ITA
SECTION III
DO NOT HYDROSTATIC TEST THROUGH AN
IN STALLED UNIT; ISOLATE REGULATOR FROM
TEST. The upper range spring pres sure level
on the nameplate is the rec om mend ed "upper
op er at ing limit" for the sens ing di a phragm.
Higher pres sures could cause internal dam age.
In ad di tion, note on the nameplate that the Inlet
and Outlet pres sure and temperature ratings are
at different levels.
ABBREVIATIONS
– Clockwise
– Inner Trim Assembly
CAUTION
IOM-CA1/SA1
12-16
Advertisement
Table of Contents

Related Manuals for cashco CA1


Summary of Contents for cashco CA1
- Page 1 3/4" (DN20), 1" (DN25), 1-1/2" (DN40), and 2" (DN50). With proper trim uti li za tion, the unit is suitable for liquid or gaseous service. (NOTE: This product was formerly identified as a Model C1 or S1; a Model CA1/SA1 and C1/S1 are one and the same product.)
-
Page 2: Principle Of Operation
2. Allow sufficient time for the line pressure down- 5. The regulator may now be disassembled for stream of the inlet block valve to bleed down. inspection and pre ven ta tive main te nance while in-line. 3. Shutoff the outlet block valve. IOM-CA1/SA1... -
Page 3: Maintenance
Only use original equipment parts designed pressure or tem per a ture limits. sup plied by Cashco for re build ing or re pair ing regulators. 8. Evenly loosen the three cage cap screws (18) in single revolution increments. The reg u la tor 4. - Page 4 - pres sure, pressure drop, or originally supplied with a level of clean li ness temperature ex ceed design lim its. equal to Cashco cleaning standard #S-1662. 2. Clean all metal parts to be reused according Contact factory for details.
- Page 5 Close-off the outlet connection. 2. Place properly oriented seat ring (21) onto its b. The level of seat leakage can be quan ti- shoul der at the lower end of cage (19). fied at the internal sensing passage. IOM-CA1/SA1...
- Page 6 (1) deeper into spring cham ber cavity another 1/4 inch (6 mm). Repeat this pro ce dure until the adjusting screw (1) keeps the two flanges from touching by ap prox i mate ly 1/8 inch (3 mm). NOTE: If IOM-CA1/SA1...
-
Page 7: Section Viii
Be aware of limits as well as where the various pressures are phragm may have exceeded limits. acting. Install pressure safety equipment as necessary. (See Table 1 in Tech Bulletin). Pressure limit for outlet is lower than the limit of the inlet. IOM-CA1/SA1... - Page 8 C. Failure due to wear. C1. Replace seat. C2. Replace all internal trim due wear. D. Improper installation. D1. Failure to "coin" CTFE or VTFE seat; disassemble and "coin". D2. Improper re-assembly. Disassemble and re-assemble per instructions within IOM. IOM-CA1/SA1...
-
Page 9: New Replacement Unit
Cashco, Inc. does not assume responsibility for the selection, use or maintenance of any product. Responsibility for proper selection, use and maintenance of any Cashco, Inc. product remains solely with the purchaser. - Page 10 Opt-1 - Closing Cap Figure 3: Model CA1/SA1 Item No. Description Item No. Description Cage Washer Adjusting Screw Cage Cap Screw Adjusting Screw Lock Nut Cage Closing Cap Valve Plug Spring Chamber 21 * Seat Ring Spring Follower Return Spring...
- Page 11 ATEX requires that all components and equipment be evaluated. Cashco pressure regulators are considered components. Based on the ATEX Directive, Cashco considers the location where the pressure regulators are installed to be classified Equipment-group II, Category 3 because flammable gases would only be present for a short period of time in the event of a leak.
- Page 12 If the above issues are addressed by selecting options that do not have potential sources of ignition, avoiding options that have not been assessed, and by taking the proper usage issue precautions, then Cashco regulators can be considered to be a mechanical device that does not have its own source of ignition and thus falls outside the scope of the ATEX directive.
Need help?
Do you have a question about the CA1 and is the answer not in the manual?
Questions and answers