
Related Manuals for Clarke PLS195B


Summary of Contents for Clarke PLS195B
- Page 1 PETROL POWER WASHER MODEL NO: PLS195B PART NO: 7330362 OPERATION & MAINTENANCE INSTRUCTIONS ORIGINAL INSTRUCTIONS GC0121...
- Page 2 This guarantee does not affect your statutory rightS. UNPACKING Unpack your power washer and check to ensure the following items are present. Contact your CLARKE dealer immediately if any parts are missing or damaged. • Power Washer • High Pressure Delivery Hose •...
-
Page 3: General Safety Rules
2. DO NOT hold your finger over the high pressure nozzle. 3. DO NOT let children or untrained personnel use this machine. 4. DO NOT try to repair this machine. Always refer to your CLARKE service department for all repairs. -
Page 4: Safety Symbols
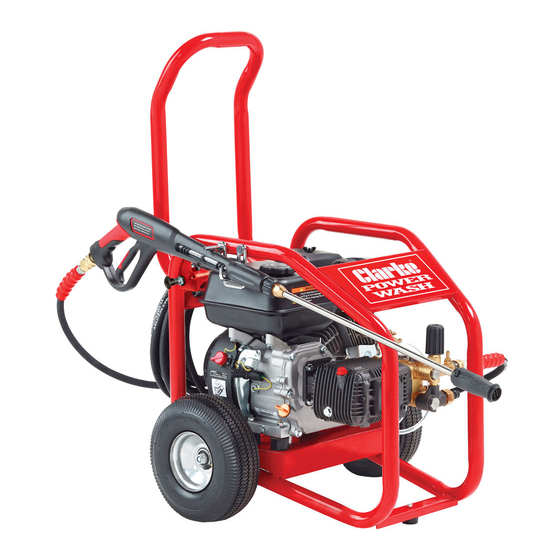
SAFETY SYMBOLS ALWAYS: Read this manual and make sure that all warnings and instructions are clear before you use this pressure washer. DANGER: Risk of fire or explosion. Stop the engine before you refuel the pressure washer. Keep flammable materials away from the work area. - Page 5 OVERVIEW NO DESCRIPTION NO DESCRIPTION Gun/lance 11 Pump oil filler Fuel Filler 12 Chemical (detergent) hose Foldable handle 13 Exhaust muffler Pressure regulator 14 Air filter housing Adjustable nozzle 15 Fuel Shut-off Valve High pressure delivery hose 16 Choke On/Off Switch 17 Throttle Wheel/tyre assembly 18 Engine starter...
-
Page 6: Assembling The Lance
ASSEMBLY FITTING THE WHEELS 1. Fit the axles into the axle ports as shown, secure with the nut, spring washer and flat washer. 2. Fit the wheels to the axles and secure with the nut and washer. NOTE: DO NOT overtighten the nuts, the wheels must be able to rotate freely. -
Page 7: Connecting The High Pressure Hose
CONNECTING THE HIGH PRESSURE HOSE CONNECT THE HOSE TO THE GUN 1. Slide the connector on the hose backwards. 2. Push the gun into the connector. 3. Release the connector. • Make sure the connection is secure. CONNECT THE HOSE TO THE MACHINE 1. - Page 8 HOSE STORAGE BRACKET 1. Screw a nut and washer onto each leg of the hose bracket. 2. Fit the hose bracket in place and secure using a washer, spring washer and nut. REMOVING THE TRAVEL PLUG 1. Remove the red travel plug before use.
-
Page 9: Before Use
BEFORE USE WARNING: TO CARRY OUT THIS CHECK, STAND THE POWER WASHER ON LEVEL GROUND WITH THE ENGINE OFF. WARNING: TAKE CARE NOT TO TOUCH ANY HOT COMPONENTS WHEN CHECKING THE OIL LEVELS. IMPORTANT: The engine is supplied without any oil in it and must be filled to the correct level before use, see below. -
Page 10: Checking The Fuel Level
CHECKING THE FUEL LEVEL 1. To check the fuel level remove the fuel tank cap. 2. Just inside the fuel tank is a fuel strainer. Check this filter periodically and remove any contaminants which may have accumulated. 3. Refuel in a well-ventilated area, before starting the engine. -
Page 11: Design Features
DESIGN FEATURES Bypass mode: In bypass mode, the pump recirculates the water because the trigger of the spray gun is not being pulled. If unit is left in bypass mode for more than two minutes, the water temperature will rise to a dangerous level and could damage internal components of the pump. - Page 12 5. Set the fuel valve lever to the ‘ON’ position. 6. If you are starting the power washer ‘cold’ set the choke lever to the CHOKE position (left). If the power washer is warm skip this step. 7. Set the throttle to the 1/3rd of the way towards the fast setting.
-
Page 13: Adjusting The Spray
USING THE POWER WASHER 1. Pull the trigger on the gun to start water flow. • Stand on a stable surface and grip the gun/spray wand firmly with both hands. • Expect the gun to kick when the trigger is pulled. 2. -
Page 14: Adjusting The Pressure
• The water/chemical ratio is typically 7:1, for every 7 gallons of water pumped 1 gallon of chemical/cleaning solution will be used. 4. The following products are available from your CLARKE dealer. TRAFFIC FILM REMOVER 5 ltr Concentrate... -
Page 15: Water Butt Connection
WATER BUTT CONNECTION This machine has the ability to draw its own water, meaning you can use water not under pressure, such as rainwater collected in a water butt. To do this you must carry out the following procedure. 1. Attach the filter to the end of the pipe supplied. -
Page 16: Shutting Down
SHUTTING DOWN 1. After each use, if you have applied chemicals, place the chemical hose into a container of clean water and run clean water through the chemical injection system to flush the system thoroughly. NOTE: Failure to do so could cause damage to the pump. 2. -
Page 17: Cleaning The Nozzle
4. Replace the drain plug and its ring seal. 5. With the power washer in a level position, fill to the centre of the sight-glass with the recommended oil. 6. Replace the oil filler cap. ENVIRONMENTAL PROTECTION One of the most damaging sources of pollution is oil. DO NOT throw away used oil with your domestic rubbish or down drains and sinks. -
Page 18: Changing The Spark Plug
1. Remove any fittings to the water inlet. 2. Remove the water filter from the water inlet. 3. Clean the filter by flushing it with water on both sides. 4. Replace the water filter. CHANGING THE SPARK PLUG CAUTION: ALLOW THE ENGINE TO COOL BEFORE REMOVING THE SPARK PLUG. -
Page 19: Checking The Air Filter
4. Make sure that the air filter is clean and not damaged. • If the air filter is damaged contact CLARKE spare parts department for a replacement. If the filter is dirty, wash it in a solution of warm water and mild detergent and rinse thoroughly. - Page 20 STORAGE See the separate engine manual supplied, for information regarding the storage procedure. 1. Drain all water from the high pressure hose, coil it and store it on the gun/ hose holder, located on the side of the power washer handle. 2.
-
Page 21: Troubleshooting
TROUBLESHOOTING If the following does not solve your problem please contact the CLARKE service department. PROBLEM CAUSE SOLUTION Engine will not No fuel Add fuel (see page10) start (see engine Low oil Add oil (see page 9) manual for further engine... - Page 22 PROBLEM CAUSE SOLUTION No or low Choke lever is in the Move the choke lever to the NO pressure (initial CHOKE position CHOKE position use) continued Throttle control lever is Move the throttle control lever to the not in the fast position fast position High pressure hose is Make sure the high pressure hose is...
-
Page 23: Specifications
SPECIFICATIONS Model PLS195B Engine Engine Model G200F Power 5.5HP/4.1 kW (3600rpm) Engine type Petrol /Air cooled Starting system Recoil Fuel Capacity 3.6 L (max) Water supply Max. feed temperature Inlet pressure 3-6 bar Performance Data Working pressure 170 Bar Max. permissible pressure 182 Bar Max. -
Page 24: Component Diagrams
COMPONENT DIAGRAMS Parts & Service: 020 8988 7400 / E-mail: Parts@clarkeinternational.com or Service@clarkeinternational.com... -
Page 25: Mechanical Parts List
MECHANICAL PARTS LIST Bolt M6x16 38 O-ring (valve cap) Oil Drain Plug 39 Check valve cap O-ring 40 Manifold outlet plug Vented Oil Cap 41 Thermal relief valve Crankcase Cover 42 Washer Gasket 43 Socket bolt M6x55 Crankcase 44 Screw Needle Bearing 45 Regulator hand grip O-ring... -
Page 26: Environmental Protection
FRAME AND ACCESSORY PARTS LIST Pump assembly 15 Nut Bolt 16 Hose support bracket 17 Handle Engine assembly 18 Nut 19 Spring washer Spring washer 20 Bolt Plain washer 21 Axle Rubber foot (engine) 22 Wheel Bolt 23 Nut 10 Rubber Pad 24 Nut 11 Lance support bracket 25 Rubber foot - (frame) -
Page 27: Declaration Of Conformity
DECLARATION OF CONFORMITY Parts & Service: 020 8988 7400 / E-mail: Parts@clarkeinternational.com or Service@clarkeinternational.com...
Need help?
Do you have a question about the PLS195B and is the answer not in the manual?
Questions and answers