Table of Contents
Advertisement
Quick Links
Advertisement
Table of Contents

Subscribe to Our Youtube Channel
Related Manuals for Beko IHS6187


Summary of Contents for Beko IHS6187
- Page 1 EN TH ID...
-
Page 2: Meanings Of The Symbols
Please read this manual first! Dear Customers! Thank you for preferring a Beko product. We hope that you get the best results from your product which has been manufactured with high quality and state-of-the-art technology. Therefore, please read this entire user manual and all other accompanying documents carefully before using the product and keep it as a reference for future use. - Page 3 İÇİNDEKİLER ENGLISH 4-14 15-28 ไทย BAHASA INDONESIA 29-41 3 / EN Induction Hob / User Manual...
-
Page 4: Important Instructions And Warnings For Safety And Environment
Important instructions and warnings for safety and environment This section contains safety in- The manufacturer shall not be structions that will help protect held responsible for damages aris- from risk of personal injury or prop- ing from procedures carried out by erty damage. -
Page 5: Product Safety
Important instructions and warnings for safety and environment Never wash the product by spread- Metallic objects such as • ing or pouring water onto it! There knives, forks, spoons and is the risk of electric shock! lids should not be placed The product must be disconnected on the hotplate since they •... - Page 6 Important instructions and warnings for safety and environment Do not use steam cleaners to clean Hotplates are equipped with “In- • • the appliance as this may cause an duction” technology. Your induc- electric shock. tion hob that provides both time and money savings must be used Unattended cooking on a hob with •...
-
Page 7: Intended Use
Important instructions and warnings for safety and environment 1.4 Intended use 1.6 Disposing of the old product This product is designed for do- • Compliance with RoHS Directive: mestic use. Commercial use will The product you have purchased complies with EU void the guarantee. -
Page 8: General Information
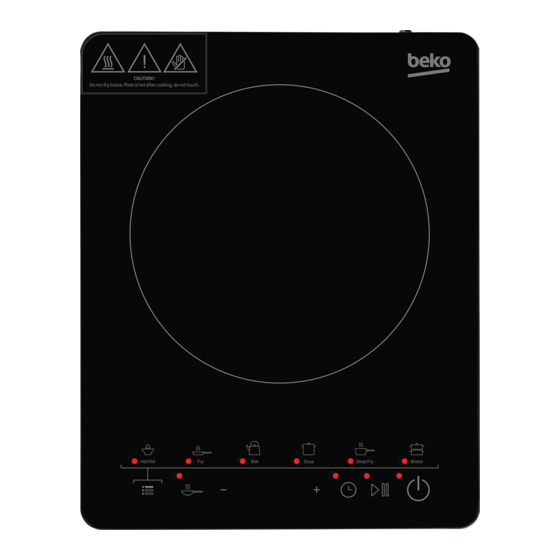
General information 2.1 Overview Hot Pot Boil Soup Deep Fry Braise 1. Air vent 2. Ceramic plate 3. Cooking zone indicator 4. Control panel 5. Air entry 6. Power cord 2.2 Technical data Applied voltage/ 220-240 V ~ 50/60Hz frequency Rated power 2100 W Dimension (mm) - Page 9 General information 2.3 Control panel Hot Pot Boil Soup Deep Fry Braise 1. ON/STANDBY • Make sure the controls are always clean, dry, 2. Pause and that there is no object (e.g. a utensil or a 3. Timer cloth) covering them. Even a thin film of water 4.
- Page 10 Operation 3.1 Put the pot on the ceramic Boil mode Press the “Function” button, choose “Boil” mode, plate the buzzer sounds, the “ON/STANDBY” and the • Make sure the air vents are not blocked and keep “Boil” indicator lamp lights up, the induction cooker utensils away from the immediate surrounds of entering the boil state.
-
Page 11: Operation
Operation Pause Press the “Pause” button to stop heating. When the induction cooker is in pause, press the “Pause” button again or select a cooking mode to quit the pause status and return to the normal heating process. After setting Pause, the induction cooker stops heating. -
Page 12: Compatible Cookware
Compatible cookware Iron oil frying pan Stainless steel por Iron pan Iron kettle Enamel stainless Enamel cooking Iron plate steel kettle utensil • Requirement for pot materials: Con- taining magnetic inducting materials. • Shape requirement: Pat bottom, with the diameter more than 14,5 cm and less than 21 cm. -
Page 13: Cleaning And Maintenance
Cleaning and maintenance • Before cleaning, please switch off the appliance first and then disconnect the power plug from the power outlet. Wait till the cooker plate of the induction cooker is not hot and start cleaning. • After using the induction cooker for a long time, the opening of air inlet/air outlet will pile up with dust or other dirt, please wipe it with a soft dry cloth. -
Page 14: Troubleshooting
Troubleshooting Abnormalities Key checking points and trouble shooting After plugging in the power cord and pressing the “ON/OFF” key, • Is the power plug properly connected? the indicator and display do not light up. • Is the switch, power outlet, fuse or power cord damaged? The “ON/OFF”...
Need help?
Do you have a question about the IHS6187 and is the answer not in the manual?
Questions and answers