mPower Electronics POLI MP400 User Manual
Multi-gas detectors
Hide thumbs
Also See for POLI MP400:
- User manual (43 pages) ,
- Quick start manual (3 pages) ,
- User manual (43 pages)
Table of Contents
Advertisement
Quick Links
Advertisement
Table of Contents

Related Manuals for mPower Electronics POLI MP400


Summary of Contents for mPower Electronics POLI MP400
- Page 1 POLI Multi-Gas Detectors MP400 & MP400P User’s Guide Rev 1.11 July, 2019...
-
Page 2: Table Of Contents
POLI User’s Guide Contents 1. General Information ......................5 1.1 Main Features ................................5 2. Battery ..........................6 2.1 Battery Charging................................ 6 2.2 Battery Status ................................6 2.3 Battery Replacement ..............................6 3. User Interface........................7 3.1 Displays and Keys............................... 7 4. Basic Operation ........................9 4.1 Turning On.................................. - Page 3 POLI User’s Guide Read Before Operating This manual must be carefully read by all individuals who have or will have the responsibility of using, maintaining or servicing this product. The product will perform as designed only if it is used, maintained and serviced in accordance with the manufacturer’s instructions. The user should understand how to set the correct parameters and interpret the obtained results.
- Page 4 POLI User’s Guide Special Conditions for Safe Use • The POLI multi-gas detector must be calibrated if it does not pass a bump test, when a new sensor has been installed, or at least once every 180 days, depending on use and sensor exposure to poisons and contaminants •...
-
Page 5: General Information
POLI User’s Guide General Information The POLI multi-gas detectors (MP400 & MP400P) offer 4- or 5-gas monitoring of oxygen (O combustible (LEL) gases, toxic gases, carbon dioxide (CO ), and volatile organic compounds (VOCs). The MP400 is a diffusion sampling model with standard O , LEL, carbon monoxide (CO) and hydrogen sulfide (H S) configuration. -
Page 6: Battery
POLI User’s Guide Battery Fully charge the POLI battery upon receiving the instrument and before each day’s use. Li-ion battery is charged using a Micro-USB cable. NOTE: Any locally-obtained USB A to Micro B USB cable works for charging, but does not work for communication with mPower Suite configuration and data transfer software. -
Page 7: User Interface
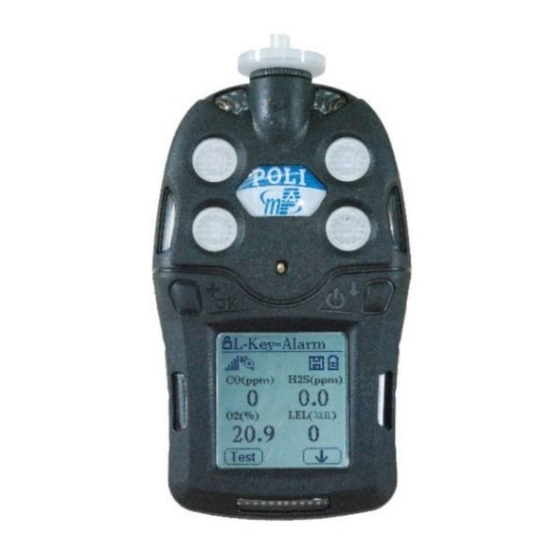
POLI User’s Guide User Interface The POLI user interface consists of two keys, four sensor sockets, one large Liquid Crystal Display (LCD), eight alarm LEDs, one buzzer, and two vibration alarms. (pump models) (Gas inlet/outlet diffusion models) 3.1 Displays and Keys The LCD provides visual information that includes real-time gas readings, sensor types, datalog / battery / pump / wireless status, and others. - Page 8 POLI User’s Guide 3.1.1 Status Indicator Icons Along the top of most screens are status icons that indicate whether a function is operating and/or its strength or level. Icon Function Wireless signal strength at 0-5 level Pump status (pump versions only) Datalogging enabled (cannot turn off) Battery voltage status Man-down alarm enabled...
-
Page 9: Basic Operation
POLI User’s Guide Basic Operation 4.1 Turning On Press and hold the [ /↓] Key for 3 seconds, until the buzzer beeps and the red LED turns on. As the unit is powers on, it will display information such as: •... -
Page 10: Active Sensor Displays
POLI User’s Guide 4.3 Active Sensor Displays The POLI is a flexible platform with four sensor sockets that allows use of anywhere between one and five sensors, the latter with a dual toxic sensor. When one or more sensors is either not installed or turned off, the display only shows the installed, active sensors: 4.4 Pump Status During normal operation, the pump icon alternately shows inflow and outflow. -
Page 11: Alarm Testing
POLI User’s Guide 4.5 Alarm Testing Under normal operation mode and non-alarm conditions, the audible (buzzer) alarm, vibration alarm, LED, and backlight can be tested at any time by pressing [+/OK] once. WARNING! If any of the alarms do not respond to this test, check the Alarm Settings in Configuration Mode to see if the alarms have been turned off. -
Page 12: Configuration Mode
POLI User’s Guide Configuration Mode The Configuration Mode (Config Mode) is used to adjust the POLI’s operation settings and calibrate sensors. Remember that the two text/symbol boxes at the bottom of the display are mapped to the Left [+/OK] and Right [ /↓] keys and will vary with the menu. 5.1 Entering Configuration Mode Press and hold both the [+/OK] and [ /↓] keys simultaneously for 3 seconds until the password screen appears. -
Page 13: Navigating Configuration Mode To Edit Parameters
POLI User’s Guide 5.3 Navigating Configuration Mode to Edit Parameters After entering Config Mode, the calibration menu is displayed first. Press [ /↓] to step (→) through the menus and [+/OK] (Enter) to enter a menu to edit the parameters in its submenu. 5.3.1 Menus and Sub-menus Configuration Mode menus and sub-menus are organized as shown here: Calibration... - Page 14 POLI User’s Guide 5.3.2 Navigating Lists There are two types of menus in Configuration Mode: 1) those that ask for selection from a list and 2) those that ask for a numerical value to be entered. Simple lists and those with radio buttons are used when only one option can be selected.
- Page 15 POLI User’s Guide 5.3.2.3 Radio Button Lists Radio buttons are used when only a single item in the list can be selected, and there are no blue further sub-menus. When a radio button list appears, follow the numbered sequence in shown below.
-
Page 16: Calibration And Bump Testing
POLI User’s Guide 5.4 Calibration and Bump Testing Use this menu to perform zero or span calibration for one or more sensors, bump test the sensors and alarms for function, and change the span gas concentration. The POLI should be calibrated on the first day of use and at regular intervals not to exceed 180 days, depending on use and exposure to particulates, contaminants and sensor poisons. - Page 17 POLI User’s Guide 5.4.1 Calibration Set-Up 5.4.1.1 Span Gas Selection The gas concentration chosen for span calibration and bump testing should be near the middle to upper range of the concentrations expected to be measured. If the possible gas concentrations are unknown, choose a gas concentration near the upper end of the sensor’s range, or near the highest exposure limit (e.g., TWA, STEL or Ceiling) of concern.
- Page 18 POLI User’s Guide Pumped Instruments Luer fitting Fixed-flow regulator with >0.5 to Demand-flow or 0.5 LPM 1.0 LPM flow using T-connector fixed flow regulator Diffusion Instruments. Diffusion instruments have a black cap covering the Luer connector to protect the unit from dirt and moisture. This cap must be removed to attach the Luer fitting and connected tubing leading to the gas supply.
- Page 19 POLI User’s Guide 5.4.2 Fresh Air (Zero) Calibration Zero calibration should precede span calibration and be done in clean air with 20.9% oxygen. This procedure determines the zero points of most sensors and the span calibration for the oxygen sensor. No gas connections are required if the ambient air contains no detectable contaminants.
-
Page 20: Measurement
POLI User’s Guide connect the gas to the POLI, and press Start to initiate the 60-second count-down. The When complete, the display shows the sensor readings alternately with a ‘Pass’ or ‘Fail’ message. The span calibration can be aborted at any time during the count-down by pressing [ /↓] (Abort). NOTE: If the sensor calibration fails, try again. -
Page 21: Alarm Settings
POLI User’s Guide 5.5.2 Gas Unit From the Measurement menu select ‘Gas Unit’ and press ‘Change’ to alter the concentration unit for any sensor. Then scroll to and press ‘Done” and ‘Save’ to save changes. Options include: Gas Unit Gas Unit Gas Unit Options ppm (parts per million) mg/m... - Page 22 POLI User’s Guide 5.6.4 Man-Down Function The POLI includes a Man-Down Alarm as a critical and potentially lifesaving safety feature for all models. When a user who is carrying the instrument stops moving or shifts to an abnormal position for a set period of time, the Man-Down Alarm is triggered, notifying anyone within earshot that the user may need rescue.
-
Page 23: Datalog
POLI User’s Guide 5.6.4.2 Man-Down Warn Time This menu allows adjustment of the time allowed for the user to clear a pre-warn signal before the unit goes into full Man-Down Alarm. The pre-warn time can be adjusted between 10 and 60 seconds and the default value is 30 seconds. - Page 24 POLI User’s Guide 5.8.2 Pump Speed If the POLI is equipped with a pump, it can be set to low or high flow, or turned off to save battery and sample by diffusion. Low flow typically runs between 250 and 350 cc/min while high flow runs between 350 and 450 cc/min, both with a 0.45 µm filter in place.
-
Page 25: Wireless Set-Up
POLI User’s Guide 5.8.6 Backlight Mode The LCD backlight can be set to illuminate automatically (in low ambient light conditions), illuminate manually, or shut off. In Manual Backlight Mode the backlight can be turned on by Using the Left [ /↓] key is convenient because it does not scroll to another pressing either key. -
Page 26: Data Communication
POLI User’s Guide 6. Data Communication The mPower Suite software can be used to 1) download logged data, 2) upload configuration parameters to the instrument, 3) display readings on a PC and download in real time and 4) upgrade the instrument firmware. mPower Suite and instrument firmware can be downloaded from our website at https://www.mpowerinc.com/software-downloads/ Micro B (5-Pin) -
Page 27: Datalog Retrieval
POLI User’s Guide 6.1.1 Configuration Details These items can only be set up using mPower Suite and are not accessible in the instrument Configuration Mode • Bump and Calibration due notifications can be set between 1 and 360 days, but should be limited to 180 days for all POLI instruments. -
Page 28: Real-Time Data
POLI User’s Guide 6.3 Real-Time Data • (This function requires mPower Suite version 1.1.0.114 or later with NEO firmware v.1.9.1 or later.) • To display a list of readings in real time, click on the “Real-time Data” tab on the top of the screen. -
Page 29: Maintenance
POLI User’s Guide 7. Maintenance The POLI requires little maintenance, aside from daily battery charging (see Section 2), regular filter replacement, and sensor replacement as needed (1 to 3 years depending on sensor and use conditions). Under extreme conditions, the pump or battery may need service or replacement. 7.1 Year of Manufacture The year of manufacture can be identified from the fifth and sixth digits of the serial number, where 00-99 indicates the manufacturing year is 2000 to 2099. -
Page 30: Replacing Pump Or Battery
POLI User’s Guide 1. Turn off the instrument. 2. Remove the six screws in the back of the instrument. 3. Turn the instrument over, lift off the front cover. 4. Carefully lift out each sensor you wish to inspect or replace. 5. -
Page 31: Troubleshooting
POLI User’s Guide 8. Troubleshooting Problem Possible Reasons & Solutions Reasons: Cannot turn on power after Defective charging circuit. Defective battery. charging the battery Solutions: Try charging the battery again. Replace battery or charger. Solutions: Lost password Call Technical Support at (408) 320-1266 Reasons: Buzzer and/or other alarms disabled. -
Page 32: Technical Specifications
POLI User’s Guide Technical Specifications All specifications and listed sensors are subject to change without notice. Please check for updates at www.mpowerinc.com... -
Page 33: Recommended Gas Span Concentrations
POLI User’s Guide Recommended Gas Span Concentrations Note: Use balance gas of air if available, otherwise use nitrogen balance gas Sensor Range Calibration Gas 1-2000 ppm 100 ppm Isobutylene LEL/O /CO/H S (mPower Std 4-gas mix) 50%LEL/18% O /50 ppm CO/15 ppm H Oxygen (O 0.1-30%Vol 18 %Vol... -
Page 34: Technical Support And Mpower Contacts
POLI User’s Guide Technical Support and mPower Contacts mPower Electronics Inc. 3046 Scott Blvd. Santa Clara, CA 95054 Phone: (408) 320-1266 Fax: (669) 342-7077 info@mpowerinc.com www.mpowerinc.com...
Need help?
Do you have a question about the POLI MP400 and is the answer not in the manual?
Questions and answers