Table of Contents
Advertisement
Quick Links
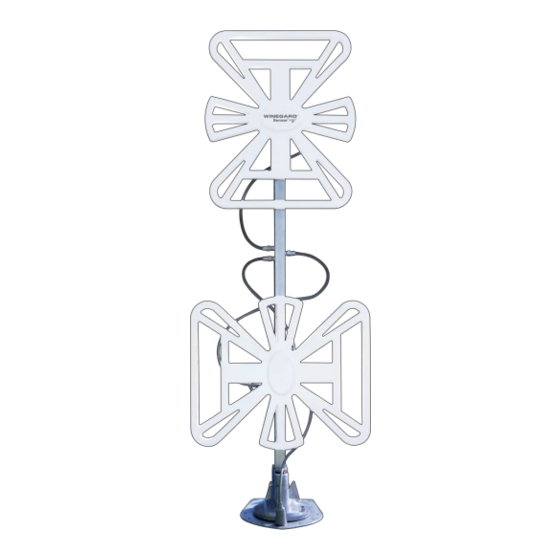
VHF & UHF Antenna
Coast to Coast RV Services
20 George Young Street, Auburn NSW 2144
Postal Address: PO Box 415, Regents Park NSW 2143
Email Technical: technical@coastrv.com.au
Email Warranty: warranty@coastrv.com.au
Specifications
• For VHF & UHF channels
• Bidirectional antenna
• Operating dimensions: 43.2 cm wide x 116 cm tall
• Length when stowed: 125.3 cm
• Height when stowed: 11.2 cm
• Storage (survival) temperature:- 40° C to +80° C
• For outdoor use only
• Model CC-10HV (Aftermarket)
Product Registration
Please register your Winegard product by
completing the online registration form at http://
www.winegard.com/registration.
Phone: 02 9645 7600
Fax: 02 9645 7688
2452246
Advertisement
Table of Contents

Related Manuals for Winegard Sensar HV CC-10HV


Summary of Contents for Winegard Sensar HV CC-10HV
- Page 1 • Height when stowed: 11.2 cm • Storage (survival) temperature:- 40° C to +80° C • For outdoor use only • Model CC-10HV (Aftermarket) Product Registration Please register your Winegard product by completing the online registration form at http:// www.winegard.com/registration. 2452246...
-
Page 2: Mounting Bracket
Elevating Spring Crank Mounting bracket Rotating gear housing Clearance Requirements The Winegard Sensar HV antenna requires a minimum roof space of 125.3 cm x 43.2 cm for the stowed antenna. When stowed, the top of the element housing rests 11.2 cm above the roof. -
Page 3: Choosing A Location For The Antenna
Is within five degrees of level (for best operation, must be within three degrees of level) • For sloped/rounded roofs, Winegard recommends model RW-2000 exterior roof RW-2000 IW-5000 wedge (sold separately) to level installation. • An interior wedge IW-5000 (sold separately) is also available. Sold Separately Sold Separately Winegard Sensar HV Antenna... -
Page 4: Assembling The Antenna
Leveling bracket Elevating gear Insert the pin through the leveling bracket and the elevating gear. Push the e-clip over the end of the pin. Remove the cap from the coax connection port. Winegard Sensar HV Antenna... -
Page 5: Installing The Mounting Bracket
Using the provided screws, secure the base plate to the mounting screws, around the hole for cable the roof. Run a solid bead of sealant over the mounting entry, and around the screws. This will also help to prevent leaks. bottom gear housing. Winegard Sensar HV Antenna... - Page 6 Then, mount the ceiling plate with the rotating base shaft. the pointers aligned. the four provided screws. Pointers The knobs on the directional handle should fit into the grooves on the ceiling plate. Winegard Sensar HV Antenna...
-
Page 7: Installing The Power Supply
If in doubt as to the polarity of the wires, connect them temporarily to the tabs, and press the “ON” switch on front of wall plate; if light comes on, polarity is correct. Turn power off. Winegard Sensar HV Antenna... -
Page 8: Operation
Rotate slowly when selecting a station, and check the fine-tuning on the TV. Don’t leave the antenna partially deployed. Lower the antenna to the travel position before Don’t apply sealant over the top of the base plate. moving the vehicle. Winegard Sensar HV Antenna... -
Page 9: Maintenance
If +12 VDC is not present at Test Point # 2, be sure the green indicator light is ON. If not, check the polarity of the ground and +12 VDC source wires to make sure there are 12VDC present. If there is still no +12 VDC, replace power supply. Winegard Sensar HV Antenna... - Page 10 Installing Connector on Coax Cable Tools Needed: Strip outer cover back Fray braid back as far Trim braid close to Slide connector tip 12 mm from end of as outer cover will outer cover, and between braid and Cable stripper cable.
-
Page 11: Ordering Repair Parts
Repair parts are available at many RV dealers and/or service centers throughout the country. If you don't have a dealer/service center near you, call Winegard Plug Company at 1-800-288-8094. All major credit cards accepted. Parts are available only in the packages shown on the following pages. -
Page 12: Additional Hardware
Parts Antenna Head & Boom Antenna Decal Antenna Element 55” Coax Assembly Boom E-clip Elevation Gear Additional Hardware Connector Screw Terminal (white) Wall Plate (white) 20’ Coax Cable 72” Coax Cable... - Page 13 Replacement Kits & Parts CC-RPHV: Antenna Element CC-25HV: Retrofit Kit (Head Only) Part Description Quantity Part Description Quantity Antenna Decal Antenna Decal (unattached) Antenna Element CC-25HV Manual 55” Coax Boom Assembly Assembly 55” Coax CC-RPHV Manual Assembly RP-0154: Boot Part Description Quantity Boot (light gray) RP-2658: Nylon Bearing (for Crank)
- Page 14 Street, Burlington, Iowa 52601, Telephone 800-288-8094 or visit www.winegard.com). Customer must provide proof of purchase with a dated sales receipt for the Winegard product to verify the product is under warranty. If the date of purchase cannot be verified, the warranty period shall be considered to begin thirty (30) days after the date of manufacture.
- Page 15 FRONT OF RV 13 mm Drill through roof. Do not drill through ceiling! 4.5 cm Drill completely through ceiling. BACK OF RV...
Need help?
Do you have a question about the Sensar HV CC-10HV and is the answer not in the manual?
Questions and answers